iBook G3 is the teardown from Hell - stripped screw

svenvendetta

Tinkerer
Nov 3, 2021
35
54
18
Boston, MA
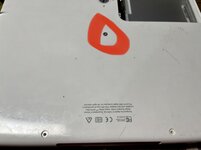
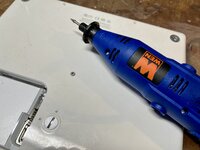
I am trying to replace a dead hard drive in iBook G3 with a mSATA and PCI-e converter. I knew what I was getting into from the iFixit guide but there is a screw in the middle bottom cover that I just CANNOT get out of the damn thing. I have tried different types of T wrenches (supposedly it's a T9) but at this point I think it's too stripped and too tight to get off. Anyone have any wisdom here? About the throw the damn thing away at this point, spent way too much time and money on this just to get it back operational.

As an aside this feels like the start of the increased effort by Apple to make it overly difficult to prevent people from servicing their machines. In the 90's they had some of the easiest machines to service, some didn't even require turning a single screw to open up and upgrade. Why not put a simple flat or Phillips screw there? To "screw" the customer and make them have to pay for service. Any way rant over.
 

Attachments

  • IMG_4586.jpg
    IMG_4586.jpg
    145.5 KB · Views: 77

Garrett

Tinkerer
Oct 31, 2021
95
107
33
MN, USA
At this point drilling it out may be your only option. Once the case is off there may be enough of the threads exposed to grip it with pliers and totally remove it. I feel your pain having dealt with a stripped brass standoff inside a case very recently!
 
  • Like
Reactions: svenvendetta

davidg5678

Tinkerer
Oct 30, 2021
60
37
18
I feel your frustration too! I have had similar issues with "cursed" heatsink screws in a 12" PowerBook G4. Sometimes, the screw isn't stripped, but the standoff that the screw goes into cracks so that the screw spins, but it doesn't come out. I don't think this is Apple's way of trying to hinder repair efforts, but it's just a symptom of a computer's old age. When this happens, I have yet to figure out a good method for extracting the screw. Usually, I undo every other screw I can (with the exception of the problem screw) and then I apply a lot of torque to the plastic case until the jammed screw is forced out. This technique requires me to give brutal treatment to my vintage computers, but sometimes, it is the only solution I can get to work.

Another idea, with which I've had mixed results, is to use superglue to attach a shaft of some sort (another smaller screw maybe?) to a stripped screw head. This sacrificial shaft can then be gripped with pliers to help facilitate the problem screw's removal. I really hate drilling screws out unless I have to, but sometimes it is the best choice.

I bought a pair of special Japanese screw extractor pliers the last time this happened to me, and I hope that they will be useful in the future. Unfortunately, I don't think they would be helpful for your iBook, because it looks like the screw is recessed into the plastic too far for them to reach.

I hope you get this computer apart somehow!
 
  • Like
Reactions: svenvendetta

svenvendetta

Tinkerer
Nov 3, 2021
35
54
18
Boston, MA
I won this round, now to get on with the SSD replacement. Only 50 more various screws to take out.
 

Attachments

  • IMG_4735.jpeg
    IMG_4735.jpeg
    1.1 MB · Views: 65

svenvendetta

Tinkerer
Nov 3, 2021
35
54
18
Boston, MA
Success! Got it up and running! Thanks for the advice on this one everyone. I thought the hardest part would be drilling the screw which was actually pretty easy once I decided to go for it. The actual hardest part was organizing the 100 different size screws and keeping track of where they go. I filled an entire ice tray through all the steps and screw types. Anyway she's back in action.

FYI I used this mSATA to 2.5 inch IDE 44pin Hard Disk Case Enclosure with this mSATA SSD 128GB SSD. Had to modify the enclosure case's plastic slightly widening the opening to get the connector to seat correctly but it worked out just fine.

ibook.JPG
 

enryfox

New Tinkerer
Apr 26, 2022
3
1
3
This line of iBook was a nightmare to take apart, I too had to replace the HDD and I filled some 15 plastic cups of screws marked with the ifixit guide step number. Just to get to the disc and change it - unbelievable.
My iBook (G3 500 Mhz, a bit older than yours) has now several problems : couple of years ago it started exhibiting problems due to the dreaded GPU cracked solder joints issue; back then I added a shim under the back cover to press the GPU to the PCB and so far so good.
From the start it had burned speakers (you can faintly hear anything with max volume - headphone out works fine actually) and the CPU emits a high pitched noise when not fully loaded. Now also the LCD is degraded (see my other thread) which, for me, is final nail in the coffin.
In 2020 I bought a G3 Powerbook Pismo and beside the washed out screen, it works great with an SSD: dead silent, fast to boot, nice sound and it has an easy-to-use VGA output for an external display.
That line of iBook has a very slick design that I personally still like in 2022, but definitely not reliable and terrible to work on.
 

Eric's Edge

Tinkerer
Oct 31, 2021
121
87
28
Looks like I'll be doing something similar with my iBook. Just picked it up from eBay. Booted fine and ran for a couple of hours before the drive died. How did you get the OS installed? Did you have to image the drive or did you use the optical drive?
 
  • Like
Reactions: KingDingus

enryfox

New Tinkerer
Apr 26, 2022
3
1
3
I have downloaded from Macintosh Garden the full set of restore CD's for my specific iBook model and installed it from there. I also have install disks of macOS from Rel 9.1 to 10.5.
 
  • Like
Reactions: Eric's Edge

davidg5678

Tinkerer
Oct 30, 2021
60
37
18
Looks like I'll be doing something similar with my iBook. Just picked it up from eBay. Booted fine and ran for a couple of hours before the drive died. How did you get the OS installed? Did you have to image the drive or did you use the optical drive?
You can also write the OSX installer onto a flash drive or firewire drive to potentially make things go faster or be more convenient (with firewire going much faster than USB 1.1).

This page is for a Clamshell iBook, but I think that the information here should still apply (definitely for firewire, probably for USB): https://lowendmac.com/2014/boot-a-clamshell-ibook-from-usb/
 

BPearce

New Tinkerer
May 9, 2022
27
17
3
For whatever it’s worth, I have found that using a rotary tool to carve a groove into the stuck screw, to allow the use of a flat head screwdriver, is usually a reliable method of getting the screw out. Of course, it requires a bit for the rotary tool that is just large enough to use without damaging the surrounding area.

Back in the day, when Trackpad set screws would still occasionally need to be adjusted or removed, they were far too shallow and very easy to strip! The rotary tool kept me from having to replace a Top Case on two or three occasions.
 

Eric's Edge

Tinkerer
Oct 31, 2021
121
87
28
Booting from USB worked after a nvram reset in open firmware. Installed OS9 and the eMac video drivers to solve the 1/4 screen size issue with the OS 9.2.2 drivers. I'm pretty sure this iBook has a replacement logic board that was better than the stock.
 

davidg5678

Tinkerer
Oct 30, 2021
60
37
18
Hi @svenvendetta! :)👋

Fantastic iBook project that you are working on! I am curious, what is the best Dremel tool to use? Can it be any brand? Minimum RPM? Maximum RPM? Does it need to be variable RPM?
Like many things, you get what you pay for: thus, a nicer Dremel will likely lead to a better Dremel-ing experience. I've heard some terrible things about the cheapest kind of $10 off-brand rotary tools, so I'd definitely stay away from them, but by no means is a top-of-the-line Dremel necessary (for this simple job) either.
 
  • Like
Reactions: retr01