My first severely battery-bombed Classic Mac... any advice ?

iPhil64

Tinkerer
Apr 5, 2022
122
86
28
France
Hello all,

A while ago, I had bought a very cheap non working Classic.
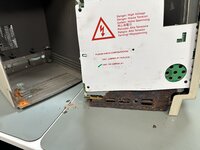
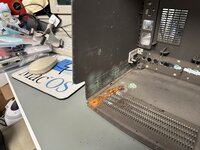
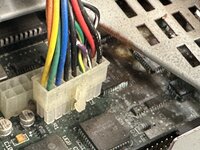
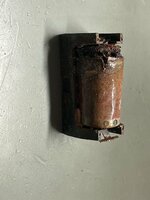
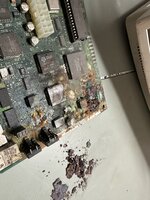
I opened it today, to find a very badly battery bombed machine. I haven't extracted the board yet, but think it will be outside reasonable repair, so this will be a good parts source for me.

This is the first time I have so much damage on a machine, and the board won't even slide, as it seems literally glued by corrosion.
Any advice on how to remove it without causing too much additional damage ?

The battery itself, a few capacitors, the quartz just fell of the machine as I was opening it.
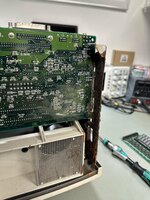
The analog board, floppy, hard disk CRT and memory extension look ok, I will test them later.
 

Attachments

  • IMG_1190.jpeg
    IMG_1190.jpeg
    1 MB · Views: 42
  • IMG_1192.jpeg
    IMG_1192.jpeg
    1.4 MB · Views: 37
  • IMG_1193.jpeg
    IMG_1193.jpeg
    902.8 KB · Views: 43
  • IMG_1194.jpeg
    IMG_1194.jpeg
    2 MB · Views: 46
  • IMG_1196.jpeg
    IMG_1196.jpeg
    1.1 MB · Views: 39
  • Wow
Reactions: JDW

3lectr1c

Active Tinkerer
May 15, 2022
629
293
63
the United States
www.macdat.net
That one's really bad. Might be worth doing a reloaded board rather than trying to fix all those bad traces and vias. You'll have to see what it looks like on top after cleaning and scraping the corrosion off.
 

iPhil64

Tinkerer
Apr 5, 2022
122
86
28
France
Did take the motherboard out.
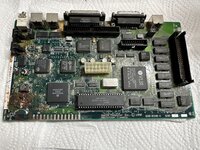
I already did a vinegar/toothbrush path, now in the ultrasonic cleaner (which is a bit small unfortunately). The board itself does not look that damage at first sight once all the residues are out. Anyway, I do not have a lot of hope.
Depending on how many of the custom ICs are hosed, this could be a fun project: https://github.com/kr239/Macintosh-Classic-Reloaded?tab=readme-ov-file
ooooh yes !

See the "after" picture, not sooo bad, and mostly passives on the left hand side. Worth playing :)
 

Attachments

  • 36BC87F4-8C72-4568-BF73-0B94D7E7D0C1_1_102_o.jpeg
    36BC87F4-8C72-4568-BF73-0B94D7E7D0C1_1_102_o.jpeg
    600.1 KB · Views: 27
  • IMG_1202.jpeg
    IMG_1202.jpeg
    1.9 MB · Views: 28
  • Wow
Reactions: JDW

iPhil64

Tinkerer
Apr 5, 2022
122
86
28
France
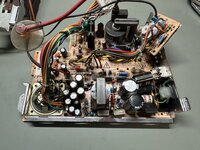
New board ordered. Analog board will need recap (see bottom left) at least, but not in a bad condition
How do we stop corrosion for good on the chassis ?
 

Attachments

  • IMG_1205.jpeg
    IMG_1205.jpeg
    1.3 MB · Views: 24
  • Like
Reactions: JDW

iPhil64

Tinkerer
Apr 5, 2022
122
86
28
France
@Kai Robinson Just received the board. Stunning quality, and so good to see all SMD already there ! :)

I keep on salvaging what I can, fortunately I have new connectors as the old ones are just a pain to desolder...
 
  • Like
Reactions: Kai Robinson

This Does Not Compute

Administrator
Staff member
Oct 27, 2021
282
426
63
www.youtube.com
How do we stop corrosion for good on the chassis ?
The best option would be to get it sandblasted (to remove all the rust) and then either powder-coated or plated (nickel, zinc, etc). You could try to sand the rust off but it's really difficult to remove it inside all the pitting. An alternative would be to keep an eye out for another chassis in better condition.
 

KennyPowers

Active Tinkerer
Jun 27, 2022
278
314
63
The best option would be to get it sandblasted (to remove all the rust) and then either powder-coated or plated (nickel, zinc, etc). You could try to sand the rust off but it's really difficult to remove it inside all the pitting. An alternative would be to keep an eye out for another chassis in better condition.
I've had success with submerging the metal chassis parts in this stuff...a better alternative to sanding: https://www.evapo-rust.com/
 

JDW

Administrator
Staff member
Founder
Sep 2, 2021
1,541
1,342
113
53
Japan
youtube.com
New board ordered. Analog board will need recap (see bottom left) at least, but not in a bad condition
How do we stop corrosion for good on the chassis ?
Here's how I de-rusted the Metal Bar on my water damaged SE motherboard (kindly sent to me by @Kai Robinson ). Note my use of Steel Wool part way through the de-rusting process.

If you continue watching that part of my video and see the part after my de-rusting was finished, you will see I used Steel Wool to do the final removal of any dark patches not eliminated by the rust remover.

After that, I tried PIKAL CARE at Kay's suggestion, but I didn't really notice any positive result from that. Kay also suggested a liquid called PMC-10, which is a cleaning liquid used in ultrasonic cleaners. I don't have an ultrasonic cleaner, so I used it with the toothbrush. Even so, Kay only recommended I use that if I use Pikal Care. It wouldn't be needed otherwise.

If you keep watching until 38:43 in my video, you will see how I PROTECT the now de-rusted metal. I used a special liquid that coats the metal BUT it also allows the metal to remain ELECTRICALLY CONDUCTIVE! That's something you wouldn't get if you merely de-rust and then paint the frame. With that said, not all of the frame needs to be electrically conductive — only the back, and the parts which connect the Power Supply and Analog Board. That special liquid is called RS-L15 Anti-rust shield, and sadly it seems only sold in Japan.

What I can say is that my metal bar looks as pristine today as it does in my video, even though Japan has high humidity and metals are prone to rust more quickly here as a result.