Macintosh IIfx repair

RetroMagic

New Tinkerer
Jun 29, 2024
7
1
3
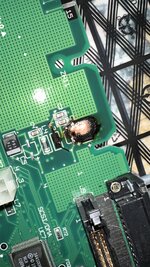
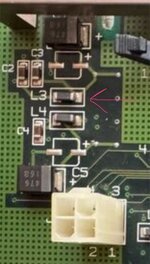
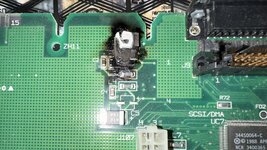
Hi everyone! I recently got a Macintosh IIfx only to have it go up in smoke on the first power up. Power light was dim/flickery and it chimed (cut short) then the speakers popped, video displayed, chimed normally, and the power light became bright. But, it then emitted a good bit of smoke. Video was still displaying - the hard drive begun to spin back down though. I pulled the plug on it. Figured it was the power supply but it looked clean - found it was a cap on the board. Another small component got cooked too. I’ve only done a little bit of soldering work. Certainly nothing like this. But I’d certainly like to try. I soaked it in 99% IPA and cleaned the area. The two scorched components just fell off. Now comes getting the parts to solder back on. Please correct me if I’m mistaken, but I’ll need the tantalum capacitor, the small component that went with it (I pointed to it in the one picture - what is this?), and wire because there’s just nothing left to solder a component directly to the board anymore from what I can see :(

Can anyone tell me what I would need to get for the small component in particular that I pointed to? Any advice in general? Also - is this area just to power the hard drive? I’m wondering if I can’t fix the area if the system would safely run without it (I’d just figure out another storage solution - too bad because I’m also a HDD enthusiast and I wanted the beefy drive assuming it didn’t get fried).

Thank you all in advance!
 

Attachments

  • IMG_0861.jpeg
    IMG_0861.jpeg
    1.1 MB · Views: 39
  • IMG_0862.jpeg
    IMG_0862.jpeg
    175.7 KB · Views: 36
  • IMG_0858.jpeg
    IMG_0858.jpeg
    1.1 MB · Views: 36
  • Wow
Reactions: croissantking

jmacz

New Tinkerer
Mar 21, 2025
25
22
3
That looks to be damage caused by a blown C1 capacitor which is common. The stock board had a 16V/47uf tantalum there and it should have been a 25v/47uf tantalum. The L3 component you lost is an inductor. Not sure what else is damaged but check the schematics which are online and then check all the traces in the area. You should be able to replace C1 creatively and as for L3, not sure what the specs are for the component but you should be able to do some initial tests with the two pads of L3 shorted, and then once it’s confirmed working, try to replace that inductor. The schematics might have the specs but if not, my guess is it would be similar to L4. Note that C1 had two sets of pads, one for use with a tantalum cap and one for use with an SMD electrolytic cap. You can see this on other parts of the board. Just an FYI.
 
  • Love
Reactions: RetroMagic

RetroMagic

New Tinkerer
Jun 29, 2024
7
1
3
That looks to be damage caused by a blown C1 capacitor which is common. The stock board had a 16V/47uf tantalum there and it should have been a 25v/47uf tantalum. The L3 component you lost is an inductor. Not sure what else is damaged but check the schematics which are online and then check all the traces in the area. You should be able to replace C1 creatively and as for L3, not sure what the specs are for the component but you should be able to do some initial tests with the two pads of L3 shorted, and then once it’s confirmed working, try to replace that inductor. The schematics might have the specs but if not, my guess is it would be similar to L4. Note that C1 had two sets of pads, one for use with a tantalum cap and one for use with an SMD electrolytic cap. You can see this on other parts of the board. Just an FYI.
Things have been so hectic lately - sorry for the delayed response! Thank you for your response!! I'll be sure to get the 25v/47uf capacitor instead! Interesting that Apple went with the lower voltage one - no wonder it's common. I'll do some digging and figure out the inductor values - good to know that I can probably test the system without it though with things minimally put back together (minus the hard drive - I'd like to check the voltages of that connector for sure 😅).

I'm guessing I can gently remove the green coating of the board to get at the copper and solder bodge wires. Never done that before but a steady hand and some practice on something else ought to suffice enough. Traces look thick enough - I think all are fine near it - just leading up to the two components got torched. There's a through hole one that's very close - I can make it out though - opposite side of the board looks perfectly fine so I guess I can wrap the wire around to the other side if the torched side is too far gone. Then I'll just cover all the copper exposed with Kapton tape so nothing shorts.

Hopefully in a week or two I'll have a working IIfx :)