Forum member @jmacz and I have been exchanging PMs for a couple months, and he recently very graciously mailed me a few prints made with PAHT-CF — a carbon fiber enhanced filament. He offers 10mm & 11mm height versions of the clip on his Printables page here:
I am using a 45x45x10mm aluminum heatsink in combination with the Clip that is for 10mm tall heatsinks. My heatsink is a gold color that was sold on Amazon USA in the past, but the current version is silver:
I already had my heatsink installed on the 040 CPU with 2-sided thermal tape, but the clip should work to secure a heatsink and 40mm Noctua fan even if you only use regular thermal paste like MX-4. My 40mm fan is 12v:
I tap power for the fan on the underside of the LC575 board at the +12v and GND points shown below (ignore the RED wire in the photo because you should connect it to the +12v point marked in Orange).

In the past, I had the same 40mm Noctua fan mounted via brute force using machine screws, which is Kay Koba's method, having the fan blowing downward onto the heatsink as shown here:

The machine screw trick works works great because the screws dig in between a couple fins on the heatsink and really mount it securely. But that requires you to use thermal tape to keep the 45x45x10mm heatsink mounted securely to your 040 CPU. There is a bit less thermal conductivity when using thermal tape compared to a good thermal paste like MX-4, and that's the benefit of using the CPU and heatsink clip I am discussing.
Another disadvantage of using Thermal Tape is that the top of the CPU and/or bottom of your heatsink may not be perfectly flat, resulting in only some of the tape making contact. I know that from first hand experience, as you can see below.

Using Thermal PASTE will resolve issues like that. I demonstrate thermal paste spreading on a 68040 processor using a transparent lens in my video here.
As you can see in the photos below, I now have the clip by @jmacz mounted with the fan blowing straight up, which pulls cool air through the heatsink fins...
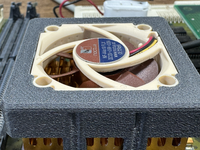
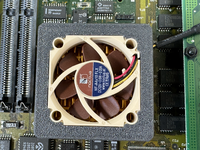
Note that you must remove the tiny rubber parts at each of the 4 corners on the sticker side of the fan so that those 4 corners will sink nicely into the clip, as shown in the above photos. There are also 4 pieces of rubber at each corner on the back side of the fan too, but I was able to leave those in place. They touch the heatsink fins, but that wasn't a problem.
At first, the clip wouldn't take hold on the underside of the lip around the 040 CPU, but I then very slightly pried the CPU up from its socket about 1mm, which allowed the little tooth on each leg of the clip to slide under the lip of the CPU, as you can see...
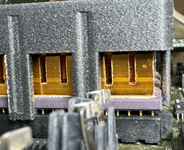
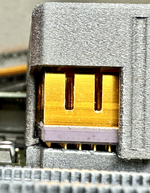
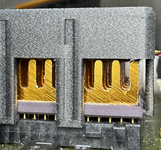
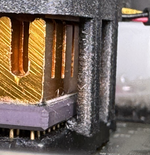
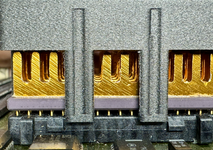
Even though it's pried up about 1mm, the 040 CPU is still nicely secured to the socket and works fine.
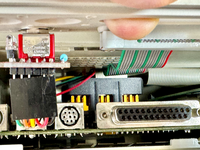
Note that I also have Kay Koba's FlippyFloppy installed, which allows me to use a FloppyEMU with my Mystic — something that otherwise would be impossible. And although there is a floppy drive ribbon cable that comes to the custom back panel, there is enough clearance above the heatsink clip to accommodate it, and there is still sufficient airflow up and out...
Without the fan, I was getting between 56°C and 58°C, but with the 40mm Noctua fan I measure a much cooler 42°C...


In the image below, you can see that surrounding chips are now hotter (54.6°C) than the CPU (42.2°C), even though I have the CPU overclocked to 50MHz (using the 475 Overclock Control Strip) and left it running for over 1 hour...

The 40mm fan noise is inaudible because the 80mm Noctua case fan is louder. I could not detect any serious vibrations either when holding my finger on the clip during normal operation.
Note that I originally had the clip printed at JLCPCB in Nylon, but I found the legs were not perfectly straight and they are more bendable than the carbon fiber reinforced version @jmacz kindly made for me, so the JLC version simply wouldn't clip down as expected. It needs to be printed in something firmer. @jmacz is not selling the clips, so you would either need to use JLC to print them in PLA or a similarly stiff plastic, or print them yourself. The caveat to that is that, in my experience, PLA prints are much more expensive than Nylon or Resin at JLC. You have to take care with Resin though because a lot of that stuff isn't suited for higher temperature use, although if you are able to get your temps down as low as my 42°C, it won't matter.
I wanted to do this writeup to let you LC575 motherboard owners know about a heatsink clip solution that works nicely. And when you overclock (as every LC575 motherboard owner SHOULD, he he), heatsinking and fanning becomes important.
I'd now like to humbly thank @jmacz for all the time and effort he put into making this clip, especially because he is making it freely available to the community.
Have fun!
I am using a 45x45x10mm aluminum heatsink in combination with the Clip that is for 10mm tall heatsinks. My heatsink is a gold color that was sold on Amazon USA in the past, but the current version is silver:
Amazon.com: MECCANIXITY Electronic Radiators Module Cooler Aluminium Heatsink 45x45x10mm for CPU Silver Tone Pack of 2 : Industrial & Scientific
Amazon.com: MECCANIXITY Electronic Radiators Module Cooler Aluminium Heatsink 45x45x10mm for CPU Silver Tone Pack of 2 : Industrial & Scientific
www.amazon.com
I already had my heatsink installed on the 040 CPU with 2-sided thermal tape, but the clip should work to secure a heatsink and 40mm Noctua fan even if you only use regular thermal paste like MX-4. My 40mm fan is 12v:
I tap power for the fan on the underside of the LC575 board at the +12v and GND points shown below (ignore the RED wire in the photo because you should connect it to the +12v point marked in Orange).
In the past, I had the same 40mm Noctua fan mounted via brute force using machine screws, which is Kay Koba's method, having the fan blowing downward onto the heatsink as shown here:
The machine screw trick works works great because the screws dig in between a couple fins on the heatsink and really mount it securely. But that requires you to use thermal tape to keep the 45x45x10mm heatsink mounted securely to your 040 CPU. There is a bit less thermal conductivity when using thermal tape compared to a good thermal paste like MX-4, and that's the benefit of using the CPU and heatsink clip I am discussing.
Another disadvantage of using Thermal Tape is that the top of the CPU and/or bottom of your heatsink may not be perfectly flat, resulting in only some of the tape making contact. I know that from first hand experience, as you can see below.
Using Thermal PASTE will resolve issues like that. I demonstrate thermal paste spreading on a 68040 processor using a transparent lens in my video here.
As you can see in the photos below, I now have the clip by @jmacz mounted with the fan blowing straight up, which pulls cool air through the heatsink fins...


Note that you must remove the tiny rubber parts at each of the 4 corners on the sticker side of the fan so that those 4 corners will sink nicely into the clip, as shown in the above photos. There are also 4 pieces of rubber at each corner on the back side of the fan too, but I was able to leave those in place. They touch the heatsink fins, but that wasn't a problem.
At first, the clip wouldn't take hold on the underside of the lip around the 040 CPU, but I then very slightly pried the CPU up from its socket about 1mm, which allowed the little tooth on each leg of the clip to slide under the lip of the CPU, as you can see...


Even though it's pried up about 1mm, the 040 CPU is still nicely secured to the socket and works fine.
Note that I also have Kay Koba's FlippyFloppy installed, which allows me to use a FloppyEMU with my Mystic — something that otherwise would be impossible. And although there is a floppy drive ribbon cable that comes to the custom back panel, there is enough clearance above the heatsink clip to accommodate it, and there is still sufficient airflow up and out...

Without the fan, I was getting between 56°C and 58°C, but with the 40mm Noctua fan I measure a much cooler 42°C...
In the image below, you can see that surrounding chips are now hotter (54.6°C) than the CPU (42.2°C), even though I have the CPU overclocked to 50MHz (using the 475 Overclock Control Strip) and left it running for over 1 hour...
The 40mm fan noise is inaudible because the 80mm Noctua case fan is louder. I could not detect any serious vibrations either when holding my finger on the clip during normal operation.
Note that I originally had the clip printed at JLCPCB in Nylon, but I found the legs were not perfectly straight and they are more bendable than the carbon fiber reinforced version @jmacz kindly made for me, so the JLC version simply wouldn't clip down as expected. It needs to be printed in something firmer. @jmacz is not selling the clips, so you would either need to use JLC to print them in PLA or a similarly stiff plastic, or print them yourself. The caveat to that is that, in my experience, PLA prints are much more expensive than Nylon or Resin at JLC. You have to take care with Resin though because a lot of that stuff isn't suited for higher temperature use, although if you are able to get your temps down as low as my 42°C, it won't matter.
I wanted to do this writeup to let you LC575 motherboard owners know about a heatsink clip solution that works nicely. And when you overclock (as every LC575 motherboard owner SHOULD, he he), heatsinking and fanning becomes important.
I'd now like to humbly thank @jmacz for all the time and effort he put into making this clip, especially because he is making it freely available to the community.
Have fun!
