Fun with TAM's. (upgrading Twentieth anniversary Macs with IDE SSD adapters, Sonnet CPU upgrades, BlueSCSI, and lots of love

dvsjr

New Tinkerer
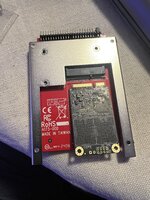
For anyone continuing to work on TAMs I recently did an upgrade with an IDE to SSD adapter and a 128 GB SSD. I bought the parts on amazon. I took out the IDE drive, used an IDE to USB adapter to connect the drive to a G4 mac mini running 10.4 Server and OS 9, (the mini itself using an SSD card). The Mini server share makes file and driver copying, imaging, reformatting etc easier since it has classic (Mac OS 9) running.
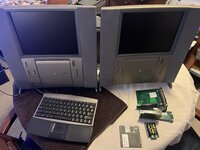
Recently I had an old and very dear friend meet up with me for lunch, He brought along his old TAM, another TAM stock, and one still in the box. I already have one from '97 I bought new for my first "I bought it new" Macintosh.
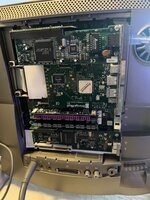
My friend's TAM is tricked out; max RAM, Farallon ethernet card, Orangemicro FW/USB upgrade card and a Crescendo G3 upgrade in the cache card slot.
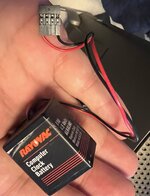
Once the TAM's internal IDE HD was imaged I copied it back to the SSD using a SSD USB adapter. reinstalled in the TAM. Added AA battery PRAM upgrades to replace the dead 4.5v weird Rayovacs that were dead but not leaking thank goodness. Fixed the clock on it.
Next step is to try out BlueSCSI and wifi. I am not sure if I can take an image I made on classic macos and use that in a BlueSCSI microSD card but thats my goal. As a looong time mac admin, I still have bootable OS 9 CD's I made with tons of repair software for every aspect of mac work and administration. If anyone has blueSCSI experience with DiskJockey, let me know?
 

Attachments

  • G3 upgrade TAM with eth FW USB.jpg
    G3 upgrade TAM with eth FW USB.jpg
    1.5 MB · Views: 25
  • SSD in IDE adapter for TAM.jpg
    SSD in IDE adapter for TAM.jpg
    1.4 MB · Views: 24
  • two tams.jpg
    two tams.jpg
    1.5 MB · Views: 24
  • rayovac TAM battery.jpg
    rayovac TAM battery.jpg
    392.2 KB · Views: 22

eric

Administrator
Staff member
Sep 2, 2021
961
1,569
93
MN
scsi.blue
I picked up a TAM at VCF-MW - first thing I tried was a BlueSCSI on it - works great. The bus is only a 5MB/sec bus on the TAM so your SSD/IDE solution will be much faster - but BlueSCSI is still handy for other things.

I'm not quite sure what you mean when you say an image made on classic macos - do you mean like a Disk Copy image? if so they wont work out of the box as they dont have the SCSI driver partition. You could drag it on to disk jockey and convert it to a "Device" image though and drop that on the SD card.

HTH

BTW - have you recapped your sub/logic board? Mine has a terrible buzz. I am not looking forward to taking it apart and hopefully I can get all my servicing done at once.
 

ClassicHasClass

Tinkerer
Aug 30, 2022
245
144
43
www.floodgap.com
I thought the issue on the subwoofer was more that the contacts to the umbilical cable were sometimes bad. I have a TAM PSU with the buzz that I need to do work on, though I also have one that has very clean sound.
 

misterg33

New Tinkerer
Oct 10, 2022
33
8
8
I thought the issue on the subwoofer was more that the contacts to the umbilical cable were sometimes bad. I have a TAM PSU with the buzz that I need to do work on, though I also have one that has very clean sound.
Cleaning the power contacts inside the sub supposedly fixes the buzz for a while, but then it comes back. I dunno that replacing the caps would fix it considering this problem happened when the TAM was brand new (unless you're replacing a cap with a different value?).
 

misterg33

New Tinkerer
Oct 10, 2022
33
8
8
How's the Orange Micro card working out with the G3 accelerator installed? I know that installing the Sonnet USB/FW card will cause lockups with their G3 card unless you apply a manual EFI patch. I'm wondering if the Orange Micro works any better?

I've currently got an ATA to CF card adapter in my TAM instead of an SSD. I'd be curious if the SSD with adapter would actually be any faster on a machine this old. I'd suspect there'd be other bottlenecks.
 

wottle

Active Tinkerer
Oct 30, 2021
548
303
63
47
Fort Mill, SC
Cleaning the power contacts inside the sub supposedly fixes the buzz for a while, but then it comes back. I dunno that replacing the caps would fix it considering this problem happened when the TAM was brand new (unless you're replacing a cap with a different value?).
I think I've read others have been replacing the header with something with higher quality ones? And in one video (
), they simply tinned the headers to try to prevent future oxidation, which may be the cause of the buzzing. But I don't think the caps are the source. However, I'd replace the caps while you are in there as they are now quite old.
 

mac27

Tinkerer
Apr 30, 2024
49
53
18
Virginia, USA
www.mac27.net
As I believe is mentioned in the iiiDIY video linked above, and also on the Macintosh Museum site, the issue is caused by some combination of (a) the uncoated spade connectors installed on the subwoofer at the factory, and (b) the pin header connections on the Bose amplifier board. These uncoated connectors can allow surface corrosion to build up, even a *very slight* amount, which then causes the buzzing sounds. AFAIK the umbilical cord connection(s) do not play a role. The issue can be somewhat mitigated by tinning the leads on these connectors, or even using a pencil eraser to remove surface oxidation on the pins, but I've read that these methods are sometimes not a permanent fix.

This past year I did a complete overhaul/'restoration' of my TAM including a full recap of all boards, SSD install, fan replacements, and also the "Bose buzz" fix. In working with Thomas Andrews (Amiga of Rochester), who did the recapping work, we decided to just go ahead and replace both of the spade connectors AND the pin headers on the amp board with new, coated ones. Thomas wrote up this post on his site about the work he did on my unit. So far (about 8-9 months later) these steps seem to be holding up as a permanent fix - no recurrence of the buzz to date.

For anyone looking to crack into their TAM, I recently put together a new comprehensive disassembly guide which covers both the head and base units. It is adapted from the iFixit guide but adds several missing critical steps midway through. I worked with iiiDIY to put this together and they used it in their more recent video focused on disassembling and recapping their unit.

Overall I'd say the TAM is the most difficult-to-work-on machine I've personally dealt with for a number of reasons, but the overhaul was 100% worth it. It's been wonderful to be able to enjoy the audio system again without the annoying buzz. And the SSD and new fans are nice and quiet.

IMG_1206.jpeg

Bose amplifier board after recapping and pin header replacements

IMG_1267.jpeg

Subwoofer cable with new (coated) spade connectors installed
 
Last edited: