Mac SE Restoration Project -- advice wanted!

BPearce

New Tinkerer
May 9, 2022
27
17
3
A functional Mac SE (FDHD) was passed along to me, and this has set me along the path of a restoration project that I’ve had in mind to try for some time.

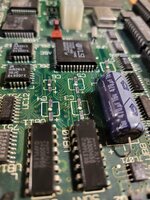
I’ve replaced a few faulty RAM modules to get it properly working again, and I’ve also disassembled and cleaned the Floppy Drive and replaced a broken eject gear. The battery had not leaked, but it has been removed for the time being.

I had the very good fortune to purchase a Raspberry Pi and set up RaSCSI -- eventually, that will all be mounted inside the case.

Current plans call for disassembly, cleaning and retrobrighting the case (I’ve had success with this before with other projects), and I’ve been thinking, at that time, I might also replace the capacitors. My understanding is that the Mac SE is much less prone to damage from leaking capacitors -- but still, they’re what -- 30 years old at this point? My soldering skills are basic, at best, but I’m good at following explicit instructions, and this seems like a task I should be able to handle.

Initially, my thinking was I’d try to do everything all at once -- replace all the caps while the Mac has been disassembled for cleaning -- but I don’t want to get myself in for more than I’m prepared (or have the spare time for).

I’ve been wondering -- how might I prioritize this project, in terms of what maintenance is likely to be more important in the short term? Should I work on the Analog Board first, as removing that is much more complicated? Or are the components on the Logic Board more prone to failure?

I’m interested in advice and guidance from others who have been down this path!
 
  • Like
Reactions: KingDingus

eric

Administrator
Staff member
Sep 2, 2021
910
1,483
93
MN
scsi.blue
My understanding is that the Mac SE is much less prone to damage from leaking capacitors
Yes, I have 5 SE's - all with the original caps - that said I really SHOULD get around to it, because as you mention they're old, not a matter of if, but when they go bad.

The SE has all axial caps, which can make your job a lot easier. Some frown on it but I just snip the caps off, leaving as much of the legs as possible and solder the new ones to the existing legs. Without a hot air gun, some of those legs are almost impossible to remove.

Here's @Branchus guide for the SE https://recapamac.com.au/macintosh-se/ I usually pick up kits from console5.com if you dont want to hunt on mouser/digikey.

What will likely need recapping more urgently is the PSU and analog board. I've had to recap each one of mine. Low voltages and cap gunk all over the analog board and PSU will likely be an issue first.

I'm always a fan of dong one thing at a time, easier to debug what when wrong when you do have an issue. Recap the logic board, it still boots? ok goto the analog board.

Good luck! It's fun and addicting.
 
Last edited:

Patrick

Tinkerer
Oct 26, 2021
434
1
223
43
I've recapped a few Plus's which also just have the axial caps. Nothing i could tell was wrong with them. But as a few people said, they will go bad. the main reason i did it was to build up my confidence to do surface mount. (like mac classics)

All the analog boards i've done worked before i did them. but on each i found leakage under the cap. so i was glad i did it before it got worse.
 

Patrick

Tinkerer
Oct 26, 2021
434
1
223
43
I also second the idea of doing on thing at a time and testing it out. And, if one were to do that, it would be handy to have the cable that goes from the analog board to the logic board to be longer. ... and with an SE you have such a solution.


BPearce

New Tinkerer
May 9, 2022
27
17
3
Yes, I suppose it makes sense to take one step at a time -- as was said, I was thinking one of the benefits of starting with a working Mac might be that if anything goes wrong, it kinda limits the scope of the likely failures.

I'd been put off by the idea of working on the Analog Board and Power Supply, -- but JDW's video (which I'd already seen) really makes it seem as though this is within my skillset. I find his patient and methodical approach is really very helpful.

Appreciate the advice!
 

Patrick

Tinkerer
Oct 26, 2021
434
1
223
43
Agreed, i think JDW has the best how to videos for these kinds of repairs. Watching Mac84 and Branchus repair computeres live is nice also. But JDW takes the time to show you all the ins and outs.

The analog board is nothing to be scared about. it does have some capactors that can hold a lot of voltage. but not for long if left unplugged. But because the components are bigger, its easier to replace.

the thing to be scared about is the tube. Although its never zapped me, i've given it plenty of space and care..
 
  • Like
Reactions: skate323k137

skate323k137

Tinkerer
Mar 7, 2022
130
103
43
SE's are pretty easy to recap in the grand scheme of things. I did mine with pretty basic tools.

Clearing thru holes while or after removing component legs is definitely a pain in most cases. Forget solder wick (Sorry to those who love it, it's not for me most of the time).

If you've already snipped the leg, with the PCB secured vertically, covering the pad in tack flux and heating with an iron while pulling from the reverse with a pliers will almost certainly get the leg removed. You just have to be careful with component legs that were bent substantially pre-soldering, so you don't snag pads while removing them.

For basic desoldering if you don't want to shell out a lot for a serious desoldering pump, this guy is unbelievably handy. I used to recap entire PCBs using these, and I still leave one around if I just need to desolder one thing or fix a bridge. https://www.amazon.com/Velleman-VTDESOL3U-Vacuum-Desoldering-Heater/dp/B00B88FRME
 

alex_santos

New Tinkerer
Sep 25, 2021
38
22
8
The SE has all axial caps, which can make your job a lot easier. Some frown on it but I just snip the caps off, leaving as much of the legs as possible and solder the new ones to the existing legs. Without a hot air gun, some of those legs are almost impossible to remove.
I sort of do frown on it but Mr. Carlson (video below) appears to do this (well he twists them off) so I wonder what the truth really is, I say this because the man is an electronics guru. I have to actually watch this video in detail to understand.

It's hard to say but desoldering with a lot of heat can also cause substantial stress to the pads as would twisting. So I am on the fence although I have never twisted or snipped the caps. What's really important, in either scenario, is to consider the pads.


ScutBoy

Administrator
Staff member
Founder
Sep 2, 2021
336
314
63
Northfield, MN USA
For basic desoldering if you don't want to shell out a lot for a serious desoldering pump, this guy is unbelievably handy. I used to recap entire PCBs using these, and I still leave one around if I just need to desolder one thing or fix a bridge. https://www.amazon.com/Velleman-VTDESOL3U-Vacuum-Desoldering-Heater/dp/B00B88FRME
I have this exact same tool, and it does help a lot. Not so much on logic boards, where the leads are very small, but on analog boards and power supplies which have healthy amounts of solder, it works great.

An ATX(?) power supply extender cable can work for the SE to keep the logic board out of the machine while working. You just plug in half of it, and let the rest hang out. Hard to explain, but easy to see if you line one up. They are cheap and easy to find.

I ended up cutting the unused portion off just because, but before that I just marked each end with sharpie to avoide confusion.

Just like JDW's video, now that I skim though it :)
 
  • Like
Reactions: skate323k137

eric

Administrator
Staff member
Sep 2, 2021
910
1,483
93
MN
scsi.blue
I sort of do frown on it but Mr. Carlson (video below) appears to do this (well he twists them off) so I wonder what the truth really is, I say this because the man is an electronics guru. I have to actually watch this video in detail to understand.

It's hard to say but desoldering with a lot of heat can also cause substantial stress to the pads as would twisting. So I am on the fence although I have never twisted or snipped the caps. What's really important, in either scenario, is to consider the pads.

These are axial though with the legs exposed - there is no stress on the pads snipping next to the body (not talking about smd ones as there are none on the SE (but i do twist and pull too, takes practice but works well for me))
1660572187829.png
 

skate323k137

Tinkerer
Mar 7, 2022
130
103
43
For SMD removal, IMO there is really only one sane method (barring skill with hot air but I don't want to remove electrolytic caps with that)

Twisting is out for me, I know some people do it, but not I.

If you try to lift while heating smd pads you're all but sure to lift one once in a while.

The best non destructive way I have found is to add a ball of 60/40 (or even better, low melt temp SMD removal alloy) to each pad of the cap. Then alternate the iron between the two balls of solder while applying sideways pressure to the base of the cap. It will slide sideways off the pads when both joints are setting but not solid. Clean up the pads with wick or a desoldering iron (I hate wick but it works here) and you are good to go. I have done LC II and SE/30 boards this way, it's fantastic.
 

Attachments

  • 20220811_141733.jpg
    20220811_141733.jpg
    1.5 MB · Views: 56

skate323k137

Tinkerer
Mar 7, 2022
130
103
43
I have this exact same tool, and it does help a lot. Not so much on logic boards, where the leads are very small, but on analog boards and power supplies which have healthy amounts of solder, it works great.
I was lucky to get a stash of smaller tips for mine, they weren't made for it, they were for an ancient "paladin solder scooter" but fit perfectly. IIRC I have 1.0, 1.5, and 2.0mm tips. I actually used it for the 2 axial on this SE/30 but with a smaller tip than it comes with.
 

ScutBoy

Administrator
Staff member
Founder
Sep 2, 2021
336
314
63
Northfield, MN USA
I was lucky to get a stash of smaller tips for mine, they weren't made for it, they were for an ancient "paladin solder scooter" but fit perfectly. IIRC I have 1.0, 1.5, and 2.0mm tips. I actually used it for the 2 axial on this SE/30 but with a smaller tip than it comes with.

That would be sweet, but I can't find a reference anywhere, and don't want to just start buying random tips until I find something that works. I guess I could try to find the manufacturer of the one I have and see if they have any leads.
 
  • Like
Reactions: skate323k137

alex_santos

New Tinkerer
Sep 25, 2021
38
22
8
The best non destructive way I have found is to add a ball of 60/40 (or even better, low melt temp SMD removal alloy) to each pad of the cap. Then alternate the iron between the two balls of solder while applying sideways pressure to the base of the cap. It will slide sideways off the pads when both joints are setting but not solid. Clean up the pads with wick or a desoldering iron (I hate wick but it works here) and you are good to go. I have done LC II and SE/30 boards this way, it's fantastic.
I typically do this myself but the dwell time multiplies. I guess it all depends on the board's conditions around those electrolytic surface mounts. @eric ah, didn't click that these are axial. As long as care is taken the day ends nicely.
 

skate323k137

Tinkerer
Mar 7, 2022
130
103
43
I typically do this myself but the dwell time multiplies. I guess it all depends on the board's conditions around those electrolytic surface mounts. @eric ah, didn't click that these are axial. As long as care is taken the day ends nicely.
True, and ones ability to use proper flux and know when to just back out and let the board cool off. I use a low wattage (like, 25 watts) with fine tip if I do that, and generally, don't put too much more heat into the PCB than I would have with air. Quickly bouncing between the points so the heat spreads throughout the area definitely helps too. But again, your point of dwell times is very important.
 

YMK

Active Tinkerer
Nov 8, 2021
349
273
63
(n) to twisting caps.

It may work for some people and some boards in good condition.

The construction of caps Apple used varied. The state of your pads will vary as well.

In my opinion, the easiest and safest method is an iron in each hand.

Don't be the guy asking how much it costs to replace a torn pad.
 

moldy

New Tinkerer
Aug 1, 2022
12
23
3
(n) to twisting caps.

It may work for some people and some boards in good condition.

The construction of caps Apple used varied. The state of your pads will vary as well.
I beg to differ - from my side this is by far the safest method with the risk of overheating the board. I replaced literally 100s of SMD caps in the audio equipment, 5 SE30s (pretty badly leaking), 3 Portables and 2 Classic IIs without a single ripped pad.
On the other hand, pads often looked miserable whenever previous repair attempts thermally stressed the PCB material and delaminated the copper.

I personally rather wiggle the caps back and forth (delicately, maybe 30-50 degrees) instead of twisting them out with a single move like in the video linked above. This way the legs are just breaking away at some point due to the material wear and then I clean up the pads/leg remains with a soldering iron, adding flux and sometimes fresh solder.

Obviously YMMV, but I would consider training on some scrap boards and finding the best way to wiggle away the cap without any damage to the pads. It really does work.
 

YMK

Active Tinkerer
Nov 8, 2021
349
273
63
I beg to differ - from my side this is by far the safest method with the risk of overheating the board.

If you have decent equipment set properly, this risk is the same as that of installing the replacements - effectively zero. If you twist, you still need heat to remove the remnants of the old caps and to install the new ones. The margin between effective desoldering and scorching the board is wide. It's not hard to find a sane temperature to work with.

If we're listing our experience points... thousands of caps across hundreds of boards. I've gotten many requests to repair missing pads. They're not burned off, they're torn off. Pliers work until they don't.