If you're coming to this thread to ask "where do I buy these dang cards?", they can be bought here. (Thanks, Eric!)
WARNING: I've been hearing from people who have ordered cards that the EEPROMs have been changed out with ones that are INCOMPATIBLE with the OS 9 flasher. You might be able to still flash these with the flashrom method, but some of these chips require 12v to program, and therefore the only option you have is using an EEPROM flasher. Sucks, but that's the way it goes, I guess. Just be aware when ordering a card that you may not be able to go this the easy way. There's still no harm in at least trying the OS 9 flasher, but just don't be surprised if it doesn't work.
(You can also just peel off the SATA RAID sticker on the EEPROM and google what EEPROM you have and see if it can be programmed on-card and just stick it into a PC and hit it with flashrom. Components change all the time, sadly, and there's no telling what each card might be equipped with.)This warning does not mean you need to buy a new EEPROM for the sole purpose of flashing your card to work with Macs, so long as you have a 128K EEPROM. This just affects how you go about flashing the card.
First off, why?
You might ask this, and it would be a valid question, especially now. Because back when I wrote this guide, the only options for the later Power Macs for a fast drive replacement were either to track down a compatible ATA card, or to buy something like a ZuluSCSI which wasn't cheap. BlueSCSI v1 is great, but speed was not its forte. But now we have the BlueSCSI v2, it's pretty fast, and pretty cheap if you take it as a kit, making SATA less of a consideration if you're fine with the 10MB/s SCSI bus in the later beige Power Macs.But if you embrace the SATA, you get some magic: On my 9600, I'd pull around 25MB/s in benchmarks, which is a fair bit more than SCSI. Plus, it allows you to use modern SATA devices natively, and there are tons of SATA drives out there. It also allows replacement of the optical drive with something newer and more reliable, too, as optical drives "just work".
But...why write this? You're hardly the first. I know. When I sat down to write this, my main issue was that the information on this was very scattered and hard to parse, and I had to hit a lot of snags through the process of getting SATA goodness into my 9600. So my goal with this guide was to consolidate everything into one post, and write it in a way that I (and others) could easily parse. I think I was successful in that regard. But yes, this is hardly a new thing, many have done this before I gave it a shot. I'd like to think I hopefully made it easier to tackle.
If that all sounds good...
What works?
- SSDs! (I've tried some SanDisk and Samsung ones, all have appeared fine in Drive Setup.)
- Hard drives of various sorts! (Though with bigger ones, you will probably want to partition them. I've heard of people having issues with 2TB drives.)
- Optical drives! (At least CDs. I have yet to have a DVD read, but I also haven't pursued this much, yet.)
What doesn't?
- Burning with said optical drive. I haven't tried it yet, but thus far there's no indication that burning software can "see" the burning capabilities of the drive.
- Super high capacity hard drives. If you're going over 2TB, you might have trouble if you don't opt to partition your drives.
Machines that might be problematic
- Digital Audio G4 (mine isn't stock, however, it has a CPU upgrade. But I can't get it to boot with any of the cheap AliExpress cards. Suspecting this is due to the voltage regulation issue I mentioned and the DA G4 being particularly sensitive, but who knows. Listing it here because of my personal experience.)
- Quicksilver G4? (architecturally very similar to the DA G4, might suffer the same problem)
Machines known to work
- Power Macintosh 4400
- Power Macintosh 9600 (both Tsunami and Kansas)
- Power Macintosh G3 Beige
- Power Macintosh G3 Blue and White
- Power Macintosh G4 MDD
What can I expect?
It really doesn't matter which route you go here; SATA drives of any sort of a recent vintage are going to saturate the PCI bus all the same, the only thing you can gain on by using an SSD is access/seek times. But given these drives are still going to be leagues faster than anything that would have shipped stock in these machines...you're probably not going to see much improvement. Throw in whatever you wish for, be it SSD or HDD.Optical drives should "just work" much like native IDE/SCSI drives. You can hold the C key to boot from them all the same. The only thing you lose out by going with a SATA optical drive is CD audio support, so if you want to listen to an audio CD with a SATA optical drive you're going to need something like iTunes or Audion (that reads the audio data over the data bus vs. using the CD audio connector.)
As said earlier, these cards "just work" and are picked up as a SCSI bus by the system. These should work in all manner of Macs, from the old world PCI ones, all the way into the New World Macs. These will work as far back as 7.5, and all the way up to 10.2 in my testing. 10.3/10.4 were a bit of a toss up but I need to recheck those after repairing my cards. More to come on that when I can get around to it.
Pick your poison
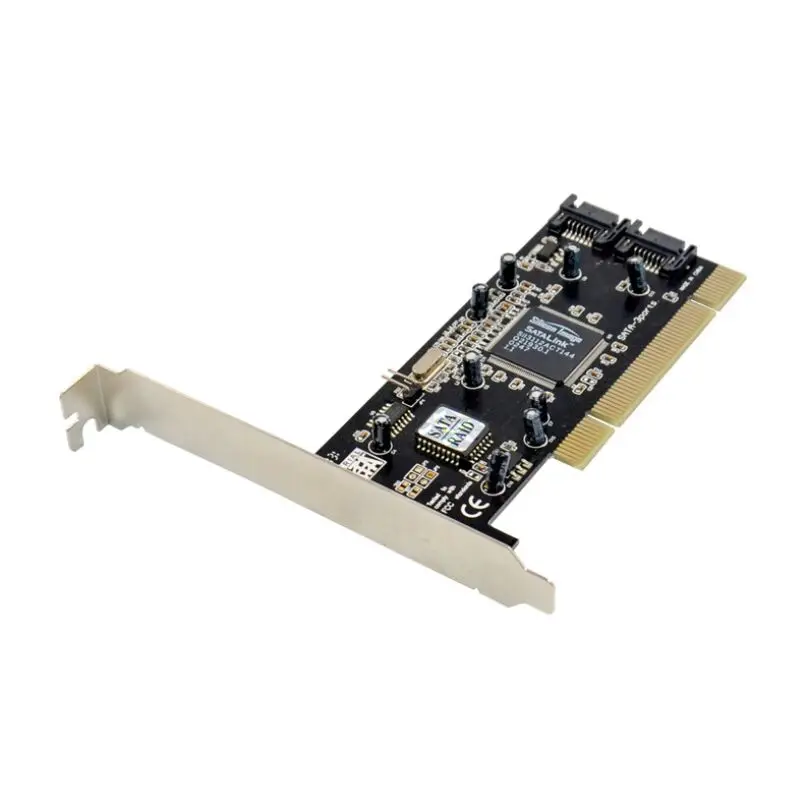
First, you're going to need an SIL3112-based SATA card. You can find this in a few different ways. Action Retro showed off this strange combo card with an SIL3112 onboard, and that worked fine. You can also just buy one off AliExpress or eBay, they come on generic boards with a cheapo ROM slapped on. These cards will do, but they can be a bit finicky as they're not exactly built to the best standards. The best luck I've had all around is getting a Startech branded SIL3112 card, but those aren't exactly the most common, either.For AliExpress, it might be wise to gather up some members on the forum (or Discord) and do a group buy for cards. That's up to you, though.
Once you have a card in hand, though, you have multiple routes. Prior to dosdude1 busting the whole thing wide open you only really had one route, which was buying a specific chip and flashing it in a programmer, then swapping the chip with hot air. However, dosdude1 has done some incredible work and now pretty much any 128K chip should work (with some edge cases) for this. He compressed the ROM down to fit on smaller EEPROMs, and patched out the chip ID check. This means you no longer need the specific EEPROM that the original 1S2 ROM was looking for. Yay.
dosdude1 also did did some patching work on a flasher utility (that FirmTek made) to allow it to flash these cards all within OS 9. This means--so long as the EEPROM on the card wants to play ball (and--I'm assuming--isn't blank so the Mac can "see" the card) you can just flash the card without ever having to touch an EEPROM programmer or soldering equipment. Nice. It's kinda like the old way of using flashrom and a Windows PC, but a lot more user friendly.
The components used to build these cards can change at any time, but as of the last revision to this guide, I used the flasher app on a Power Mac G3 minitower to flash an AliExpress card perfectly fine. I've heard of some EEPROMs requiring a programmer to write to them, so if the flasher app fails (potentially for this reason?) you'll have to go it the hard way.
That said...the three routes lay before you:
I choose peace. (Flashing with the flashing utility in Mac OS)
DEFINITELY TRY THIS FIRST. Unless you like a challenge. Or something. I ain't the boss of you. But if things go well, this is so ridiculously easy I was questioning if it really worked. If you bought your card more recently via the AliExpress link up top, this method probably won't work. Still worth a try though, because it's infinitely easier than the other two methods.Requirements:
- a Mac with a PCI slot
- said Mac being capable of running Classic Mac OS (so, 9.x, I've not tried this on 8.5 or 8.6 yet)
Step 1: Grab the 128K ROM.zip (it's attached to this post, at the bottom)
I'd decompress this on a modern-ish machine just in case Stuffit whines about it on classic Mac OS. I've had mixed luck with .zip files and Stuffit, sadly. Once that's done, though, copy the .ROM file over to the Mac you're going to do the flashing on.Note: I am assuming you're taking a straight-from-aliexpress card and trying to flash it, and most if not all of these have 128K EEPROMs. If you have a 512K EEPROM you can substitute the 3112-512-patched-ROM.zip.
Step 2: Grab the SeriTek1S2Flasher.hqx file (attached to this post, too)
Unlike with the ROM.zip file, you do not need to decompress this on a modern machine. This should decompress just fine in Stuffit Expander. Copy the Flasher.hqx file to your Mac, decompress it and you should have the Flasher application ready to go.Make sure the 1S2-patched-compressed.ROM file and the Flasher application are in the same folder. Start the Flasher app.
Step 3: Read the scary warnings and click a bunch of buttons
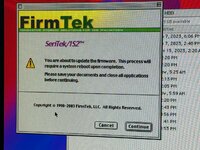
Note: Pay close attention to which card you're flashing if you have multiple SATA cards in your Mac. The flasher will allow you to select which one to flash.Anyway, when you start the Flasher, you'll get a scary legalese warning. Click Accept and move on.
Next you'll get a screen telling you what this flasher is going to do. Click Continue.
The next screen will allow you to select which card you want to flash. If you only have the one card installed, it should default to that. If you're using an already-flashed SATA card and are flashing another one, pay close attention. Flashed cards will end in .1S2 for their firmware revision.
Once the right card is selected, click "Update Firmware".
...and now it should erase the EEPROM on the card, and begin flashing it.
Once it's finished, it should pop a message saying as such. If so, restart your Mac, and open Apple System Profiler. Or just connect a HFS-formatted SATA drive to your card, either/or. You should see pretty quickly if it worked. If you're going to ASP, you'll want to look for this under Devices and Volumes:
(It's supposed to come up as a SCSI bus.)
If you see this, your card should be ready to go! Connect your drives and enjoy the ludicrous speed! But if for some reason it didn't work, you'll likely need to take the violent route, which involves programmers, hot air rework, and pain.
I like a bit of pain. (Flashing via Flashrom on a PC)
Requirements
- a PC that can boot DOS (pretty much anything should be able to)
- said PC having a PCI slot (NOT PCI-E)
- the SATA card itself (it cannot have a blank ROM on it)
I wrote these instructions using a Win98 PC, for the record. You can use whatever you want so long as you can get into DOS and the device the files are stored on can be recognized by DOS.
Repeating this for posterity: the card cannot have a blank ROM on it. If you're opting to swap the EEPROM with a bigger one for whatever reason, you'll want to program the replacement EEPROM first with the instructions under Hurt Me Plenty. Flashrom will just stare at you blank-faced if you try to tell it to flash onto a card with a blank ROM on it.
Step 0: Prepare a DOS boot drive, if needed
I did this by just telling Windows 98 to copy system files to a floppy disk within the formatting dialog. There are many ways to get DOS onto a boot disk, you can do this up to XP, I believe (having the FDD formatter just copy DOS files to the disk). You can also use FreeDOS. I'm going to let you write your own destiny here, as there are so many ways you can go about this.Step 1: Copying the files to the DOS drive
Download the 128K ROM.zip and 3112_Flashing.zip files. Extract them somewhere memorable. You can throw away the 1S2_ROM file in the 3112_Flashing.zip archive, we won't be needing it.Copy flashrom.exe and 1S2-patched-compressed.ROM to either your DOS boot disk or whatever drive you plan on using within DOS. I highly recommend putting them on the root of whatever disk you're using to boot DOS to make the whole process WAY easier.
Step 2: Booting DOS and using flashrom
At this point, reboot your PC into whatever flavor of DOS you chose to use. I can't give specific instructions here because there are so many variables, but I assume you know how to get whatever PC it is you're using to boot from a certain drive.Once you're in DOS you should be sitting at an A: (or C
") prompt. If you didn't put the files on the root of your DOS boot disk you'll need to navigate to where they are.
prompt. If you didn't put the files on the root of your DOS boot disk you'll need to navigate to where they are.You can use the dir command to verify everything is in place.
Once everything looks good, you can type this command (flashrom and the ROM file need to be in the same folder/directory)
Code:
flashrom --programmer satasii -w 1S2-patched-compressed.ROMA whole bunch of text should scroll by. You might get some scary-sounding messages like:
Code:
Warning: flash seems unconnected.
This flash part has status UNTESTED for operations:
Don't worry, press on. It should be fine. Eventually it'll get down to:
Code:
Reading old flash chip contents... Done.
Erasing and writing flash chip... Erase/write done.
What you'll want to see is this at the end, with it dumping you back out to the DOS prompt:
Code:
Verifying flash... VERIFIED.You should now be able to shut down the PC, pull the card, and it should be able to be used in a Mac, now!
Hurt me plenty. (Flashing manually with a programmer)
(You'll need to go this route if you opt to replace the EEPROM on the card with a blank one.)Requirements:
- Some level of soldering experience
- A hot-air rework station (I used a cheapo one for this)
- A soldering iron (preferably a decent one)
- A programmer (I used a TL866II+ but anything that can write a PLCC32 EEPROM and has compatibility with whatever chip you use SHOULD work)
Pick-a-programmer
Personally, I use a TL866II+, and it's an excellent piece of kit. It has since been discontinued and replaced with the T46, I believe. If you can find a discounted TL866, it's worth picking up. I do know there are likely cheaper programmers out there, but I've not used them. Either way you go, make sure your programmer supports 12v erase/program if you're flashing one of those chips that require it.The process
This guide is written using a TL866II+ and XGecu's XGpro software. If you opt to use your own solution, hopefully the directions translate somewhat well to whatever software/programmer you use.First, you're going to want to put the chip in the DIP32 adapter, making sure the dot in the chip is oriented toward the top of the adapter and programmer, like so:
Make sure the handle is locked in the downward position. (Also, I know this is the wrong chip, I'm using it for demonstration purposes.)
Open up Xgpro. It might prompt you to update the firmware on your TL866 if you're using one, follow the directions to do that and come back when you're done. Should be quick.
Go up to the Select menu and pick Search And Select.
A window should pop up:
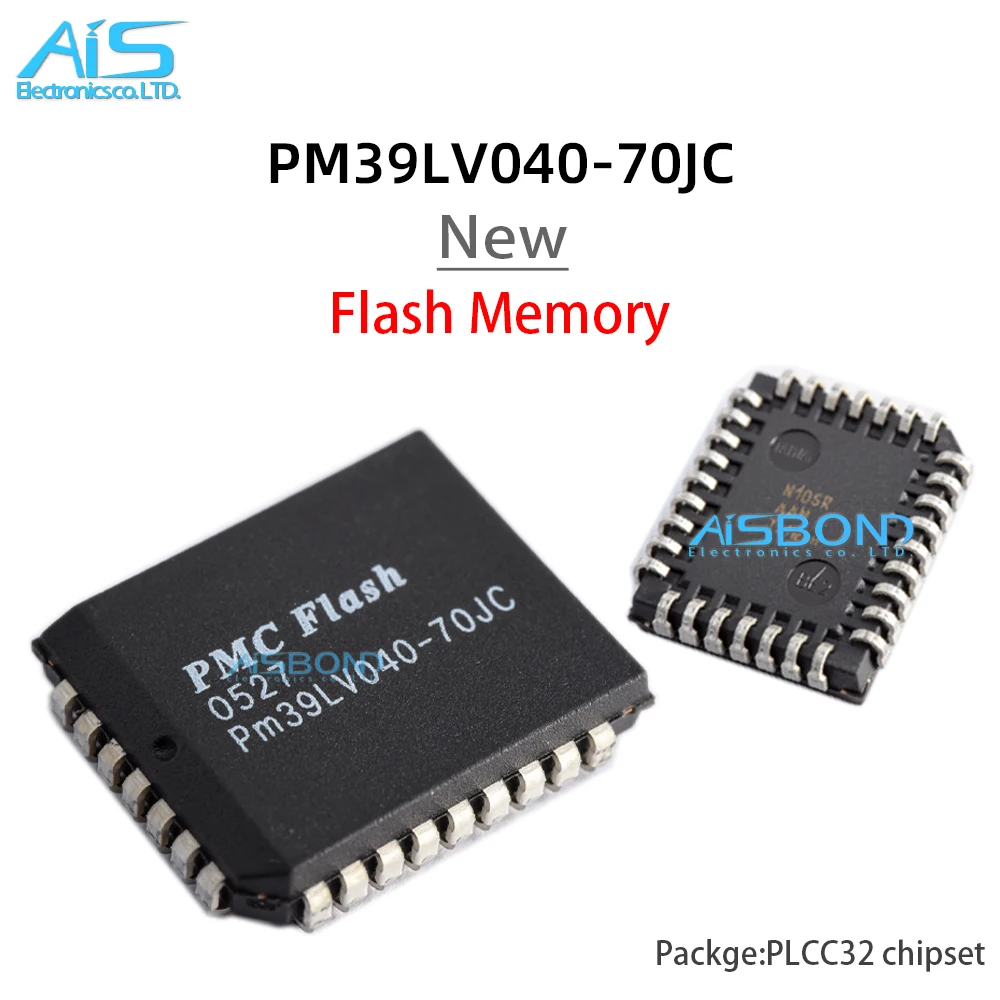
This is where we tell Xgpro (and the programmer) what chip we're working with. In the upper left, type out whatever chip you have. In this case, you see that I've typed "PM39LV040". Usually it'll autoselect the right one, but sometimes there are multiple form factors. Like in this case there's a TSOP32 version. Make sure you've selected the PLCC32 version and you're good to go.
At this point you can do a quick sanity check and click the READ button and see if the chip will read (even though it's empty). You should see this (pay no mind to the chip ID being different, again, this is a scrap chip I'm using for demo purposes.)
(NOTE: You MIGHT get pin errors on this step. If you do, try and reorient the adapter a little bit. Sometimes it can actually help to pry up on one corner of the EEPROM so it sits in the socket kind of askew. If this was a chip pulled from another card, you might need to check the pins for residual solder.)
If all checks out, now what you want to do is load in the Seritek ROM. Dip into the 3112_Flashing zip attached to this post and you should see a file called 1S2_512.rom. Put it somewhere memorable, this is the file we want.
Back in Xgpro, click the LOAD button:
And point to where you stashed the ROM. The file load window should look like this:
You should not need to mess with any of the options, leave them at their defaults. Click OK. At this point you should start to see some resemblance of data in the main Xgpro window:
Now that we have this loaded into Xgpro, it's time to flash it. Go up to the top of the window and click the PROG button:
A similar window to when we were reading the chip will appear. If all looks good and the chip ID is still correct, go ahead and click "Program". If it was successful, it'll look like this (though hopefully without pin errors like I had here!)
At this point, you're done with the programmer. Hopefully. Get the chip out, it's time to stick it on the card.
Putting the chip on the card
I prefer hot air for this, for both removing and installation. I got out my iron and wet the joints with some fresh leaded solder to lower the melting point, then set my crappy 858D clone to 360c on full speed and got to work, and after about 45 seconds or so the chip came right off the board.After which I took my iron back out, wicked up all the solder, then fluxed and tinned the pads back up.
I put some more flux down, aligned the chip with the tinned pads, and used the hot air once again to install the chip, giving it about a solid minute at the same temp as before. This was enough to make a solid connection for me, but YMMV.
After a quick douse with some electronics cleaner and 91% IPA, I had a clean, flashed SATA card.
Moment of truth...
The only thing left now is to slap the card into a Power Mac and see if anything happens. Thankfully for me it worked first shot; my FAT32-formatted SSD popped up on the desktop of my 9600 immediately. Better yet, Drive Setup just works with this card. I didn't need Patched Drive Setup for any of this. It appears as another SCSI bus to the Mac. Sweet.And because it's a "SCSI" device, that means we can bench it with SCSI Director 4, and my oh MY these numbers.
And that, folks, is how I at least made my 9600 do some ludicrous drive speed.
PSA for AliExpress cards, if you have trouble/weirdness
If you buy one of these and it ends up either not working or working partially (in my case, the card only worked in a New World Mac, not my beige G3 or 9600), check the soldering on the card. Whoever or whatever assembles these cards does NOT do a good job, and in my case, both AliExpress cards I had suffered from cold joints, and in the case of one of them even had a pad completely missing from one of the capacitor locations. Bodged it all up and it works great now, even on the 9600.Wick up the solder and reapply some new stuff with some flux and generally you'll be good to go. I wouldn't be surprised if some of these cards end up shipping with bum capacitors, either. But thus far, haven't heard of any.
Also, unfortunately, these cheapo cards have some...not good voltage regulation. It's enough to pass muster in something like a Power Mac 9600, G3s of varying vintage, and some G4s, but some machines really sensitive to this may not work with these cards. In my case, none of the three cards I have work in my Digital Audio G4. But my Startech-branded one works perfectly fine.
I've heard of people bodging in better voltage regulation to get the cards to work on these more sensitive systems, but I've not looked too deep into that, only known that people HAVE done it.
Updates n' history things
Keepin' track of this stuff now:3/21/23 - Partial rewrite, rewrote the intro, put in placeholder for the flashing utility, I need to try this on an actual machine and fill this in.
11/15/23 - I finally got another, unflashed 3112 card to try the Mac OS 9 flasher. Surprise, surprise, it worked great, and I was finally able to write that bit into the guide. Barring any groundbreaking developements and whatnot, I believe this guide is now 100% complete. Thanks for reading.
11/22/23 - Filled out the flashrom part because I actually had to go through this song and dance to roll back one of my cards so I could use it in my Win98 PC.
Attachments
Last edited: