Sony CR44 PSU from Mac SE - Left on with no load over night

BeigeBoxSC

New Tinkerer
Oct 30, 2021
13
8
3
Richmond, VA
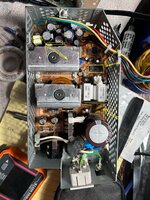
I stayed up late recapping the PSU because I was on a roll. I tested it and got good voltage. But accidentally left it on overnight with no load. D'oh!

Now the voltages are low and all wrong. I pulled off and tested five of the new capacitors but found them to be still normal.

Replacing capacitors is really the only thing I know to do with my YouTube education. I'm hoping some pros can offer me guidance on what other components I should check and how to check them.

Thanks!
 

JDW

Administrator
Staff member
Founder
Sep 2, 2021
2,326
1,884
113
54
Japan
youtube.com
Honestly, I've never left my Sony CR44 PSU powered-on in a No-Load condition for more than a few minutes to take measurements. I therefore have no personal experience to drawn on to say why your PSU would have failed, and certainly after you replaced ALL the electrolytic capacitors.

Was the removable door which acts as a heatsink left removed overnight? I doubt that would kill the PSU in a No-load condition, but I am just curious.

When you recap the PCB, you must remove the heatsink clip on one 3-legged component on the left side of the circuit board, because that locks the PCB into the metal chassis. After your recap, did you remember to put that component back in place with its gray heat-pad too? I'm not sure if that heat-pad was intended to replace thermal paste alone, or if it actually acts to electrically isolate the component too. Because if that pad isolates the component from the metal chassis, and if you forget the pad and secure the component's metal back to the chassis, maybe that would fry that component? Again, I'm not sure, but just thinking out loud.

Was anything hot when you found the PSU in the switched-ON position the next morning?

What if you leave it disconnected for an hour, then switch it on and do tests again?

Were there any bad smells?

Do you happen to have a Thermal Camera which could help you identify excessive heat on the PCB?

What happens if you turn down the little POT which lets you adjust voltage? Any change or improvement?
 
  • Like
Reactions: BeigeBoxSC

BeigeBoxSC

New Tinkerer
Oct 30, 2021
13
8
3
Richmond, VA
Honestly, I've never left my Sony CR44 PSU powered-on in a No-Load condition for more than a few minutes to take measurements. I therefore have no personal experience to drawn on to say why your PSU would have failed, and certainly after you replaced ALL the electrolytic capacitors.

Was the removable door which acts as a heatsink left removed overnight? I doubt that would kill the PSU in a No-load condition, but I am just curious.

When you recap the PCB, you must remove the heatsink clip on one 3-legged component on the left side of the circuit board, because that locks the PCB into the metal chassis. After your recap, did you remember to put that component back in place with its gray heat-pad too? I'm not sure if that heat-pad was intended to replace thermal paste alone, or if it actually acts to electrically isolate the component too. Because if that pad isolates the component from the metal chassis, and if you forget the pad and secure the component's metal back to the chassis, maybe that would fry that component? Again, I'm not sure, but just thinking out loud.

Was anything hot when you found the PSU in the switched-ON position the next morning?

What if you leave it disconnected for an hour, then switch it on and do tests again?

Were there any bad smells?

Do you happen to have a Thermal Camera which could help you identify excessive heat on the PCB?

What happens if you turn down the little POT which lets you adjust voltage? Any change or improvement?
The unit was closed up with the clip and gray heat pad in place as if it was ready to go back onto the analog board. When I discovered my mistake, don't believe it was hot, but just a bit warm and definitely an "electrical smell". Not super strong, but definitely present.

I did leave it alone all day and retested that evening, still bad.

Thermal camera! Good call! I forget that I have one. I looked carefully and saw three points that were heating up. I circled them in the attached picture.

Thanks and PS: your videos have been essential to my vintage Mac journey.
 

Attachments

  • IMG_2036.jpg
    IMG_2036.jpg
    601.5 KB · Views: 20
  • Like
Reactions: JDW

JDW

Administrator
Staff member
Founder
Sep 2, 2021
2,326
1,884
113
54
Japan
youtube.com
The resistors won't matter unless they are visually browned or blackened with heat.

The the black IC151 board shown was said to be hot, at 112°C, but I think that is normal...

1761020227983.png
1761020829440.png


IC251 probably shouldn't be hitting 100°C (unless all your measurements were °F, and in that case, it would be 37°C, which is nothing of concern at all).

1761020361887.png
1761020489204.png


You didn't mention IC253, but it shouldn't be getting anywhere close to 100°C either...

1761020415942.png


Examine for burn marks on any component, and on ICs you would look for discoloration or shiny parts versus matte parts of the chip.

Lastly, check all solder joints on the bottom of the board because that very well could be the culprit.

Also, has the board been cleaned in IPA to ensure there is no leaked capacitor fluid wreaking havoc on components near the big capacitors?
 

BeigeBoxSC

New Tinkerer
Oct 30, 2021
13
8
3
Richmond, VA
The resistors won't matter unless they are visually browned or blackened with heat.

The the black IC151 board shown was said to be hot, at 112°C, but I think that is normal...

View attachment 24089 View attachment 24093


IC251 probably shouldn't be hitting 100°C (unless all your measurements were °F, and in that case, it would be 37°C, which is nothing of concern at all).

View attachment 24090 View attachment 24092


You didn't mention IC253, but it shouldn't be getting anywhere close to 100°C either...

View attachment 24091


Examine for burn marks on any component, and on ICs you would look for discoloration or shiny parts versus matte parts of the chip.

Lastly, check all solder joints on the bottom of the board because that very well could be the culprit.

Also, has the board been cleaned in IPA to ensure there is no leaked capacitor fluid wreaking havoc on components near the big capacitors?
I should have said, my temps are indeed Fahrenheit.
 

JDW

Administrator
Staff member
Founder
Sep 2, 2021
2,326
1,884
113
54
Japan
youtube.com
In that case, none of those temperatures are "hot."

If you have an oscilloscope, it would be good to see what is going on with the output voltages. I know what your multi-meter says, but seeing the waveforms might prove interesting. Even so, you may not have a scope, and that is fine too.

But as I said in my earlier post, you need to take a lens (so you can see close-up) and check the components for anything odd. You may find nothing.

After that, take your lens and check solder joints. Reflow anything suspect.

And lastly...

When you recapped and removed all the old caps, was there a lot of leaked fluid on the PCB? If so, did you try your best to clean off that fluid with IPA?
 
  • Like
Reactions: BeigeBoxSC

BeigeBoxSC

New Tinkerer
Oct 30, 2021
13
8
3
Richmond, VA
In that case, none of those temperatures are "hot."

If you have an oscilloscope, it would be good to see what is going on with the output voltages. I know what your multi-meter says, but seeing the waveforms might prove interesting. Even so, you may not have a scope, and that is fine too.

But as I said in my earlier post, you need to take a lens (so you can see close-up) and check the components for anything odd. You may find nothing.

After that, take your lens and check solder joints. Reflow anything suspect.

And lastly...

When you recapped and removed all the old caps, was there a lot of leaked fluid on the PCB? If so, did you try your best to clean off that fluid with IPA?
FIXED.

Embarrassing, but I gave the board a bath in IPA and that seemed to do the trick. Thanks for your help!