I’ve been tinkering off and on for nearly a year with Gentoo Linux on a 800 MHz iBook G4 from 2003. As you may be aware, pickings are slim for active Linux distros that support PPC. Besides the excellent Lubuntu 16.04 Remix by @wicknix, and Adelie Linux, the only other option that I found is Gentoo Linux. (There is also a Mint PPC release that I could not get to work.) If you know of any others, post them below.
If you aren’t familiar with Gentoo Linux, it is a highly flexible, source code-based Linux distribution that supports a wide variety of architectures, PPC included. So I decided to give it a spin on one of my recently restored iBook G4s. In addition to being source code-based, Gentoo can be highly optimized for just about any application or need. Of course, that means diving deep into the bowels of specific hardware configurations, compiler options, and many other details that for many of us are hidden with modern OS distributions and desktop environments.
What I’m about to share are notes, comments, and highlights for getting a Gentoo install working successfully on an iBook G4 based on my trials and starts/stops over the last year. These notes should work for pretty much any other G4-based system, and with appropriate mods ought to work for G3 and G5 Macs. I say that, of course, without having attempted the latter, although I’m eyeballing the 600 MHz iBook G3 above my desk as a potential guinea pig. Sorry about the length of this post - it represents my notes collected over the last year, and as you will see, there is a lot required to get Gentoo working on PPC. Installing Gentoo is an exercise in patience, perseverance, frustration, and utter joy when the boot prompt appears after a successful install. (The big "FINALLY!" that I shouted after a successful kernel compile and boot was epic.)
The basics
I had my doubts about what I’m about to say, but I’ve come to the conclusion that this is true: follow the Gentoo PPC Handbook. My impression of the Gentoo Handbook is that it is written by programmers for programmers, and thus even though I do have a programming background in my distant past, the Gentoo Handbook is not the way I would write an installation manual stylistically. You will encounter branches for key decisions that will have ramifications later, and these same decisions are repeated over and over for different unrelated topics. If you lose track of what decision you made, you’ll have to start over. Ask me how I know. You will also be presented with options in the Handbook with no recommendations that will impact you later. I try to call out several of those when they occur and tell you the ramifications of a wrong choice. Did I mention this took me nearly a year to get working?
Lastly, this whole endeavor assumes you are familiar with working in the terminal and issuing unix commands. If you aren’t, a Gentoo installation will not be your cup of tea.
This also assumes you have a free Ethernet cable and connection for your iBook G4. Wireless networking does not work out of the box for the Gentoo live CD for the wifi card on the iBook G4. Foreshadowing, it took two days to compile wireless networking (iw and wpa-supplicant) and is not a step I would recommend anyway. Stick to Ethernet for your iBook G4.
About the installation
Read this page in the Handbook thoroughly. The handbook is about openness, choice, and power. With all three comes great responsibility. If you are interested in the least amount of hassle, follow my recommendations. Once you get a working system, you can start over and try tweaking a few decisions. In my experimentation and trials, I started over about a dozen times, which is a pain because of the excruciating slow compile times on an iBook G4. That’s why it took me nearly a year to get a working system! I hope the lessons learned I'm sharing will cut that down for you significantly.
Choosing the media
Follow this page in the Handbook carefully. I used another Mac with a network connection and CD burner to download and burn the CD. Skip the mirror stuff and go straight to the downloads page link referenced in the Handbook. From there, navigate to the ppc option and select the PPC/PPC64 Minimal Installation CD. This CD contains the necessary bootloader, kernels and drivers to boot into a text-only live environment for both a 32-bit ppc (G3/G4) and 64-bit ppc (G5), which you will pick at boot time. For an iBook G4, it will be ppc going forward. Keep that in mind if presented with a choice between ppc and ppc64.
Ignore the stage archives, those will come later.
I didn’t worry about verifying the downloaded files, I like to live dangerously like that.
This approach assumes you have a working CD drive in your iBook G4, like I did. It is possible in theory to use a USB drive to boot a ppc system, but it requires OpenFirmware voodoo that I could not master. Research told me that some USB drives are bootable in OpenFirmware, and others aren’t, and I never found a USB drive that I could boot successfully in OpenFirmware. Stick with the CD route.
Before moving ahead to Booting the system with the installation CD, I found through trial and error that initializing the target drive can be problematic per the Handbook. Therefore, I suggest doing it via MacOS X per the following:
Now you’re ready to boot your iBook G4 with the live CD. Follow the directions in the Booting section. Ignore the references to yaboot here and in subsequent sections - the Handbook is in error. Latest Gentoo installation CDs use grub for a bootloader, which we will also use in our installed environment later. Select Boot live cd kernel ppc, and don't worry about boot options - I did not have to enter any. Note that if you don't select anything and the grub bootloader times out, the default boot option is ppc64 which will throw errors and hang your iBook G4. If the boot is successful, you see some instructions displayed on the screen (more on that in a moment) and will be greeted by a command prompt.

Pro tip - once booted with the live CD, use ssh from your modern machine to log onto the iBook G4. I highly recommend using ssh for the installation because you can copy-paste from the Handbook into your ssh session on your modern machine, which makes command line entry much easier and less prone to typing mistakes!
To enable ssh, ignore the Optional: Starting the SSH daemon instructions in the Handbook and instead follow the instructions on the screen on your booted iBook G4 as shown above:
/etc/init.d/sshd start
passwd root
(you will be asked to enter and confirm a new root password)
These steps start the ssh daemon on the iBook G4 and establish a password for root in the live CD environment, which you’ll need for ssh-ing from your modern machine to the iBook G4. Note that ssh-ing as root is only allowed from the live CD - it won’t work if you try to ssh as root in the installed system later.
Configure the network
I found the live CD supported Ethernet networking just fine out of the box and did not require any extra configuration.
To ssh into your iBook G4, you’ll need to know its IP address assigned by your router. Use “ip address show” on your iBook G4 or if you are like me, my router web client shows all devices and IP addresses assigned.
ssh into your iBook G4 from a terminal on your modern machine via “ssh [email protected]” replacing the placeholder IP address with your actual IP address of your iBook G4, and enter the root password you just set. If it works you should be greeted with a command line prompt starting with “livecd” or something similar.
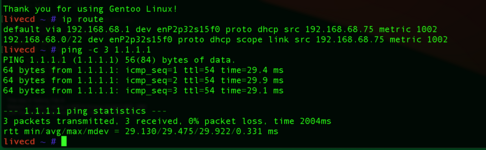
To verify that network is working completely, try pinging a web site of choice. This ensures that the network is functioning properly and that the network packets are reaching the net, DNS name resolution is working correctly, etc. If your connection works, you should see something similar to the below:

Run “ntpd -q -g” to update time on your iBook G4, or do manually via date command.
Use cat /proc/cpuinfo to verify CPU, which will be handy for setting CPU FLAGS later. For an iBook G4 you will see “cpu: 7455, altivec supported” along with other pertinent details such as those shown below:

Preparing the disks
There is some interesting information in the Handbook about partitioning Apple New World machines such as the iBook G4. Read through this section (again mentally substituting grub wherever you see yaboot). Some key notes about partitioning:
The first partition (sda1) is always an Apple Partition Map (APM). This partition keeps track of the layout of the disk. It is not possible to remove this partition.
The next partition (sda2) should always be an Apple bootstrap partition. This partition contains a small (800KB) HFS filesystem that will hold a copy of the bootloader and its configuration file. The bootstrap partition is not the same as a /boot partition found on other architectures. In fact, there will be mistaken references later in the Gentoo PPC Handbook to setting up a /boot partition which caused me endless confusion and headaches, and was one of the initial reasons I had to start over several times. The partition being referenced here is a bootstrap partition that will contain bootloader information installed later so that the machine will boot. If you have dabbled with Intel-based machines, it is somewhat analogous to the EFI partition (a comparison of which might get me in trouble with purists) but was how I kept it straight in my mind versus a traditional /boot partition. Mac New World machines do not require a separate /boot partition. The kernel and initramfs will go into a boot directory under root and will work just fine after the bootloader is configured later.
After the bootstrap partition, the usual Linux filesystems are placed in accordance with the guidance in the Handbook. I used swap in sda3 sized for 2 GB and the linux root partition in sda4. To dual boot, the MacOS X partition(s) can go anywhere after the bootstrap partition to insure that the bootloader starts first. I established sda5, sda6, and sda7 for Tiger, Sorbet Leopard, and OS9, which I copied later and don't describe as part of these notes. (Note: an iBook G4 cannot boot OS9 but I place OS9 files into its own separate partition - it’s how I roll.)
Follow the Handbook instructions on using mac-disk to establish your partitioning scheme. If you followed my instructions earlier, you've already formatted your drive via MacOS X with sda1 as APM and sda2 as a big blank partition. Delete sda2 using the "d" option and proceed with the instructions in the Handbook. Here is what my partition map looked like after partitioning and formatting per the Handbook. The bootstrap partition is created wit the “b” option, and all other partitions are created with the “c” option per the Handbook. I formatted the three Apple HFS partitions after emerging the hfsutils package in Gentoo. You can format them in MacOS X later if you like.

Turn on swap (/dev/sda3) and mount the root filesystem (/dev/sda4) per the Handbook, adjusting the partition references for swap and root per your partitioning scheme.
Per the Handbook, cd /mnt/gentoo - this is where you’ll download the stage3 tarball in a moment.
Make sure your date is current via the earlier instructions (“ntpd -q -g” or manually via date command).
Installing the Stage file
The choice of a stage file is one of those dreaded choices that have ramifications later. Read through the “Choosing a stage file” section, then I will recommend a choice:
Init system: use systemd. Some downstream installations are a bit easier under systemd than under OpenRC. If you have ever dabbled with starting or stopping services from the terminal under macOS or on a Raspberry Pi, systemd might already be familiar to you. The opposite (OpenRC) may be true for you if you’ve fiddled with other flavors of linux. Take my word for it and use systemd for now. If you get comfortable and are an OpenRC purist, you can start all over later.
The multilib (32 and 64-bit) and No-multilib options don’t apply to PPC. Skip.
Next, we’ll move to grabbing a stage3 tarball. At the time of this writing, here are the options for ppc:

Since I already recommended systemd, you really only have once choice for a tarball: “systemd | merged usr” under "Stage archives, big endian ppc and ppc64". Copy the link using a modern browser and use the wget <PASTE> command per the Handbook to download the stage3 tarball to your iBook G4.

Once the download is complete, extract via the tar command per the Handbook (I copy-pasted the command from the Handbook into my terminal, a clear benefit of using ssh from a modern machine for the install).
Next you’ll encounter the “Configuring compile options”, one of the more daunting sections of the Handbook (at least to me). Read through this section carefully, then I will make some recommendations.
For CFLAGS and CXXFLAGS, recall the cat /proc/cpuinfo to verify CPU? At the following link for Safe CFLAGS scroll down to the G4 (PPC74xx) section where you’ll see the following recommendation for COMMON_FLAGS:

Change the COMMON_FLAGS entry in /mnt/gentoo/etc/portage/make.conf per the above. (Note that before executing the chroot command later, we need to specify the full pathname to the make.conf file. Once chroot is executed on /mnt/gentoo, the path /etc/portage/make.conf applies.)
Next is MAKEOPTS. Although the PPC is single core, I found elsewhere to treat the PPC as if it had two cores. Therefore, add a line MAKEOPTS=“-j2” to the make.conf file.
These are the only changes needed at this time. Later we will work with USE flags, but that will be after the kernel is compiled and we’re moving on to building applications.
Here is a copy of my make.conf file, which at this point is at /mnt/gentoo/etc/portage/make.conf. (The below screenshot is from my installed environment, hence why you don't see the leading /mnt/gentoo in the cat command.) It also contains entries for ACCEPT_LICENSE, USE flags, INPUT-DEVICES, and VIDEO_CARDS that I’ll discuss later, and an entry at the bottom for a GENTOO_MIRROR that is optional but you can set by following the Handbook.

Installing the base system
Follow the Chrooting section for copying DNS info, mounting the filesystems, and entering the new environment.
Please note the following steps mentioned in the Handbook. If you ever have to interrupt your installation and resume from a cold boot, you’ll need to perform the following steps to ensure you have a properly-configured system to resume installation. i found this very handy when my installations got interrupted, which you can imagine happened numerous times over the last year. The swapon and gentoo mount commands assume the partitioning scheme from earlier, where swap is on dev/sda3 and root is on /dev/sda4.
swapon /dev/sda3
mount /dev/sda4 /mnt/gentoo
mount --types proc /proc /mnt/gentoo/proc
mount --rbind /sys /mnt/gentoo/sys
mount --make-rslave /mnt/gentoo/sys
mount --rbind /dev /mnt/gentoo/dev
mount --make-rslave /mnt/gentoo/dev
mount --bind /run /mnt/gentoo/run
mount --make-slave /mnt/gentoo/run
chroot /mnt/gentoo /bin/bash
source /etc/profile
export PS1="(chroot) ${PS1}"
Skip the “Preparing for a bootloader” subsection - it doesn’t apply to Apple New World machines. The bootloader will be covered later.
Configure Portage per handbook.
Configure the repository per the Handbook.
Now it is time to select a profile. Here is another choice than can bite you if you choose unwisely. For me, the initial list had #12 preselected, I switched to #10.
Why #10? I wanted to experiment with a desktop environment and I figured Gnome was fine (KDE was not offered as a choice). The Handbook explains about these choices, and it is better to select them and not use them than the reverse. (In the end I decided not to install Gnome for reasons I'll explain later.)

Under Optional: Configure the ACCEPT_LICENSE variable in /etc/portage/make.conf, I recommend adding the following. Read the section carefully for a fuller explanation.
ACCEPT_LICENSE="-* @FREE @GPL-COMPATIBLE @BINARY-REDISTRIBUTABLE"
Configure timezone and locale per the Handbook. When selecting a locale, pick one with utf8. You’ll thank me later when you try to compile the X Window System and it throws compilation errors at you if you don’t.

Configuring the kernel
Welcome to emerge, Gentoo Linux’s way of compiling source code and installing into the target location!
Compiling a working kernel proved time and time again to be the point where I got stuck. I tried a manual configuration (the third option), yet the choices are so overwhelming and require deep, intimate knowledge on the hardware of the iBook G4 that I repeatedly made mistakes and compiled a kernel that would kernel panic on boot. Next, I tried Genkernel (the second option) yet it created a compressed kernel that would not boot, and I couldn’t figure out how to configure the genkernel options to not get a compressed kernel. Finally, I tried a Distribution Kernel per the linked page. For the three current distribution kernels listed on the page, the sys-kernel/vanilla kernel would fail upon compile, and sys-kernel/gentoo-kernel-bin would throw memory errors upon boot. The lone kernel option that showed promise was sys-kernel/gentoo-kernel. Yes, I tried all the options so that you wouldn’t have to.
However, not all is sunshine and roses. When I tried to build the sys-kernel/gentoo-kernel. distribution kernel, I encountered masked keywords ~ppc per the below:

What in the hell does that mean? In theory it means that the ppc distribution kernel is still in testing and might or might not work, per this page.
I threw caution to the wind and followed the instructions on https://wiki.gentoo.org/wiki/Knowledge_Base:Unmasking_a_package to unmask the ppc keyword. (I found an easier way to do this manually later, but this is how I did it for the kernel compilation.)

It took about half a day to compile the kernel. The emerge command compiles and installs the kernel and initramfs in /boot directory on the root partition.
Pro tip: format your emerge command by surrounding it with date and time commands like this:
date; time emerge <emerge command details>; date
This will print the time and date at the start and end via the date command, and the time command will yield time statistics for the emerge like this:
real 551m4.248s
user 479m45.255s
sys 54m42.439s
Yes, the example emerge above took 551 minutes to complete (i.e., over 9 hours) - it was for the awesome window manager which I'll discuss later.
Once the kernel emerge is complete, here is the result you should see in /boot. Ignore the grub and NWBB directories - those will be created later when we configure the bootloader. If you do this later and the linux kernel is updated, you'll see a different version (6.7.4 is the current linux kernel version for Gentoo at the time of this writing).

Bottom line on the kernel: Out of all the kernel options I tried, the sys-kernel/gentoo-kernel was the lone option that would both compile and boot successfully. Don't waste your time with the other options like I did unless you know exactly what you are doing.
Configuring the system
Follow the Handbook as written for fstab, hostname, network, hosts, init and boot config, remote shell, time synchronization, and filesystem tools. Follow everything carefully especially when presented with the choice of OpenRC vs systemd (use systemd) and don’t skip any steps.
Set a root password - this is for the installed environment versus the earlier step for the liveCD environment. While you are at it, also set up a user account and a password. You will need that to be able to ssh into your installed environment later.
Typical example is as follows (replace joe with your preferred user id):
user add -m -G wheel,video -s /bin/bash joe
passwd joe
Make sure to add the video group - you’ll thank me later when you try to start the X Window System and it will throw errors if you don't.
Installing tools
Follow the systemd branches on this page. I installed sshd, chronyd, and a bunch of the filesystem tools.
Skip the wireless networking tools - they take 2 days to emerge, and the age of the wifi card in the iBook G4 makes it not worth it. Stick with Ethernet for networking.
Configuring the bootloader
install and configure grub per the Handbook. I did the steps exactly as listed in the Handbook, even if the reformatting of the bootstrap partition seemed like an unnecessary step. Do it anyway per the Handbook - it will work. In the example below, the bootstrap partition is /dev/sda2 per the earlier setup, and yours should be too.

By the way, during the time I was attempting to get Gentoo working on my iBook G4, the preferred bootloader switched in the Handbook from yaboot to grub. Originally, I tried yaboot but couldn't get it to work, even after applying patches to correct some compilation errors. The bootloader section has clearly been updated to grub, and it worked perfectly. Not all the earlier sections in the Handbook were updated from yaboot to grub, hence my earlier note to mentally substitute grub for yaboot in the Handbook.
Skip all the alternative bootloaders on the page.
Towards the bottom of the page is Rebooting the system. If all works, you will boot into your installed environment!
Next Steps
Now you should have a working Gentoo Linux install on your iBook G4! It's time for you to shout "FINALLY!" just like I did!
Of course you can’t do much with it until you emerge more tools, applications, and GAMES. Some apps I recommend installing immediately are sys-process/htop and app-misc/neofetch. Google gentoo and whatever tool or app you want to install, and more times than not you’ll find it available to emerge.
For example, htop. You’ll see a Gentoo wiki page for htop that goes through the installation and configuration steps for it, and you’ll also see a Gentoo package page for htop that lets you know the various versions and the state of the versions for various architectures - for example, green means good, yellow means being tested and is likely keyword masked that you’ll have to override to emerge. I saw pages like these two nearly universally via google search for any items I wanted to emerge.
Another handy tool to emerge is sudo to allow you to run commands as root from a user.
emerge app-admin/sudo
edit /etc/sudoers to enable wheel group - this is a standard linux install step, no different for Gentoo.
After emerge for sudo is complete, you may see a warning to issue a command “libtool --finish /usr/libexec/sudo” which you should do. You may see a similar warnings with other items you emerge. Go ahead and do it when you encounter it.
Pro tip: when getting ready to emerge something, use the following format first:
emerge -pvt <whatever package>
This will show if you need to set particular USE flags or override a masked keyword before the emerge. More about these options are available in the Gentoo Handbook.
Graphical User Interfaces
If you want to live in a text environment, you’re essentially done except for the aforementioned emerging of tools, apps, and games. However, if you’re like me, you want to experiment with a graphical user interface - it is why I suggested picking the desktop gnome profile earlier.
Before we move on to that, make the following changes to /etc/portage/make.conf:
USE=“X -kde gnome”
INPUT_DEVICES=“libinput synaptics”
VIDEO_CARDS=“radeon”
The X USE flag is definitely required, and -kde gnome means not to compile with kde but do for gnome. For INPUT_DEVICES some say synaptics is not required but it doesn't hurt to add it. The video card in an iBook G4 is radeon-based, hence the VIDEO_CARDS=radeon flag.
The first step in creating a graphical user interface is to emerge the X Window System. Besides being period correct and widely supported today, it is the best way to get a GUI installation until Wayland matures further. You can read about the X Window System on the wiki pages.
To emerge the X Window System, you'll need both the xorg-server and xorg-drivers:
emerge --ask --verbose x11-base/xorg-server x11-base/xorg-drivers
You'll also definitely need xterm. You can add another terminal emulator later. X uses xterm by default, and this is a good way to test your basic X install.
emerge x11-terms/xterm
Run startx in a terminal to verify the X Window System install, and by default it should start 3 xterm windows.

Congratulations, you now have a working unix GUI from the 1980’s!
From here, you can decide whether to go the full Desktop Environment (DE) route or go with a Window Manager. The DE route is likely more familiar to you, and you can try Gnome as I originally planned to do. I tried xfce4 which supposedly is lower on resources than the other DEs, but I found it sluggish. Therefore, I dropped the idea of a DE on the iBook G4 and decided to explore the world of tiling Window Managers, something I never did back in the day. The one recommended for us DE types is awesome.
emerge x11-wm/awesome
For awesome to work enter the following line to .xinitrc
exec dbus-launch --sh-syntax --exit-with-session awesome
From there, issue startx in a terminal to initiate awesome, and you should see something like this

If the screen blanks after sitting idle for a while, enter ctrl-alt-F2 to wake up.
I’m still playing around with awesome, which is pretty awesome so far - it is very snappy and I have a lot to learn about customizing it which ought to keep me occupied for a while. Awesome uses lua for a programming language which I don't know, but what the heck - I'll give it a go. There are a lot of other window managers out there, but my cursory glance at availability for PPC led me to awesome.
I’ll end this extremely long post at this point. Hopefully you'll find the above information useful for your Gentoo install on your iBook G4 or other PPC machine. Cheers!
If you aren’t familiar with Gentoo Linux, it is a highly flexible, source code-based Linux distribution that supports a wide variety of architectures, PPC included. So I decided to give it a spin on one of my recently restored iBook G4s. In addition to being source code-based, Gentoo can be highly optimized for just about any application or need. Of course, that means diving deep into the bowels of specific hardware configurations, compiler options, and many other details that for many of us are hidden with modern OS distributions and desktop environments.
What I’m about to share are notes, comments, and highlights for getting a Gentoo install working successfully on an iBook G4 based on my trials and starts/stops over the last year. These notes should work for pretty much any other G4-based system, and with appropriate mods ought to work for G3 and G5 Macs. I say that, of course, without having attempted the latter, although I’m eyeballing the 600 MHz iBook G3 above my desk as a potential guinea pig. Sorry about the length of this post - it represents my notes collected over the last year, and as you will see, there is a lot required to get Gentoo working on PPC. Installing Gentoo is an exercise in patience, perseverance, frustration, and utter joy when the boot prompt appears after a successful install. (The big "FINALLY!" that I shouted after a successful kernel compile and boot was epic.)
The basics
I had my doubts about what I’m about to say, but I’ve come to the conclusion that this is true: follow the Gentoo PPC Handbook. My impression of the Gentoo Handbook is that it is written by programmers for programmers, and thus even though I do have a programming background in my distant past, the Gentoo Handbook is not the way I would write an installation manual stylistically. You will encounter branches for key decisions that will have ramifications later, and these same decisions are repeated over and over for different unrelated topics. If you lose track of what decision you made, you’ll have to start over. Ask me how I know. You will also be presented with options in the Handbook with no recommendations that will impact you later. I try to call out several of those when they occur and tell you the ramifications of a wrong choice. Did I mention this took me nearly a year to get working?
Lastly, this whole endeavor assumes you are familiar with working in the terminal and issuing unix commands. If you aren’t, a Gentoo installation will not be your cup of tea.
This also assumes you have a free Ethernet cable and connection for your iBook G4. Wireless networking does not work out of the box for the Gentoo live CD for the wifi card on the iBook G4. Foreshadowing, it took two days to compile wireless networking (iw and wpa-supplicant) and is not a step I would recommend anyway. Stick to Ethernet for your iBook G4.
About the installation
Read this page in the Handbook thoroughly. The handbook is about openness, choice, and power. With all three comes great responsibility. If you are interested in the least amount of hassle, follow my recommendations. Once you get a working system, you can start over and try tweaking a few decisions. In my experimentation and trials, I started over about a dozen times, which is a pain because of the excruciating slow compile times on an iBook G4. That’s why it took me nearly a year to get a working system! I hope the lessons learned I'm sharing will cut that down for you significantly.
Choosing the media
Follow this page in the Handbook carefully. I used another Mac with a network connection and CD burner to download and burn the CD. Skip the mirror stuff and go straight to the downloads page link referenced in the Handbook. From there, navigate to the ppc option and select the PPC/PPC64 Minimal Installation CD. This CD contains the necessary bootloader, kernels and drivers to boot into a text-only live environment for both a 32-bit ppc (G3/G4) and 64-bit ppc (G5), which you will pick at boot time. For an iBook G4, it will be ppc going forward. Keep that in mind if presented with a choice between ppc and ppc64.
Ignore the stage archives, those will come later.
I didn’t worry about verifying the downloaded files, I like to live dangerously like that.
This approach assumes you have a working CD drive in your iBook G4, like I did. It is possible in theory to use a USB drive to boot a ppc system, but it requires OpenFirmware voodoo that I could not master. Research told me that some USB drives are bootable in OpenFirmware, and others aren’t, and I never found a USB drive that I could boot successfully in OpenFirmware. Stick with the CD route.
Before moving ahead to Booting the system with the installation CD, I found through trial and error that initializing the target drive can be problematic per the Handbook. Therefore, I suggest doing it via MacOS X per the following:
- Boot your iBook G4 into MacOS X using an external Firewire drive with a compatible version of MacOS X. I have a clone of Tiger on an external Firewire drive and used that to boot the iBook G4 into MacOS X Tiger.
- Format the target hard drive in your iBook G4 via Disk Utility. Select Apple Partition Map, and format the disk as a single partition, We’ll reformat it later once booted in the live CD. It goes without saying that this destroys all content on your internal hard drive, so make sure you have a backup if you need to save anything.
Now you’re ready to boot your iBook G4 with the live CD. Follow the directions in the Booting section. Ignore the references to yaboot here and in subsequent sections - the Handbook is in error. Latest Gentoo installation CDs use grub for a bootloader, which we will also use in our installed environment later. Select Boot live cd kernel ppc, and don't worry about boot options - I did not have to enter any. Note that if you don't select anything and the grub bootloader times out, the default boot option is ppc64 which will throw errors and hang your iBook G4. If the boot is successful, you see some instructions displayed on the screen (more on that in a moment) and will be greeted by a command prompt.
Pro tip - once booted with the live CD, use ssh from your modern machine to log onto the iBook G4. I highly recommend using ssh for the installation because you can copy-paste from the Handbook into your ssh session on your modern machine, which makes command line entry much easier and less prone to typing mistakes!
To enable ssh, ignore the Optional: Starting the SSH daemon instructions in the Handbook and instead follow the instructions on the screen on your booted iBook G4 as shown above:
/etc/init.d/sshd start
passwd root
(you will be asked to enter and confirm a new root password)
These steps start the ssh daemon on the iBook G4 and establish a password for root in the live CD environment, which you’ll need for ssh-ing from your modern machine to the iBook G4. Note that ssh-ing as root is only allowed from the live CD - it won’t work if you try to ssh as root in the installed system later.
Configure the network
I found the live CD supported Ethernet networking just fine out of the box and did not require any extra configuration.
To ssh into your iBook G4, you’ll need to know its IP address assigned by your router. Use “ip address show” on your iBook G4 or if you are like me, my router web client shows all devices and IP addresses assigned.
ssh into your iBook G4 from a terminal on your modern machine via “ssh [email protected]” replacing the placeholder IP address with your actual IP address of your iBook G4, and enter the root password you just set. If it works you should be greeted with a command line prompt starting with “livecd” or something similar.
To verify that network is working completely, try pinging a web site of choice. This ensures that the network is functioning properly and that the network packets are reaching the net, DNS name resolution is working correctly, etc. If your connection works, you should see something similar to the below:
Run “ntpd -q -g” to update time on your iBook G4, or do manually via date command.
Use cat /proc/cpuinfo to verify CPU, which will be handy for setting CPU FLAGS later. For an iBook G4 you will see “cpu: 7455, altivec supported” along with other pertinent details such as those shown below:
Preparing the disks
There is some interesting information in the Handbook about partitioning Apple New World machines such as the iBook G4. Read through this section (again mentally substituting grub wherever you see yaboot). Some key notes about partitioning:
The first partition (sda1) is always an Apple Partition Map (APM). This partition keeps track of the layout of the disk. It is not possible to remove this partition.
The next partition (sda2) should always be an Apple bootstrap partition. This partition contains a small (800KB) HFS filesystem that will hold a copy of the bootloader and its configuration file. The bootstrap partition is not the same as a /boot partition found on other architectures. In fact, there will be mistaken references later in the Gentoo PPC Handbook to setting up a /boot partition which caused me endless confusion and headaches, and was one of the initial reasons I had to start over several times. The partition being referenced here is a bootstrap partition that will contain bootloader information installed later so that the machine will boot. If you have dabbled with Intel-based machines, it is somewhat analogous to the EFI partition (a comparison of which might get me in trouble with purists) but was how I kept it straight in my mind versus a traditional /boot partition. Mac New World machines do not require a separate /boot partition. The kernel and initramfs will go into a boot directory under root and will work just fine after the bootloader is configured later.
After the bootstrap partition, the usual Linux filesystems are placed in accordance with the guidance in the Handbook. I used swap in sda3 sized for 2 GB and the linux root partition in sda4. To dual boot, the MacOS X partition(s) can go anywhere after the bootstrap partition to insure that the bootloader starts first. I established sda5, sda6, and sda7 for Tiger, Sorbet Leopard, and OS9, which I copied later and don't describe as part of these notes. (Note: an iBook G4 cannot boot OS9 but I place OS9 files into its own separate partition - it’s how I roll.)
Follow the Handbook instructions on using mac-disk to establish your partitioning scheme. If you followed my instructions earlier, you've already formatted your drive via MacOS X with sda1 as APM and sda2 as a big blank partition. Delete sda2 using the "d" option and proceed with the instructions in the Handbook. Here is what my partition map looked like after partitioning and formatting per the Handbook. The bootstrap partition is created wit the “b” option, and all other partitions are created with the “c” option per the Handbook. I formatted the three Apple HFS partitions after emerging the hfsutils package in Gentoo. You can format them in MacOS X later if you like.
Turn on swap (/dev/sda3) and mount the root filesystem (/dev/sda4) per the Handbook, adjusting the partition references for swap and root per your partitioning scheme.
Per the Handbook, cd /mnt/gentoo - this is where you’ll download the stage3 tarball in a moment.
Make sure your date is current via the earlier instructions (“ntpd -q -g” or manually via date command).
Installing the Stage file
The choice of a stage file is one of those dreaded choices that have ramifications later. Read through the “Choosing a stage file” section, then I will recommend a choice:
Init system: use systemd. Some downstream installations are a bit easier under systemd than under OpenRC. If you have ever dabbled with starting or stopping services from the terminal under macOS or on a Raspberry Pi, systemd might already be familiar to you. The opposite (OpenRC) may be true for you if you’ve fiddled with other flavors of linux. Take my word for it and use systemd for now. If you get comfortable and are an OpenRC purist, you can start all over later.
The multilib (32 and 64-bit) and No-multilib options don’t apply to PPC. Skip.
Next, we’ll move to grabbing a stage3 tarball. At the time of this writing, here are the options for ppc:
Since I already recommended systemd, you really only have once choice for a tarball: “systemd | merged usr” under "Stage archives, big endian ppc and ppc64". Copy the link using a modern browser and use the wget <PASTE> command per the Handbook to download the stage3 tarball to your iBook G4.
Once the download is complete, extract via the tar command per the Handbook (I copy-pasted the command from the Handbook into my terminal, a clear benefit of using ssh from a modern machine for the install).
Next you’ll encounter the “Configuring compile options”, one of the more daunting sections of the Handbook (at least to me). Read through this section carefully, then I will make some recommendations.
For CFLAGS and CXXFLAGS, recall the cat /proc/cpuinfo to verify CPU? At the following link for Safe CFLAGS scroll down to the G4 (PPC74xx) section where you’ll see the following recommendation for COMMON_FLAGS:
Change the COMMON_FLAGS entry in /mnt/gentoo/etc/portage/make.conf per the above. (Note that before executing the chroot command later, we need to specify the full pathname to the make.conf file. Once chroot is executed on /mnt/gentoo, the path /etc/portage/make.conf applies.)
Next is MAKEOPTS. Although the PPC is single core, I found elsewhere to treat the PPC as if it had two cores. Therefore, add a line MAKEOPTS=“-j2” to the make.conf file.
These are the only changes needed at this time. Later we will work with USE flags, but that will be after the kernel is compiled and we’re moving on to building applications.
Here is a copy of my make.conf file, which at this point is at /mnt/gentoo/etc/portage/make.conf. (The below screenshot is from my installed environment, hence why you don't see the leading /mnt/gentoo in the cat command.) It also contains entries for ACCEPT_LICENSE, USE flags, INPUT-DEVICES, and VIDEO_CARDS that I’ll discuss later, and an entry at the bottom for a GENTOO_MIRROR that is optional but you can set by following the Handbook.
Installing the base system
Follow the Chrooting section for copying DNS info, mounting the filesystems, and entering the new environment.
Please note the following steps mentioned in the Handbook. If you ever have to interrupt your installation and resume from a cold boot, you’ll need to perform the following steps to ensure you have a properly-configured system to resume installation. i found this very handy when my installations got interrupted, which you can imagine happened numerous times over the last year. The swapon and gentoo mount commands assume the partitioning scheme from earlier, where swap is on dev/sda3 and root is on /dev/sda4.
swapon /dev/sda3
mount /dev/sda4 /mnt/gentoo
mount --types proc /proc /mnt/gentoo/proc
mount --rbind /sys /mnt/gentoo/sys
mount --make-rslave /mnt/gentoo/sys
mount --rbind /dev /mnt/gentoo/dev
mount --make-rslave /mnt/gentoo/dev
mount --bind /run /mnt/gentoo/run
mount --make-slave /mnt/gentoo/run
chroot /mnt/gentoo /bin/bash
source /etc/profile
export PS1="(chroot) ${PS1}"
Skip the “Preparing for a bootloader” subsection - it doesn’t apply to Apple New World machines. The bootloader will be covered later.
Configure Portage per handbook.
Configure the repository per the Handbook.
Now it is time to select a profile. Here is another choice than can bite you if you choose unwisely. For me, the initial list had #12 preselected, I switched to #10.
Why #10? I wanted to experiment with a desktop environment and I figured Gnome was fine (KDE was not offered as a choice). The Handbook explains about these choices, and it is better to select them and not use them than the reverse. (In the end I decided not to install Gnome for reasons I'll explain later.)
Under Optional: Configure the ACCEPT_LICENSE variable in /etc/portage/make.conf, I recommend adding the following. Read the section carefully for a fuller explanation.
ACCEPT_LICENSE="-* @FREE @GPL-COMPATIBLE @BINARY-REDISTRIBUTABLE"
Configure timezone and locale per the Handbook. When selecting a locale, pick one with utf8. You’ll thank me later when you try to compile the X Window System and it throws compilation errors at you if you don’t.
Configuring the kernel
Welcome to emerge, Gentoo Linux’s way of compiling source code and installing into the target location!
Compiling a working kernel proved time and time again to be the point where I got stuck. I tried a manual configuration (the third option), yet the choices are so overwhelming and require deep, intimate knowledge on the hardware of the iBook G4 that I repeatedly made mistakes and compiled a kernel that would kernel panic on boot. Next, I tried Genkernel (the second option) yet it created a compressed kernel that would not boot, and I couldn’t figure out how to configure the genkernel options to not get a compressed kernel. Finally, I tried a Distribution Kernel per the linked page. For the three current distribution kernels listed on the page, the sys-kernel/vanilla kernel would fail upon compile, and sys-kernel/gentoo-kernel-bin would throw memory errors upon boot. The lone kernel option that showed promise was sys-kernel/gentoo-kernel. Yes, I tried all the options so that you wouldn’t have to.
However, not all is sunshine and roses. When I tried to build the sys-kernel/gentoo-kernel. distribution kernel, I encountered masked keywords ~ppc per the below:
What in the hell does that mean? In theory it means that the ppc distribution kernel is still in testing and might or might not work, per this page.
I threw caution to the wind and followed the instructions on https://wiki.gentoo.org/wiki/Knowledge_Base:Unmasking_a_package to unmask the ppc keyword. (I found an easier way to do this manually later, but this is how I did it for the kernel compilation.)
It took about half a day to compile the kernel. The emerge command compiles and installs the kernel and initramfs in /boot directory on the root partition.
Pro tip: format your emerge command by surrounding it with date and time commands like this:
date; time emerge <emerge command details>; date
This will print the time and date at the start and end via the date command, and the time command will yield time statistics for the emerge like this:
real 551m4.248s
user 479m45.255s
sys 54m42.439s
Yes, the example emerge above took 551 minutes to complete (i.e., over 9 hours) - it was for the awesome window manager which I'll discuss later.
Once the kernel emerge is complete, here is the result you should see in /boot. Ignore the grub and NWBB directories - those will be created later when we configure the bootloader. If you do this later and the linux kernel is updated, you'll see a different version (6.7.4 is the current linux kernel version for Gentoo at the time of this writing).
Bottom line on the kernel: Out of all the kernel options I tried, the sys-kernel/gentoo-kernel was the lone option that would both compile and boot successfully. Don't waste your time with the other options like I did unless you know exactly what you are doing.
Configuring the system
Follow the Handbook as written for fstab, hostname, network, hosts, init and boot config, remote shell, time synchronization, and filesystem tools. Follow everything carefully especially when presented with the choice of OpenRC vs systemd (use systemd) and don’t skip any steps.
Set a root password - this is for the installed environment versus the earlier step for the liveCD environment. While you are at it, also set up a user account and a password. You will need that to be able to ssh into your installed environment later.
Typical example is as follows (replace joe with your preferred user id):
user add -m -G wheel,video -s /bin/bash joe
passwd joe
Make sure to add the video group - you’ll thank me later when you try to start the X Window System and it will throw errors if you don't.
Installing tools
Follow the systemd branches on this page. I installed sshd, chronyd, and a bunch of the filesystem tools.
Skip the wireless networking tools - they take 2 days to emerge, and the age of the wifi card in the iBook G4 makes it not worth it. Stick with Ethernet for networking.
Configuring the bootloader
install and configure grub per the Handbook. I did the steps exactly as listed in the Handbook, even if the reformatting of the bootstrap partition seemed like an unnecessary step. Do it anyway per the Handbook - it will work. In the example below, the bootstrap partition is /dev/sda2 per the earlier setup, and yours should be too.
By the way, during the time I was attempting to get Gentoo working on my iBook G4, the preferred bootloader switched in the Handbook from yaboot to grub. Originally, I tried yaboot but couldn't get it to work, even after applying patches to correct some compilation errors. The bootloader section has clearly been updated to grub, and it worked perfectly. Not all the earlier sections in the Handbook were updated from yaboot to grub, hence my earlier note to mentally substitute grub for yaboot in the Handbook.
Skip all the alternative bootloaders on the page.
Towards the bottom of the page is Rebooting the system. If all works, you will boot into your installed environment!
Next Steps
Now you should have a working Gentoo Linux install on your iBook G4! It's time for you to shout "FINALLY!" just like I did!
Of course you can’t do much with it until you emerge more tools, applications, and GAMES. Some apps I recommend installing immediately are sys-process/htop and app-misc/neofetch. Google gentoo and whatever tool or app you want to install, and more times than not you’ll find it available to emerge.
For example, htop. You’ll see a Gentoo wiki page for htop that goes through the installation and configuration steps for it, and you’ll also see a Gentoo package page for htop that lets you know the various versions and the state of the versions for various architectures - for example, green means good, yellow means being tested and is likely keyword masked that you’ll have to override to emerge. I saw pages like these two nearly universally via google search for any items I wanted to emerge.
Another handy tool to emerge is sudo to allow you to run commands as root from a user.
emerge app-admin/sudo
edit /etc/sudoers to enable wheel group - this is a standard linux install step, no different for Gentoo.
After emerge for sudo is complete, you may see a warning to issue a command “libtool --finish /usr/libexec/sudo” which you should do. You may see a similar warnings with other items you emerge. Go ahead and do it when you encounter it.
Pro tip: when getting ready to emerge something, use the following format first:
emerge -pvt <whatever package>
This will show if you need to set particular USE flags or override a masked keyword before the emerge. More about these options are available in the Gentoo Handbook.
Graphical User Interfaces
If you want to live in a text environment, you’re essentially done except for the aforementioned emerging of tools, apps, and games. However, if you’re like me, you want to experiment with a graphical user interface - it is why I suggested picking the desktop gnome profile earlier.
Before we move on to that, make the following changes to /etc/portage/make.conf:
USE=“X -kde gnome”
INPUT_DEVICES=“libinput synaptics”
VIDEO_CARDS=“radeon”
The X USE flag is definitely required, and -kde gnome means not to compile with kde but do for gnome. For INPUT_DEVICES some say synaptics is not required but it doesn't hurt to add it. The video card in an iBook G4 is radeon-based, hence the VIDEO_CARDS=radeon flag.
The first step in creating a graphical user interface is to emerge the X Window System. Besides being period correct and widely supported today, it is the best way to get a GUI installation until Wayland matures further. You can read about the X Window System on the wiki pages.
To emerge the X Window System, you'll need both the xorg-server and xorg-drivers:
emerge --ask --verbose x11-base/xorg-server x11-base/xorg-drivers
You'll also definitely need xterm. You can add another terminal emulator later. X uses xterm by default, and this is a good way to test your basic X install.
emerge x11-terms/xterm
Run startx in a terminal to verify the X Window System install, and by default it should start 3 xterm windows.
Congratulations, you now have a working unix GUI from the 1980’s!
From here, you can decide whether to go the full Desktop Environment (DE) route or go with a Window Manager. The DE route is likely more familiar to you, and you can try Gnome as I originally planned to do. I tried xfce4 which supposedly is lower on resources than the other DEs, but I found it sluggish. Therefore, I dropped the idea of a DE on the iBook G4 and decided to explore the world of tiling Window Managers, something I never did back in the day. The one recommended for us DE types is awesome.
emerge x11-wm/awesome
For awesome to work enter the following line to .xinitrc
exec dbus-launch --sh-syntax --exit-with-session awesome
From there, issue startx in a terminal to initiate awesome, and you should see something like this
If the screen blanks after sitting idle for a while, enter ctrl-alt-F2 to wake up.
I’m still playing around with awesome, which is pretty awesome so far - it is very snappy and I have a lot to learn about customizing it which ought to keep me occupied for a while. Awesome uses lua for a programming language which I don't know, but what the heck - I'll give it a go. There are a lot of other window managers out there, but my cursory glance at availability for PPC led me to awesome.
I’ll end this extremely long post at this point. Hopefully you'll find the above information useful for your Gentoo install on your iBook G4 or other PPC machine. Cheers!
Attachments
Last edited:
