A Tale of Three SE/30s - Restoration and Upgrade Log

ph4z

New Tinkerer
May 20, 2025
13
15
3
Today I finally picked up not one, not two, but three Macintosh SE/30 machines. My goal is to restore these to working condition. I’m planning to keep at least one SE/30 (if any make it at all) to upgrade and tinker around.

I want to use this thread as a log and document my progress. and also to ask questions and receive some feedback along the way. Hopefully this is the correct subforum for such a post and of interest to the members.

My starting point of this journey is: I have been looking for a project SE/30 for a while. I decided the on SE/30 for mostly its era, compactness and upgradability. Several sales didn’t go through until recently. These three were listed on local classifieds and were part of a practitioner’s office. These Macs never moved home until today. From the listing I gather that the right SE/30 powers on, shows a cursor and then throws error that it can find boot media. But since these machines have not seen use or service in a very long time I wont be powering them on for now.

Next, I’m going to do a full disassembly, inspection and some cleaning, just to get a better sense of the state of matters. Will I find exploded batteries? Devastated boards from capacitor leaking? Or some really cool upgrades? Till next time…


IMG_4282.jpeg
 
Last edited:

ph4z

New Tinkerer
May 20, 2025
13
15
3
Log entry #2

Each of the macs has been cracked and inspected; three initial findings below. With the help of some instructions here and elsewhere on the internet, the opening the macs was really simple and really effortless. Even for a novice and with two machines that I suspect were never opened.

My small twist was pulling the handle up slightly backward worked really well for me (obviously with the screen face down and screws removed). I figured that the original opening tools were also meant to spread/separate the case at that location.

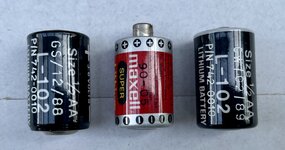
1) The original batteries were in tact on all three boards. I measured the batteries but they were obviously all flat (less than 0.01 V).

IMG_4317.jpeg

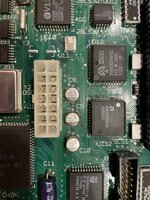
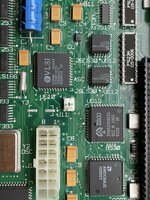
2) There is definitely capacitor leakage on one board. It is worst around C9 were the vias (?? the little dots that go through the boards) are very crusty and not shiny. I’m really not sure how bad this is. What does anyone with more experience think?

IMG_4285.jpeg


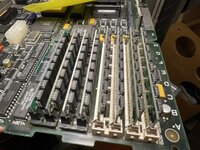
3) One board has a bunch of repairs: a botch wire, four metal clipped RAM sockets and a metal clipped ROM socket.

IMG_4301.jpeg

Next: going to recap all logic (and analogue) boards. I have placed an order with Mouser thanks to JDW’s excellent video on picking capacitors.
 

croissantking

Tinkerer
Feb 7, 2023
103
49
28
Log entry #2

Each of the macs has been cracked and inspected; three initial findings below. With the help of some instructions here and elsewhere on the internet, the opening the macs was really simple and really effortless. Even for a novice and with two machines that I suspect were never opened.

My small twist was pulling the handle up slightly backward worked really well for me (obviously with the screen face down and screws removed). I figured that the original opening tools were also meant to spread/separate the case at that location.

1) The original batteries were in tact on all three boards. I measured the batteries but they were obviously all flat (less than 0.01 V).

View attachment 21561

2) There is definitely capacitor leakage on one board. It is worst around C9 were the vias (?? the little dots that go through the boards) are very crusty and not shiny. I’m really not sure how bad this is. What does anyone with more experience think?

View attachment 21562


3) One board has a bunch of repairs: a botch wire, four metal clipped RAM sockets and a metal clipped ROM socket.

View attachment 21563

Next: going to recap all logic (and analogue) boards. I have placed an order with Mouser thanks to JDW’s excellent video on picking capacitors.
That bodge wire is from factory.
 
  • Like
Reactions: ph4z

MeTheMac

New Tinkerer
Feb 20, 2025
59
12
8
Mars
RetroPods.io
3) One board has a bunch of repairs: a botch wire, four metal clipped RAM sockets and a metal clipped ROM socket.
Very nice finds! Congratulations!!

Bodge wire is a factory modification to fix a certain combination of chips. One of three(?) revisions of the SE/30 board had metal clips pre-installed, so that's a good find! I doubt much work was done on the board.
 
Last edited:
  • Like
Reactions: ph4z

ph4z

New Tinkerer
May 20, 2025
13
15
3
That bodge wire is from factory.
I doubt much work was done on the board.
Thanks for the clarification and the correct spelling of bodge :) (I must have only heard it till now).

If the sockets and bodge wire are factory and a different revision, there are three unique revisions here. Two have a socketed CPU, the other one is soldered in. The later board also has a different sticker on the case.
IMG_4341.jpeg
 
  • Love
Reactions: MeTheMac

ph4z

New Tinkerer
May 20, 2025
13
15
3
Log entry #3: After watching just about every YouTube classic mac repair video, I finally felt confident to repair my three SEs. I also ended up getting additional tooling. While I have a tendency to linger in the prepare phase a bit too long, I am very happy for the virtual experience and additional tools I got.

So I have now recapped, cleaned and tested the three analog boards. All boards definitely had leaking caps to varying degrees. The fish smell in combination with the hot air was nauseating. Due to the corrosion from the electrolyte and thorough cleaning of the pads (followed Branchus Creations’s approach here), and the broader pads of the tantalum, I didn’t have a lot of confidence in the traces run near the caps. I chose to add a layer of new solder mask near the caps, it looks a bit bad up close, but I don’t want to take any risks here.

The current score is 2 out of 3 work (with several minor issues) and 1 board is giving me major video issues.

Can any provide some insights to help me along? Any help is much appreciated :).

Major issue 1: scrambled video​

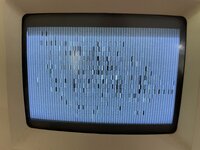
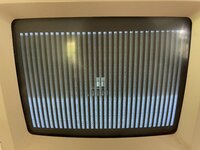
Let’s start with the bad, the board that had the worst corrosion is also the now working board. There is very scrambled video and I can just about make out the mouse moving through the mess. Only once when I pressed interrupt button, there was a pattern of vertical lines that was (slightly more) ordered.
It is no coincidence that this is the board with the most corrosion, I‘ll need to go over all traces. Any thoughts on this would be great.

IMG_4729.jpegIMG_4731.jpegIMG_4736.jpeg


Minor issue 2: sound only works after a brief period​

On one of the logic boards the sounds works only after the unit has been on for half a minute. First there is no sound and all, then it will start with some humming and buzzing from the speakers, then suddenly the sounds works. Also after restarts. When the unit is powered off and left off for a bit (say a minute), the issue start over again. This has me thinking: caps, but I just recapped the logic board, and I tried two different power supplies, but of course both could have issues.

I have uploaded a short video to YouTube with this behaviour:
(apologies the wife decided it was a good moment to turn on the kettle, so you can hear that in the background)

Minor issue 3: one of three SCSI drives doesn’t boot​

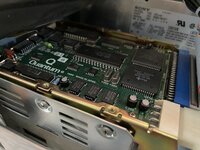
There is one Quantum drive that doesn’t boot, it also look different from the other two. I can hear it spinnig, but other than that there is no noise. It appears as if the top plate was removed, but this could also be design?

IMG_4737.jpeg

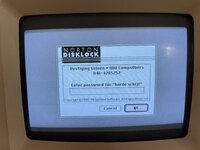
Minor issue 4: drives are locked with Norton DiskLock​

Not really an issue, but I was hoping to find some nice software or get a sense what these machines were used for. Can this by bypassed/cracked somehow?
IMG_4734.jpeg

Minor issue 5: non of the floppy drives work​

I was expecting to need to do some work on the drives, so no suprise here. I made a short video with the current state. Does anyone have a good guide on refurbishing these drives?

Link to the video:

Other findings​

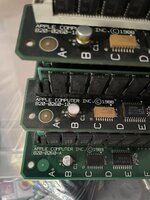
  • All RAMs and ROMs appear to work, at least all lead to a startup chime with the two working logic boards.
  • All screens work and are nice and bright, but the two older units have some slight burn in, the newer unit is perfect.
  • BlueSCSIv2 external boots up! I built it as a kit, so I’m happy it works fine first try.
 
Last edited:

Steve Rieck

New Tinkerer
Mar 24, 2023
60
15
8
My take would be to do a cursory cleaning with IPA of each of the logic boards and then put them aside (to be recapped after) and obviously lose the batteries.

- Then take care of (clean, recap and reflow) the Analog Boards and Yoke board., Clean, lube (and replace the eject gear in) the Floppy Drives and possibly recap the PSU's as well. Check 5v and 12v outputs. Should be just a bit over without any load.
- After all of that, obviously careful attention to the logic boards starting with a recap using polymer tantalum capacitors and any further troubleshooting of the logic boards after which, further repairs will hopefully not be needed.

Once you verify that the Analog Board and PSU are rock solid, you can infer that any further issues are confined to the logic board and go from there.
 
Last edited:

ph4z

New Tinkerer
May 20, 2025
13
15
3

Once you verify that the Analog Board and PSU are rock solid, you can infer that any further issues are confined to the logic board and go from there.
Thanks! However, I already recapped and cleaned the logic boards. The issues described were cross verified on different analog boards. Still, I’ll take your suggestions for creating a rock solid base.

I’m really hoping to receive specific pointers to investigate issues 1 & 2. Maybe these behaviors are familiar to anyone?
 
  • Like
Reactions: Steve Rieck