Advice on PB 145B repair

pfuentes69

Active Tinkerer
Oct 27, 2021
380
290
63
Switzerland
I got for cheap a 145B today. Cosmetically is in good condition. Hinges are a bit stiff but not broken, and it has the rear lid. The power adaptor is missing, but I could find a temporary solution.
I get boot chime and apparently right HD noise. Logic board seems OK, but I get no image.
What would be your advice on from where to start checking? Any good guide to safely disassemble it?
Txs!
 

eric

Administrator
Staff member
Sep 2, 2021
808
1,281
93
MN
scsi.blue
Screen will need to be recapped, but looks salvageable. I'd be wary of powering it on anymore as I had one of the panels short out with cap juice.

Recapping is pretty straight forward - this video shows it a bit but opening is just a few screws and pull out the LCD -

The caps/screen is the same as the 160 - @Mac84 has a guide here https://mac84.net/web/macintosh-powerbook-160-lcd-display-recapping-guide/

One thing to note is that i would also chck the opposite side of the lcd pcb and clean any gunk/juice - thats where mine shorted.

Good luck! It's pretty fun to get these old PowerBooks up and running.
 
  • Love
Reactions: pfuentes69

pfuentes69

Active Tinkerer
Oct 27, 2021
380
290
63
Switzerland
Good luck! It's pretty fun to get these old PowerBooks up and running.
Super thanks!
I'll document myself and get the replacement parts.
I'm OK with the soldering job but I must say that the part that scares me the most is to disassemble it without breaking the plastics...
 

pfuentes69

Active Tinkerer
Oct 27, 2021
380
290
63
Switzerland
Well... I received the caps and I got into the job... The disassembly was pretty straightforward thanks to the videos I could watch on this.
camphoto_758783491.jpg

The caps had leaked, but at least there was not corrosion

And the result was quite good!
IMG_1965.jpeg

Even the HD works, although it makes funny noises, so I'll replace it soon by a BlueSCSI. Now I need some nicer solution for the power supply and see if there's any way to have a working battery... maybe is possible to remove the old cells and put something inside that can be recharged and take the load.

Thanks for your advices, it helped a lot!
 

Daniel Hansen

Tinkerer
Oct 29, 2021
164
120
43
Nice! Congrats. :D

You can definitely repack the battery - I've done a few. 10x 1.2v NiMH flat-top AA's -- two groups of 5 in series, joined in parallel. The higher the mAh the better of course - just make sure they're all the same.
 
  • Like
Reactions: pfuentes69

pfuentes69

Active Tinkerer
Oct 27, 2021
380
290
63
Switzerland
Nice! Congrats. :D

You can definitely repack the battery - I've done a few. 10x 1.2v NiMH flat-top AA's -- two groups of 5 in series, joined in parallel. The higher the mAh the better of course - just make sure they're all the same.
Thanks!
Any advice on how to open the battery case with the least damage?
 

Daniel Hansen

Tinkerer
Oct 29, 2021
164
120
43
I use an Xacto knife and slowly work it around the seam of the case. It doesn't take long, but don't rush it.

Once you get in there, make sure to salvage the temp sensors for reuse.

If you have access to a spot welder, the job is easy. I don't, so I used tabbing wire and solder, and it works fine.

Extra Tinker Points (TM) if you make your own spot welder.
 

pfuentes69

Active Tinkerer
Oct 27, 2021
380
290
63
Switzerland
I use an Xacto knife and slowly work it around the seam of the case. It doesn't take long, but don't rush it.
Once you get in there, make sure to salvage the temp sensors for reuse.
If you have access to a spot welder, the job is easy. I don't, so I used tabbing wire and solder, and it works fine.
Extra Tinker Points (TM) if you make your own spot welder.
Do you happen to have photos on the process, or the battery setup?
 

Daniel Hansen

Tinkerer
Oct 29, 2021
164
120
43
Do you happen to have photos on the process, or the battery setup?
No, but I do happen to have a couple dead batteries open on my bench and took some pics (attached):
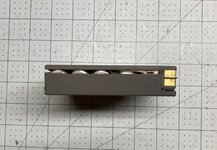
  • First image shows the open seam. Note the part of the case around the terminals is not welded, it just separates. You only need to work around the seam on the top side. I just slowly, lightly cut with a scalpel - razor or x-acto will also work, a thin very sharp blade - all around in the groove of the seam. Takes maybe 10 or 15 minutes, tops. I do it on the couch while watching tv.
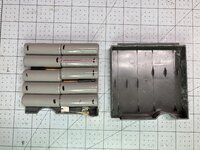
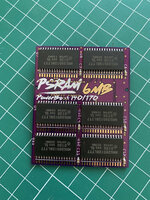
  • The second image shows the cover off and the arrangement of batteries inside --- the black lines on the batteries note the negative ends. The black rectangles are temperature sensors, which are - in this case - connected between the last two batteries in each series.
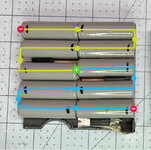
  • The third image illustrates how the batteries are connected.
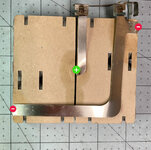
  • The fourth image shows the reverse of the assembly, showing how the series connect to the terminal strips.

The only parts of the assembles I reuse are the sensors and the terminal strips. Sometimes the insulating paper can be salvaged, but really depends on the glue or the state of corrosion. If the paper can't be salvaged, you can just recreate it with card stock or something similar.

Note that not all of the Apple branded PB batteries are the same inside, they can differ slightly. But the general idea is the same.

I don't have any photos of the tabbing / repacking process I use, and I don't have any flat-top batteries handy to replicate it, but for each battery connection it's the same steps. However, I really want to advise caution... I actually recommend using a spot welder and nickel strips for this, but I'm reckless so here's a video that goes through the same steps I follow:


Note that it's very important to use a HOT iron (800+) and BIG tip to minimize soldering time... you can damage the battery if it gets too hot, or even result in thermal runaway in extreme cases. The sanding and fluxing also keeps things quick.

Also, don't glue the batteries together as demonstrated in the above video, since the arrangement is obviously different in the PB case.

There are also flat-top NiMH batteries that have tabs pre-installed if you're concerned about soldering directly on the terminals or don't have an iron that can get hot enough. I've used them once, and found it kinda fussy, but it worked.
 

Attachments

  • IMG_0935.jpg
    IMG_0935.jpg
    701.5 KB · Views: 55
  • IMG_0936.jpg
    IMG_0936.jpg
    1.5 MB · Views: 66
  • IMG_0936b.jpg
    IMG_0936b.jpg
    352.8 KB · Views: 61
  • IMG_0937b.jpg
    IMG_0937b.jpg
    569.8 KB · Views: 67
Last edited:
  • Like
Reactions: pfuentes69

Daniel Hansen

Tinkerer
Oct 29, 2021
164
120
43
Nice!

Depending on your board, the PRAM battery is either soldered in or in a coin holder. If a holder, then obviously easy, just a CR2032. If soldered, you can use a Panasonic VL2330-1 or install a coin holder w/ CR2032. My 145B has the holder, which is nice.
 

pfuentes69

Active Tinkerer
Oct 27, 2021
380
290
63
Switzerland
Nice!

Depending on your board, the PRAM battery is either soldered in or in a coin holder. If a holder, then obviously easy, just a CR2032. If soldered, you can use a Panasonic VL2330-1 or install a coin holder w/ CR2032. My 145B has the holder, which is nice.
Thanks. It’s soldered.
Any holder would fit or needs to be of a particular kind?