TechnikTobi

New Tinkerer
Oct 1, 2025
3
0
1
Austria
Hi everyone! A few years ago I got a Color Classic that didn't work properly (can't recall the exact symptoms at that point - again, it has been a while...). So I performed the obvious operations: Recapping the logic board with Tantalum capacitors and the more "error prone" caps from the analog board as lined out by @Branchus. At that point I got the CC to boot up to the boot-media-question-mark (original HDD tested & declared dead, no replacement yet). However, the machine didn't seem to make any attempts at reading a floppy when inserted. The question mark kept flashing, the cursor did move but no noise whatsoever from the floppy drive (already did a service on that, tested it and works). Also in some cases, nothing happened at all, no life after switching on power and pressing the boot button from the keyboard (tried different keyboards, all work on other machines). That is where I left the project some time ago.

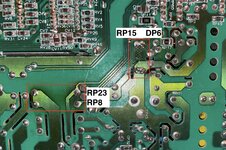
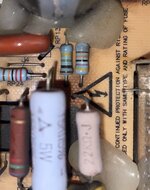
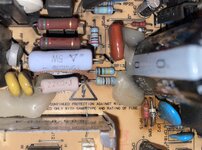
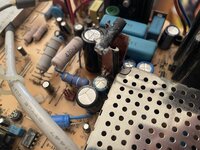
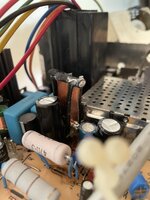
A week ago or so I stumbled upon the component upgrade video by @JDW and the tip for using an even cooler running diode. Inspecting the diodes on my CC's AB showed the same discoloration on the board, so I replaced the two diodes DL21/22 with a DOI-201 packaged 1N5355B + a copper heatsink (looks a bit weird, I admit, but should get the job done. The two copper plates are held together at the top so that they don't vibrate using a bit of heat shrink that is additionally hardened with a bit of super glue), RL22, RL62, RF11, DF2 and the surrounding electrolytic capacitors that haven't been replaced yet (just in case they were affected by the heat - I know, not really necessary, but if I am already working on that area...).

Unfortunately this is not enough: There is a picture (although with a strong blue tint that doesn't really come across on the video I uploaded and a bit of a geometric distortion at the top and bottom, though I suspect that is more of an adjustment issue) and the CC tries to boot but shuts down/looses power after less than a minute (see video). Sometimes it gets to the boot-media-question-mark, but not always. Putting in a floppy doesn't seem to make a difference, no audible attempt at trying to read anything from that. With a bit of help from my dad we were able to read the voltages on the HDD power connector (as there isn't a disk in there) in the short time it powers on but nothing out of the ordinary there either (just shy of 12V and 5V).

This is where I'm currently stuck and need help/advice on what to take a look at next. I still suspect that the analog board is the (main) culprit here as the CC gets to the point where I can see and move the cursor, so I don't think its the logic board (also, the blue tint of the image) - on the other hand, the floppy drive showing no signs of life could either be a power issue there or a failure of the floppy controller on the LB? But then, why would this cause the machine to suddenly lose power? Any help or advice is greatly appreciated! Please feel free to ask me for any additional information required to troubleshoot this in case I missed something!
 

Attachments

  • 1.jpeg
    1.jpeg
    187.4 KB · Views: 5
  • 2.jpeg
    2.jpeg
    142.3 KB · Views: 5
  • 3.jpeg
    3.jpeg
    182.7 KB · Views: 5
  • 4.mp4
    12.1 MB · Views: 0

JDW

Administrator
Staff member
Founder
Sep 2, 2021
2,185
1,802
113
54
Japan
youtube.com
@TechnikTobi
Welcome to TinkerDifferent!

Congrats on doing the Beefy Component Upgrade and for heat sinking your DO-201 Zener Diode! I enjoyed looking at your photos. Should be interesting to see how long the superglue holds that heatshrink atop those heatsinks.

Anyway, I'm glad you used an insulator (heat shrink tubing) and not a piece of metal. :) I don't think people will solder a deal short across their Zener, but you never know what people will do at times.

In regards to your power instability, it's important to know that no fluid-filled electrolytic capacitor has eternal life. Any such cap more than 25 years old and especially those used in hot conditions like the CC Analog Board needs to be replaced. Yes, even the largest cap on that board too. They ALL must be replaced with 105°C rated capacitors to ensure you get a reasonable life from them.

I also suggest making sure the LEAD SPACING is correct for replacement caps too, especially for the big ones, because you don't want those sitting up on their legs. The caps surrounding the DL21/DL22 diode area absolutely must be replaced because they have had the hottest heat exposure over the years. Doing that alone may resolve the sudden shutdown problem. And if it doesn't, then it's time to take a closer look with a magnifying glass at traces on the solder side and any burned components, especially transistors on the component side.

All connectors and the flyback and power switch need to have their solder reflowed. This is an absolute must. Could be that alone is the main problem, and as the machine heats up, a cracked solder joint comes apart enough that the machine loses power. Go over all solder joins with a magnifying glass. I did that on my Analog Board. Yes, it is time consuming but necessary.

Once your machine remains on without issue, you can then do the CRT Adjustments at back, in accordance with my video on that here...


I look forward to hearing how it goes!
 

TechnikTobi

New Tinkerer
Oct 1, 2025
3
0
1
Austria
Hi, thanks for the quick reply! Yes, I'll eventually update on how this heat shrink tubing construct holds up over time.

Okay, so what I get from this is that for now I should just replace all caps that are still original - is there anything else I could/should replace as a precautionary measure? For example, upon further inspection, I noticed some similar heat-related discoloration of the board around DP6 & RP15 (next to the big 330µF/400V capacitor CP30) and RP8 & RP23 (also adjacent to CP30). Any experience on replacing those? I also read about others with failing RIFAs, optocouplers, ... What about those? In the meantime I'll reflow the solder joints... Any advice on how to do that with all the SMD components on the solder side?
 

JDW

Administrator
Staff member
Founder
Sep 2, 2021
2,185
1,802
113
54
Japan
youtube.com
I noticed some similar heat-related discoloration of the board around DP6 & RP15 (next to the big 330µF/400V capacitor CP30) and RP8 & RP23 (also adjacent to CP30). Any experience on replacing those?
I've never touched those on my board. Maybe if you could share some clear photos of that area, I could better comment about them. Maybe they are just dirty and not burned. Put some IPA on a tissue and wipe them to see if the grime comes off. If it doesn't wipe off, they may have burned. But typically those components in that area don't burn.

Here's a high resolution photo of my board prior to my Beefy Component Upgrade...

Analog-Board-Top-JDW.jpg

And here's a hi-rez photo of the bottom of the board, after the beefy component upgrade, but only part way through the 84V 13" Hi Resolution Mod...

Analog-Board-Btm-JDW.jpg
 

TechnikTobi

New Tinkerer
Oct 1, 2025
3
0
1
Austria
Thanks for the high-res images! Comparing them to images I took a few days ago prior to the component upgrade there is definitely some discoloration on both sides of the board and not just some dirt (though you are right that I should also go over the entire board with some cotton swabs and IPA).
 

Attachments

  • bottom.jpeg
    bottom.jpeg
    1.4 MB · Views: 8
  • top2.jpeg
    top2.jpeg
    557.1 KB · Views: 8
  • top1.jpeg
    top1.jpeg
    1,011.5 KB · Views: 9

JDW

Administrator
Staff member
Founder
Sep 2, 2021
2,185
1,802
113
54
Japan
youtube.com
Very interesting. Thank you for the photos. Certainly looks like DP6 and RP15 have been compromised due to heat. But resistors RP23 and RP8 are raised up off the board, and yet the board directly under them is charred. Very odd.

Not sure if he'll reply, but I'd like to ask @techknight if he's seen charring in that area before. He has lots of experience repair these boards, so it could be something he has seen. I will tag @Kay K.M.Mods as well. I myself only have the one Color Classic, so I am only experienced on the board I have in front of me. Also, @Paolo B , would you happen to have any thoughts?
 
  • Like
Reactions: TechnikTobi

Paolo B

Tinkerer
Nov 27, 2021
287
171
43
Switzerland
I have three CCs, each of them at a different mod level. Besides the
Thanks for the high-res images! Comparing them to images I took a few days ago prior to the component upgrade there is definitely some discoloration on both sides of the board and not just some dirt (though you are right that I should also go over the entire board with some cotton swabs and IPA).
You seem to have some corrosion on the lead of DP6, looks like a dent in the photo.
 

Paolo B

Tinkerer
Nov 27, 2021
287
171
43
Switzerland
Very interesting. Thank you for the photos. Certainly looks like DP6 and RP15 have been compromised due to heat. But resistors RP23 and RP8 are raised up off the board, and yet the board directly under them is charred. Very odd.

Not sure if he'll reply, but I'd like to ask @techknight if he's seen charring in that area before. He has lots of experience repair these boards, so it could be something he has seen. I will tag @Kay K.M.Mods as well. I myself only have the one Color Classic, so I am only experienced on the board I have in front of me. Also, @Paolo B , would you happen to have any thoughts?
The symptom reminds me of a totally similar issue I had with a laser printer that would systematically shut down after a few secs. Eventually it was a blown resistor that would shut down the optocouplers. I have no clue, though, if the CC and derivatives do feature such a safety circuit or (unlikely) a thermally regulated one.
The very bluish tint during the few secs the machine is alive are surely speaking for some issue in the video circuitry.
First off, though, I would try to disconnect the hard drive and the floppy and see if it remains alive, as the timing of the shut down seems to be quite consistent with the one at which the OS should be loaded.
 

JDW

Administrator
Staff member
Founder
Sep 2, 2021
2,185
1,802
113
54
Japan
youtube.com
Solder joins for these two components look "factory" done...

1759440354900.png


But these solder joints look either compromised or someone desoldered them and resoldered without flux...

1759440407756.png


The problem is that there is no Schematic for the CC Analog Board, so problem (burned) components need to be traced by hand to see where the current is coming from and where it is going.

In other words, it's more than the aforementioned 4 components possibly being bad. Something caused them to burn.

In the case of DP21 and DP22, we know the reason. It's bad to use two Zeners in parallel, because one could heat more than the other. And they both were only rated for about 1.25W, originally. And they were clearly shunting more current to ground than they could handle without being heatsinked. Even so, the AMOUNT OF CURRENT running through them was the issue. Had there been less current flow shunted through D21 and D22, they wouldn't be charring boards.

In like manner, the reason for excessive current flow through the 4 aforementioned components needs to be determined. And the mystery of why the board is charred beneath two very large resistors (RP23 and RP8) which are lifted up and off the board needs to be determine. Is it really possible for those two huge resistors to get hot enough that high up off the board to char the board beneath them? That is really odd!