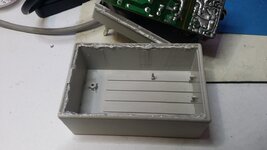
I've seen quite often people breaking into these plastic cases that are kind of welded together, usually batteries and power bricks, with various tools and mixed cosmetic results. I found a technique that minimizes the damage and allows assembling back the device for reuse. I documented it in a few videos, but it's the kind of things that would also warrant a searchable text version, so here it is.
So we're left with mechanical solutions. I've seen many people use tools like a Dremel and other things, with "mixed" results. Yes the case is open, but often it looks terrible and can't even be reassembled.
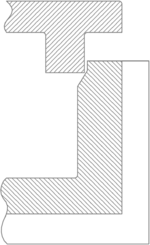
Also, the joint isn't usually in line with the faces but actually inside a groove, that's called a shear joint (thanks Wikipedia), which means we might need to go at an angle:
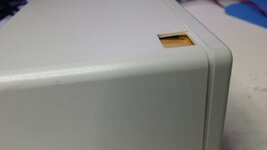
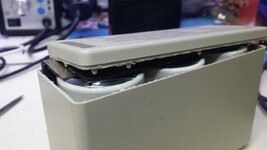
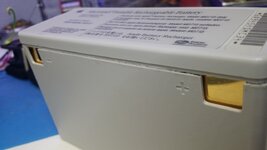
Here on this Macintosh Portable Rechargeable Battery we can clearly see the melted joint on the bottom left of the seam.
I initially tried with 1cm wide blades, and though it did work, I had to hit quite hard, and I managed to knock out some coils inside the power supply I was opening, breaking their leads. Because the force was transferred to them and they vibrate mechanically. That's why you see glue on these large components, to limit vibrations that could damage them (indeed, only those which didn't have glue broke).
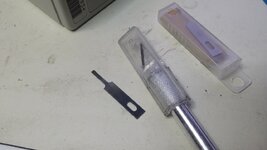
So I found narrower blades, 2mm wide, and now it works every time, almost perfectly. Unless you get distracted and hit elsewhere. See at the end for the link.
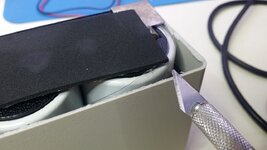
Find the joint inside the seam, and target it at an angle with the blade. Start at a place where it's visible, like contacts or connector holes.
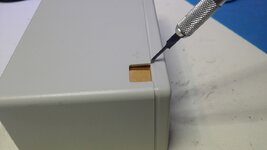
Tap the other end of the exoknife with the rubber mallet to puncture the joint. Then move the blade a few millimeters further along the joint, hit again.
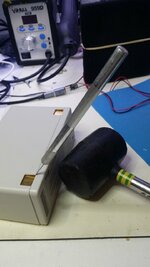
Eventually you'll reach a point where you can use lever or prying tool to start to separate the parts and see the joint better.
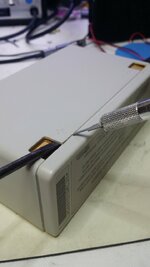
Continue along the other seams, making sure you stay on the right side (it's not always the same).
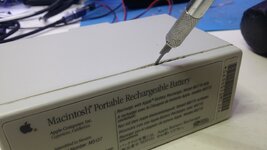
Can is open, time to serve dinner!
I used to not like hot glue much, because it barely sticks where I tried to use it. But for this usage I found it quite suitable, exactly because it can be melted again. However, if we want our assembly to not look ugly, we need to control the amount of glue we pour everywhere. But, hot glue starts to solidify quickly, even though it takes quite a while to cool down completely. But that's enough to prevent joining the parts together correctly.
So we'll do it as a two steps process instead: put glue where we need it, then heat it up again when assembling. This allows precisely controlling the amount of glue, and assembling properly.
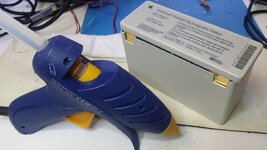
First, we'll try to put a thin wire of hot glue along the seam, rather on the inside so it spreads inward rather than outward where we'll have to remove it for cosmetics. It is not strictly necessary to put glue on both parts, though it could help I suppose. Take your time here, we'll re-heat it anyway.
Now we will start heating around where the glue is, and soon face the parts together. Continue heating around the seam, you should see the glue becoming more transparent and fluid. You can rotate the item while heating as it's less handy to target from behind.
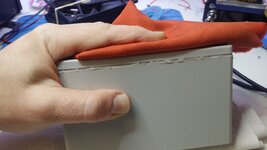
When you think the glue is hot enough everywhere, put down your gun on the holder, take a folded cloth to spread the force around and avoid burning yourself, and press it against the top part with as much force as possible (you might need to stand up to push more)… but not too much, as some cases have brittle plastics. If you hear something cracking just don't force more. Keep pushing for a few minutes to leave time for the glue to solidify.
Don't clean too much though. I also like perfection, but hot glue wants to stay in one piece, so removing a protrusion might actually pull some of the inside glue and weaken the bond. You'll want to cut it correctly before pulling it. But then, blades might add scratches to the seam.
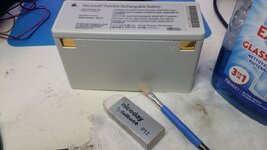
There's usually also some thinner traces of glue around, these can be removed with things like a pencil eraser, or some Windex and a cloth, or a brush.
Videos on youtube:
The problem
I've often heard of "ultrasonic welded plastics" but I wasn't sure of how they did that. Turns out it's the right term. It seems it concentrates mechanical vibration with specifically designed "energy directors" shapes into a small section of the material where friction melts it and welds it to itself. This means we can't just use a simple heat source (hot air gun or whatever) or a chemical to soften any glue, because there's no glue. Heating would be uncontrolled and melt the rest of the case as well.So we're left with mechanical solutions. I've seen many people use tools like a Dremel and other things, with "mixed" results. Yes the case is open, but often it looks terrible and can't even be reassembled.
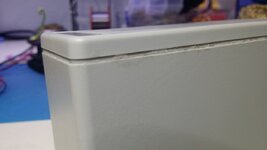
Also, the joint isn't usually in line with the faces but actually inside a groove, that's called a shear joint (thanks Wikipedia), which means we might need to go at an angle:

Here on this Macintosh Portable Rechargeable Battery we can clearly see the melted joint on the bottom left of the seam.

Breaking in
What we need here is to direct the force to a localized area of the plastic, just like they did with the sound. So we use a blade, but a very narrow one, so the impact doesn't spread to a chunk of plastic, which means putting more force into it to break it apart, but instead cut into small sections one at a time.I initially tried with 1cm wide blades, and though it did work, I had to hit quite hard, and I managed to knock out some coils inside the power supply I was opening, breaking their leads. Because the force was transferred to them and they vibrate mechanically. That's why you see glue on these large components, to limit vibrations that could damage them (indeed, only those which didn't have glue broke).
So I found narrower blades, 2mm wide, and now it works every time, almost perfectly. Unless you get distracted and hit elsewhere. See at the end for the link.

What you need
- A cloth or mat on the table to protect the case from scratches
- An exoknife
- The specific blade, see below
- A rubber mallet (a small hammer could probably to if you're careful)
- Eventually some plastic or metal prying tools
- Tools to clean up (blade, file…)
Let's cut it!
Replace your regular exoknife blade with the 2mm one.Find the joint inside the seam, and target it at an angle with the blade. Start at a place where it's visible, like contacts or connector holes.

Tap the other end of the exoknife with the rubber mallet to puncture the joint. Then move the blade a few millimeters further along the joint, hit again.

Eventually you'll reach a point where you can use lever or prying tool to start to separate the parts and see the joint better.

Continue along the other seams, making sure you stay on the right side (it's not always the same).

Can is open, time to serve dinner!

Cleaning up
There will be shards and other parts left from the work, removing them will help with reassembly, for that you can use a blade or a file maybe…
Some tips
- Observe. The solder joint is not always on the same side of the seam on the same case because of molding or other constraints. Finding pictures of the already opened gear helps.
- Take your time, It's easy to break stuff, harder to fix them.
- Using a finger to guide the blade can help it from deriving, but beware, it can break if you hit too hard!
- Don't cut too far in. Sometimes the electronics is just behind the plastic and you can damage it (I already did once or twice). I haven't tried yet, but maybe it can help to put some heatshrink tube around the blade to restrict it to the required travel and act as a bump stop.
- PSU bricks usually have thicker plastic and a kind of double shear joint, like a T inside a U, which makes it harder, but still doable, just be careful and patient. I've fixed and reassembled several laptop PSUs already this way.
- Some people suggested heating the blade to help it penetrate the joint. While I already modded a soldering iron with a blade to cut into connectors, it was on an unregulated iron so the result was not pretty, melted too much, and worse, the melted stuff re-solidified right after the blade has passed. So maybe on a temperature controlled iron it could work, but then you can't use the mallet to tap on the soldering iron… I've found just using the blade and mallet to work well enough, it just takes time. If you want to try and share the results, please do
Gluing it back on
After you've fixed the thing (you can do it!), or replaced the guts with a more recent thing, now we want to put it back on, ideally so it can still be taken apart again without more breakage.I used to not like hot glue much, because it barely sticks where I tried to use it. But for this usage I found it quite suitable, exactly because it can be melted again. However, if we want our assembly to not look ugly, we need to control the amount of glue we pour everywhere. But, hot glue starts to solidify quickly, even though it takes quite a while to cool down completely. But that's enough to prevent joining the parts together correctly.
So we'll do it as a two steps process instead: put glue where we need it, then heat it up again when assembling. This allows precisely controlling the amount of glue, and assembling properly.
What you need
- A hot glue gun with a glue stick
- An temperature controlled hot air gun that can go as low as 150°C (a heat gun will probably melt the plastic directly)
- A cloth to protect your hand
- Tools to clean up, see below
Applying hot glue

First, we'll try to put a thin wire of hot glue along the seam, rather on the inside so it spreads inward rather than outward where we'll have to remove it for cosmetics. It is not strictly necessary to put glue on both parts, though it could help I suppose. Take your time here, we'll re-heat it anyway.
Reassembly
Get your hot air gun, and set the temperature to something like 150 to 170°C. You may want to bump it up a bit, but you really don't want to go past 200°C, as most plastics will already melt there. For precious things you might want to test on the inside to see if the plastic can withstand this temperature.Now we will start heating around where the glue is, and soon face the parts together. Continue heating around the seam, you should see the glue becoming more transparent and fluid. You can rotate the item while heating as it's less handy to target from behind.
When you think the glue is hot enough everywhere, put down your gun on the holder, take a folded cloth to spread the force around and avoid burning yourself, and press it against the top part with as much force as possible (you might need to stand up to push more)… but not too much, as some cases have brittle plastics. If you hear something cracking just don't force more. Keep pushing for a few minutes to leave time for the glue to solidify.

Cleanup
Now that it's all back in one piece, we want it to look as stock as possible, so we'll try to remove as much visible glue as possible. For this you can try various tools to cut into it, like thin plastic tools, blades (but beware scratches), or your finger nails.Don't clean too much though. I also like perfection, but hot glue wants to stay in one piece, so removing a protrusion might actually pull some of the inside glue and weaken the bond. You'll want to cut it correctly before pulling it. But then, blades might add scratches to the seam.
There's usually also some thinner traces of glue around, these can be removed with things like a pencil eraser, or some Windex and a cloth, or a brush.

Some more tips
- You can adjust the joint if some part misses glue: put some more, and use a thin tool to push it inside the seam, eventually re-heat it and press again. Then clean up again.
- The good thing about hot glue is it can be melted again, so if the device fails or you need to recap it again or whatever, you can just use a hot air gun around it and reopen it.
The result
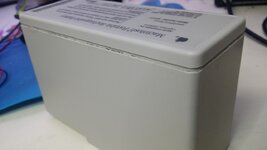
Now I have a "brand new" Macintosh Portable Rechargeable Battery", and the power supply will need to receive the same treatment for recapping.


Links
The blade I use: https://aliexpress.com/item/1005006673626131.html "NO 4A Blade" But you can probably find it elsewhere too.Videos on youtube:
Last edited:


