IIci restoration chances

blturner

New Tinkerer
Sep 12, 2022
11
8
3
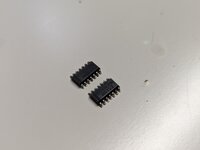
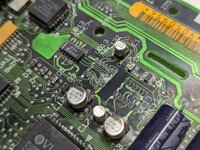
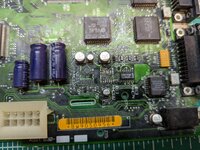
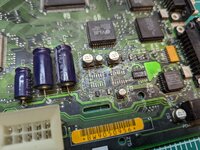
I received a IIci recently and I was planning to attempt my first re-cap with it. When I opened the case, everything looked good except I noticed two components which had broken off during shipping. Luckily, I found them inside the case with a fair bit of corrosion. Upon further inspection, I noticed more corrosion on the board. I’ve cleaned it up a bit, but haven’t soaked it yet to try to release the majority of the grime. The area where the components broke off is causing me some concern, as I’m not sure if it looks like there might be trace damage where the components go back.

I haven’t done much electronics soldering beyond model train DCC chips, which are quite small. So I’m wondering if this might be a bad project to start with?
 

Attachments

  • 8EFB8752-4CD8-446A-AD66-B95EBA6D4B7F.jpeg
    8EFB8752-4CD8-446A-AD66-B95EBA6D4B7F.jpeg
    519 KB · Views: 94
  • 56219F24-480B-4D01-B79F-489295D8D654.jpeg
    56219F24-480B-4D01-B79F-489295D8D654.jpeg
    1.6 MB · Views: 102

KennyPowers

Active Tinkerer
Jun 27, 2022
249
297
63
That kind of corrosion and damage is common on that part of the board with all the leaky capacitors in that area. Mine was worse than that (I had to replace all 3 of those chips and another elsewhere on the board), and my IIci works great now. That was my first time finding broken traces and replacing surface mount ICs like that, but with the right tools and watching some YouTube videos, it wasn't that hard. So I wouldn't call it a bad project to start with since it'll be more fun and interesting than just blindly swapping out some capacitors. Give it a shot!
 
Last edited:
  • Like
Reactions: blturner

blturner

New Tinkerer
Sep 12, 2022
11
8
3
That kind of corrosion and damage is common on that part of the board with all the leaky capacitors in that area. Mine was worse than that (I had to replace all 3 of those chips and another elsewhere on the board), and my IIci works great now. That was my first time finding broken traces and replacing surface mount ICs like that, but with the right tools and watching some YouTube videos, it wasn't that hard. So I wouldn't call it a bad project to start with since it'll be more fun and interesting than just blindly swapping out some capacitors. Give it a shot!
That‘s encouraging, thanks!
 

blturner

New Tinkerer
Sep 12, 2022
11
8
3
Okay, well I just found a re-capping video from @Branchus where he fixes these exact chips! Not sure how I missed it before, doesn’t look too daunting so I’ll give it a go once I collect all the materials. 🙏
 
  • Like
Reactions: Daniel Hansen

3lectr1c

Active Tinkerer
May 15, 2022
619
289
63
the United States
www.macdat.net
Good luck fixing this IIci! And a word of advice - if it's your first time soldering, or even if it's your first time soldering surface mount ICs, always remember to practice on a junk board first. The best way to screw up is to dive right in on the board that matters.
 
  • Like
Reactions: blturner

rikerjoe

Tinkerer
Oct 31, 2021
141
216
43
My IIci restoration project last summer also required a repair in that exact same area with the same chips. You can read about it at this thread here. I’m by no means an expert, but it wasn’t too daunting of a task. My IIci is purring like a champ.
 
  • Like
Reactions: blturner and retr01

Performa430

New Tinkerer
Apr 14, 2022
11
2
3
USA
My IIci board looked bad as well. After recapping and testing each leg of those three chips for continuity, it wouldn't boot. I threw it in the ultrasonic cleaner, then it booted right up. I'm a believer in the ultrasonic cleaner now!
 

XKSTEVE

New Tinkerer
Nov 2, 2022
29
15
3
Somerset, United Kingdom.
Yep agree with all comments thus far. I actually keep a small stock of those ICs for this exact reason. My own IIci was fine though as I think I caught it in time before the caps went bad. It’s quite an easy job if you have the right tools to do it, just check every trace before you do any reworking and once you’ve cleaned the board prior to re soldering, take photos just in case you need to test continuity on the chip pins as it is way easier if you have good quality photos, this is something I do with the microscope camera on every recap I do of others but your trusty phone camera does a good job these days.
 
Last edited:
  • Like
Reactions: blturner

blturner

New Tinkerer
Sep 12, 2022
11
8
3
My IIci board looked bad as well. After recapping and testing each leg of those three chips for continuity, it wouldn't boot. I threw it in the ultrasonic cleaner, then it booted right up. I'm a believer in the ultrasonic cleaner now!
How's a dishwasher compare to the ultrasonic cleaner? 🙃
 

blturner

New Tinkerer
Sep 12, 2022
11
8
3
Some good news to report: last night I sat down and began removing corrosion from the pads with an xacto knife. They cleaned up well enough to take some new solder and I was able to reattach the HC132 components that had fallen off. @KennyPowers was kind enough to mail me some extras from his IIci repair so I used new replacements instead of the ones that fell off the board. It’s my first attempt at soldering SMDs so it doesn’t look pretty, but I was quite pleased that the machine booted right up on the first try! This IIci will live, next up is to re-cap it.
 

Attachments

  • 0E42A532-72B4-41F1-ADA8-057028B42974.jpeg
    0E42A532-72B4-41F1-ADA8-057028B42974.jpeg
    1.7 MB · Views: 52
  • 32362A41-C8A4-4CB7-8D61-1727E1A8769B.jpeg
    32362A41-C8A4-4CB7-8D61-1727E1A8769B.jpeg
    2.1 MB · Views: 59
  • 38D9AB3A-4891-4CB7-8AC8-65A8910F47A7.jpeg
    38D9AB3A-4891-4CB7-8AC8-65A8910F47A7.jpeg
    1.9 MB · Views: 59