
non embedded imgur.com/gallery/imac-sleeper-build-UUrxatb
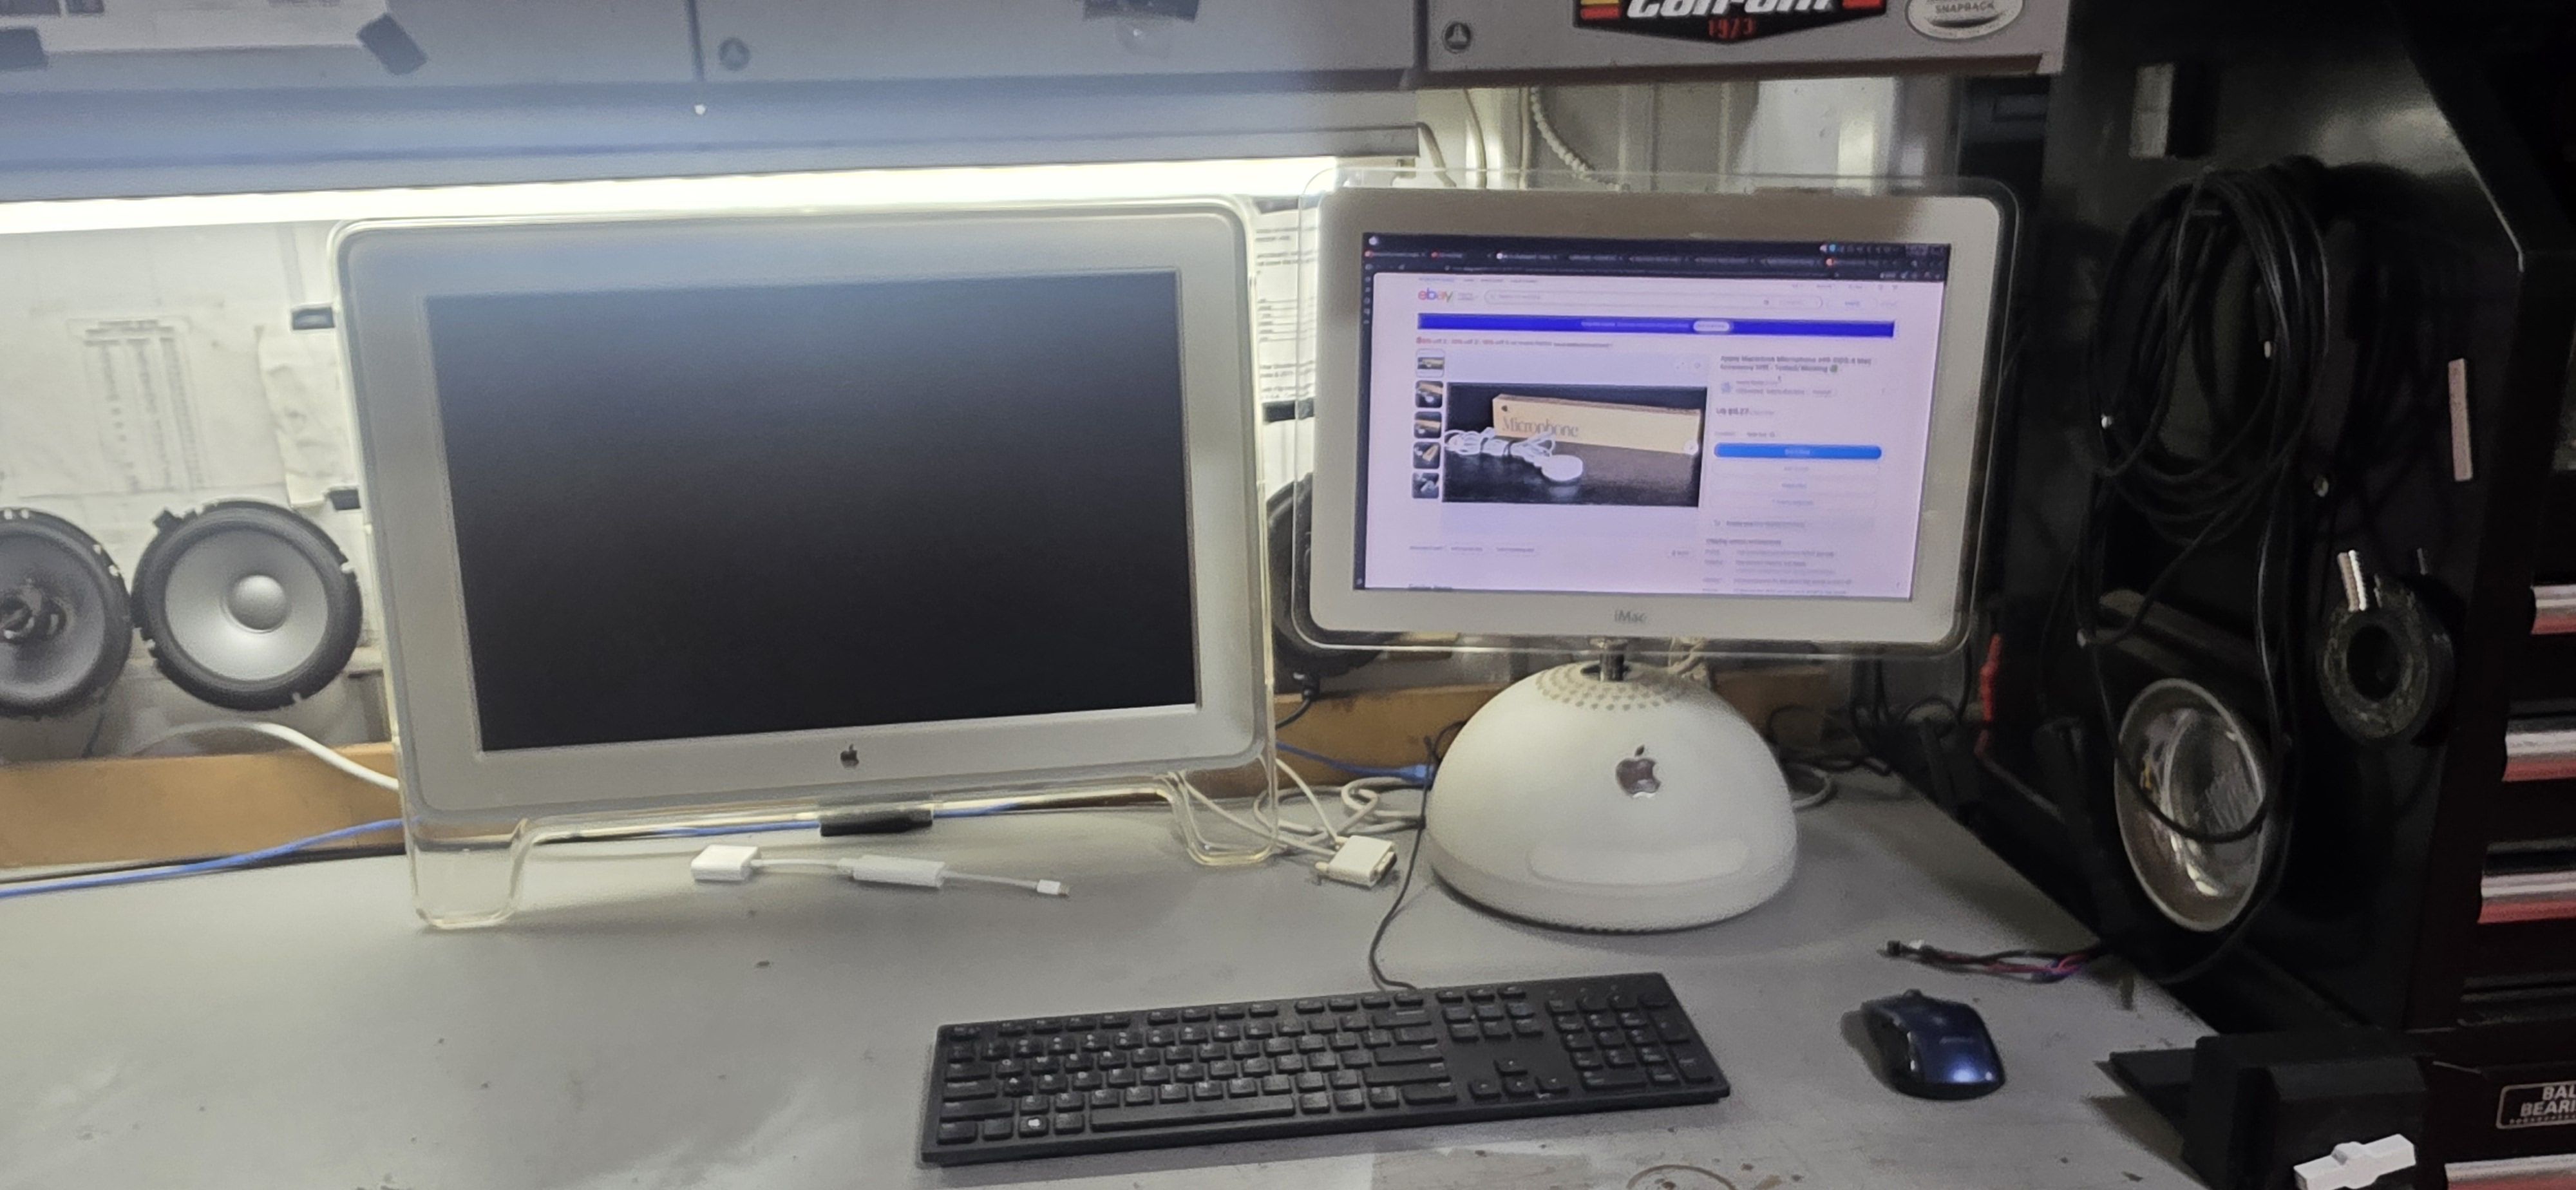
so i thought id share, not sure what place to put this but this build took me most of the year. i got a couple iMACs for free and got a crazy idea to put something modern into one of them. in the end i wound up with a samsung panel, i5 intel, and a radeon GPU.
some of you might ask why not a mac mini? well at the time there was not good Egpu support and i wanted to game, also EVERYONE has alrady done that so... i took a different route. at first i thought a micro or mini itx system and that would actually fit! there were some boards from asrock where id be able to drop a off teh shelf setup in there. so why not? the dome.
as it turns out, the dome proved to be a surprising (/s) design constraint. my square area reduced drasticly as i went up so i was unable to raise the itx board above a video card OR put a card over the board. i did find some low profile cards that could fit but their performance was so poor that a moden intel igpu would have been about the same. i wasnt willing to go that route....
with out any idea of what fits where, i started looking at physical sizes of things and cutting out cardboard. ca gluing templates to see what might fit! this actually worked very well but it was hard to find the physical specs. newegg had a good sort by but as it happens, thats only length of a card, not height or thickness so it was into each products spec page and trial and error....
i think i started by sourcing a replacement panel bezel/housing. my imacs were 15" models and i wanted a 17 wide. they are hard to find for a price but i came across a ebay store that turns old macs into art work. he makes real lamps out of these guys and had a warehouse FULL of parts. so i got a full, complete top assembly minus the LED panel. however go figure.... its TOTALLY different from the 15. screw holes, cables, thickness, mounting, all ofit... none of it fit! it wasnt hard to drill new hols after making a jig, i tig welded up the old holes and got it together.
at this point i should mention, i started this in febuary i think? when i got the two systems. it is now november LOL. once id started, i knew id finish, i just had no idea what hte final build would be but i wanted it to NOT be what everone else had done.
quite a bit of amazon, facebook market, and ebay time while i looked for a 'computer' as now id decided a NUC was my only choice. what i quickly ran into was PCIE lane issues. i needed wifi, a m.2 that was 4.0 spec to run the GPU and i still needed a NVME or some kind of non 3.5 drive. even if i pulled the 3.5 appart i dont think i could have fit that in there. this landed me on a single height intel NUC i5/i7. in benchmarks there was a less than 10% difference in performance between teh two but there is a boosted power/thermal budget on the i7 and the i5 with tweaked boost settings allowed better performance than the i7 so... i went i5. the other nice thing was a m.2 for wifi, and a m.2 bkey sata, AND a m.2 4.0x4 that ran to the CPU die and not a controller. it came iwth 8gb of ram but that was a cheap upgrade. (i actually run into issues with only 16 but idk what to do about that yet). a bonus was this system had a 4 pin internal 12v PSU plug so that made life easier, no power brick.
once i had that, it was down to the PSU, GPU, and wiring. id setteled on a 6600/7600xt radeon from power cooler. a lack of hackintosh support for the 7XXX put me on the 6 and its about the same speed. also takes a good OC. but it HAD to be the power cooler red devil as its the only one that would fit! people complained about tyhe tiny crapy heatsink but thats exactly what i needed!
while i waited i started autocad and 3d printed a bunch of prototypes for the base, mounting, ports, the motherboard tray. fan shrouds, air direction fins and bevels. i bought some small 1.5-3mm nutserts so i coudl screw everything in. just melted it all in place and some bits got ca glue instead of reprinting things. the I/O was a challenge, at each step of this - i acomplished one task and created 3 more to overcome. in the end i had to mount things and sand down PCB for various ports. each one got a nutsert, 3d printed tabbed holder or some kind of bonding to other parts. i reused the factory power plug and factory holes so the OG case is not modded, just reprovisioned.
it was important to me that from the outside, you would not know its a sleeper or hackintosh. to that end i had to fit EVERYTHING inside. the PSU i found took a couple months. a meanwell for medical uses JUST fit into the allowed space and it had a 600w transient support which works perfect. my total W budget was 325 and i average far below that, even when gaming. still, alwasy good to have more than less. a simple printed box for it with some lattice work for air flow seems to work quite well. i again printed an angle plate to the bottom to hold the whole thing up on its own and screw down with in teh system.
on the bench i found the first lCD panel i bought didnt work. no idea what hte cause was so weeks of testing on that before i bought antoehr panel from another seller. then it just worked.... finding that samsung panel took a good coupel weeks as these screens are not common in monitors. laptops yes but even then, only a few models. i happened to find a pdf schematic for the panel tho so i had all its specs and pinouts which turned out to be needed as i had to make my own LVDS cables. about 70cm of them in total to go from screen to under the mac dome. the LVDS control board fit under there where the OG ram was nearly perfectly. i was able to print some hold downs and the factory bottom plate even fit. i printed a super thin piece to prevent shorting just in case. also on the screen are the LED for power and the mic, both of which i wired down and was able to use. at first id wanted to run HDMI so thats what i did. but then discovered my LVDS would not fit in the panel housing so.... had to redo all the wires to add more for the 30 pin, power, backlight, and mic/led. about 40 wires in total.
the fan was a noctua at the top, that was easy and a 3d printed dome top and fan grill kept the wires where htey needed to be and helped direct air flow. id hoped that was enough to pull air up through the openings (which i printed into the base plate) but now tha ti had to move all my stuff around and tilt/stack instead of keeping things to the side like i thought i could.... the GPU was overheating with out fans. not suprising i suppose.... i picked up a 40mm noctua and printed a shroud for it to blas from one side to the other of the gpu heatsink. that gets directed up by some fins and pulled out by the top fan. some luvers help induct more air from around the cool side of the gpu as well. this works well as its only in synthetic testing that i hit thermal limits.
bench testing with everything mocked up worked well. fedora booted first try with the m.2 to pcie adapater. id expected this as i use these adapters on my NAS with out issue. however it needed a 5v power feed that i did not have. i used a buck converter i had laying around to generate this. i had researched cards quite a bit and found a neglidgable performance decrease on x4 vs x16 for this card (4.0 anyway). i also needed radeon as at the time no one had vibe coded a nvidida gpu for mac os driver.
the assembly was decent. printed a plate to hold GPU one side and LVDS/backlight psu on the other. added a mount to the NUC shroud to screw to the gpu heatsink, screwed the psu and gpu to the large plate i made for the base. i used factory screws to hold the base plate down and im able to tip it all upside down iwth nothing moving. i played aroudn with HDMI cables from GPU to lvds but in the end i had to aliexpress a ribbon cable for this as nothing else fit properly. i only had to move things a tiny bit as most of my measurments worked out.
hte hackintosh install was a challenge. lots of problems mapping things and getting stuff to boot AND i was way out of date on bios. like .50 vs .80 however after updaing my DGPU no longer worked.... only the igpu. i also got lots of ram issues and errors, everything became unstable. several weeks of flashing back but nothing worked. there was a hard lock on flashing back more than like 12 versions but i wanted to go back 20 versions or more. what i had to do was desolder the cmos and replace it to get my older bios back. after this, my ram errors went away and my DGPU started acting as primary again.
a constant issue i had was signaling for the main screen. the 60cm lvds cable was just at its limit. the best i was able to get was some ferrite rings and insulation (not htat i could fit much in that arm) but this got things mostly stable. i get a bit of flicker when screens change but otherwise its stable. so for now thats good enough until i work out a better fix.
i wanted internal speakers as well as i wanted the mack gong and for everyting to be all in one. a small 15w class d 12v amp that i wired into the audio output of the lvds board. i also wired this board to the 3.5 mic/speaker output i made. all wiring is a one off, twisted and routed around the edge and under the video card.
I CANT EXPRESS JUST HOW TIGHT EVERYTHIGN IS IN HERE
fedora 44 loaded just fine, dual boot with sequoia. that setup was pretty easy but the macos took me a good month and a half with help from the hackintosh discord.
3d printer again for templates and i got 2 small speakers off parts express by peerless. wired them in stereo and printed a case to mount on top of the PSU. this plays audio through the plastic cd rom cover that i glued in. with a bit of easy eq in software they sound decent and have some low end.
it was at this point i fitted things together and found they actually FIT! the whole dome went down on it all. i used some USB and TB extenders for my external ports. directly soldered cat5 to the new port i bought, cut it down, mounted it, and rj45 end into the NUC. it works a treat. the DP is also and extension but its a ribbon on one end with a 90 built in. JUST fits into the card. also used fuses and some RC car plugs for the 110v psu input
i had a problem i could nto shake tho.... it did not bong when i turned it on. how???? this is where i foudn a mini mp3 player about the size of a micro sd card. i paired this with an arduino nano i had laying aorund. its set to check the 5v refrence pin on the power headder of the NUC, then sense power button pulling the 2 pin low for more than .5 seconds but less than 2.5 seconds, and then rx/tx to the mp3 player which sends pre-amp to the 15w amp for the startup bong. it does NOT bong if you hold down to shut off OR if you press it for sleep when the system is already on. i got the sound off YT and chose the performa era of bong. this took about a week to get working
i had that second black screen id been using but wanted something period correct. i found a cinema display on marketplace for free. no ide if it worked. i used magic eraser and dawn to clean the outside, retro bright on the cables, and painted the bezel with pebble grey. in the end it worked out well and looks nearly new again. im waiting on a dvi to DP cable later this week to get it plugge din but i tested it on my G4 QS and it does work. the ADC to DVI to miniDP to DP did not work tho.
i may add to this or if you have questions ig. i think this is mostly everything.
so i thought id share, not sure what place to put this but this build took me most of the year. i got a couple iMACs for free and got a crazy idea to put something modern into one of them. in the end i wound up with a samsung panel, i5 intel, and a radeon GPU.
some of you might ask why not a mac mini? well at the time there was not good Egpu support and i wanted to game, also EVERYONE has alrady done that so... i took a different route. at first i thought a micro or mini itx system and that would actually fit! there were some boards from asrock where id be able to drop a off teh shelf setup in there. so why not? the dome.
as it turns out, the dome proved to be a surprising (/s) design constraint. my square area reduced drasticly as i went up so i was unable to raise the itx board above a video card OR put a card over the board. i did find some low profile cards that could fit but their performance was so poor that a moden intel igpu would have been about the same. i wasnt willing to go that route....
with out any idea of what fits where, i started looking at physical sizes of things and cutting out cardboard. ca gluing templates to see what might fit! this actually worked very well but it was hard to find the physical specs. newegg had a good sort by but as it happens, thats only length of a card, not height or thickness so it was into each products spec page and trial and error....
i think i started by sourcing a replacement panel bezel/housing. my imacs were 15" models and i wanted a 17 wide. they are hard to find for a price but i came across a ebay store that turns old macs into art work. he makes real lamps out of these guys and had a warehouse FULL of parts. so i got a full, complete top assembly minus the LED panel. however go figure.... its TOTALLY different from the 15. screw holes, cables, thickness, mounting, all ofit... none of it fit! it wasnt hard to drill new hols after making a jig, i tig welded up the old holes and got it together.
at this point i should mention, i started this in febuary i think? when i got the two systems. it is now november LOL. once id started, i knew id finish, i just had no idea what hte final build would be but i wanted it to NOT be what everone else had done.
quite a bit of amazon, facebook market, and ebay time while i looked for a 'computer' as now id decided a NUC was my only choice. what i quickly ran into was PCIE lane issues. i needed wifi, a m.2 that was 4.0 spec to run the GPU and i still needed a NVME or some kind of non 3.5 drive. even if i pulled the 3.5 appart i dont think i could have fit that in there. this landed me on a single height intel NUC i5/i7. in benchmarks there was a less than 10% difference in performance between teh two but there is a boosted power/thermal budget on the i7 and the i5 with tweaked boost settings allowed better performance than the i7 so... i went i5. the other nice thing was a m.2 for wifi, and a m.2 bkey sata, AND a m.2 4.0x4 that ran to the CPU die and not a controller. it came iwth 8gb of ram but that was a cheap upgrade. (i actually run into issues with only 16 but idk what to do about that yet). a bonus was this system had a 4 pin internal 12v PSU plug so that made life easier, no power brick.
once i had that, it was down to the PSU, GPU, and wiring. id setteled on a 6600/7600xt radeon from power cooler. a lack of hackintosh support for the 7XXX put me on the 6 and its about the same speed. also takes a good OC. but it HAD to be the power cooler red devil as its the only one that would fit! people complained about tyhe tiny crapy heatsink but thats exactly what i needed!
while i waited i started autocad and 3d printed a bunch of prototypes for the base, mounting, ports, the motherboard tray. fan shrouds, air direction fins and bevels. i bought some small 1.5-3mm nutserts so i coudl screw everything in. just melted it all in place and some bits got ca glue instead of reprinting things. the I/O was a challenge, at each step of this - i acomplished one task and created 3 more to overcome. in the end i had to mount things and sand down PCB for various ports. each one got a nutsert, 3d printed tabbed holder or some kind of bonding to other parts. i reused the factory power plug and factory holes so the OG case is not modded, just reprovisioned.
it was important to me that from the outside, you would not know its a sleeper or hackintosh. to that end i had to fit EVERYTHING inside. the PSU i found took a couple months. a meanwell for medical uses JUST fit into the allowed space and it had a 600w transient support which works perfect. my total W budget was 325 and i average far below that, even when gaming. still, alwasy good to have more than less. a simple printed box for it with some lattice work for air flow seems to work quite well. i again printed an angle plate to the bottom to hold the whole thing up on its own and screw down with in teh system.
on the bench i found the first lCD panel i bought didnt work. no idea what hte cause was so weeks of testing on that before i bought antoehr panel from another seller. then it just worked.... finding that samsung panel took a good coupel weeks as these screens are not common in monitors. laptops yes but even then, only a few models. i happened to find a pdf schematic for the panel tho so i had all its specs and pinouts which turned out to be needed as i had to make my own LVDS cables. about 70cm of them in total to go from screen to under the mac dome. the LVDS control board fit under there where the OG ram was nearly perfectly. i was able to print some hold downs and the factory bottom plate even fit. i printed a super thin piece to prevent shorting just in case. also on the screen are the LED for power and the mic, both of which i wired down and was able to use. at first id wanted to run HDMI so thats what i did. but then discovered my LVDS would not fit in the panel housing so.... had to redo all the wires to add more for the 30 pin, power, backlight, and mic/led. about 40 wires in total.
the fan was a noctua at the top, that was easy and a 3d printed dome top and fan grill kept the wires where htey needed to be and helped direct air flow. id hoped that was enough to pull air up through the openings (which i printed into the base plate) but now tha ti had to move all my stuff around and tilt/stack instead of keeping things to the side like i thought i could.... the GPU was overheating with out fans. not suprising i suppose.... i picked up a 40mm noctua and printed a shroud for it to blas from one side to the other of the gpu heatsink. that gets directed up by some fins and pulled out by the top fan. some luvers help induct more air from around the cool side of the gpu as well. this works well as its only in synthetic testing that i hit thermal limits.
bench testing with everything mocked up worked well. fedora booted first try with the m.2 to pcie adapater. id expected this as i use these adapters on my NAS with out issue. however it needed a 5v power feed that i did not have. i used a buck converter i had laying around to generate this. i had researched cards quite a bit and found a neglidgable performance decrease on x4 vs x16 for this card (4.0 anyway). i also needed radeon as at the time no one had vibe coded a nvidida gpu for mac os driver.
the assembly was decent. printed a plate to hold GPU one side and LVDS/backlight psu on the other. added a mount to the NUC shroud to screw to the gpu heatsink, screwed the psu and gpu to the large plate i made for the base. i used factory screws to hold the base plate down and im able to tip it all upside down iwth nothing moving. i played aroudn with HDMI cables from GPU to lvds but in the end i had to aliexpress a ribbon cable for this as nothing else fit properly. i only had to move things a tiny bit as most of my measurments worked out.
hte hackintosh install was a challenge. lots of problems mapping things and getting stuff to boot AND i was way out of date on bios. like .50 vs .80 however after updaing my DGPU no longer worked.... only the igpu. i also got lots of ram issues and errors, everything became unstable. several weeks of flashing back but nothing worked. there was a hard lock on flashing back more than like 12 versions but i wanted to go back 20 versions or more. what i had to do was desolder the cmos and replace it to get my older bios back. after this, my ram errors went away and my DGPU started acting as primary again.
a constant issue i had was signaling for the main screen. the 60cm lvds cable was just at its limit. the best i was able to get was some ferrite rings and insulation (not htat i could fit much in that arm) but this got things mostly stable. i get a bit of flicker when screens change but otherwise its stable. so for now thats good enough until i work out a better fix.
i wanted internal speakers as well as i wanted the mack gong and for everyting to be all in one. a small 15w class d 12v amp that i wired into the audio output of the lvds board. i also wired this board to the 3.5 mic/speaker output i made. all wiring is a one off, twisted and routed around the edge and under the video card.
I CANT EXPRESS JUST HOW TIGHT EVERYTHIGN IS IN HERE
fedora 44 loaded just fine, dual boot with sequoia. that setup was pretty easy but the macos took me a good month and a half with help from the hackintosh discord.
3d printer again for templates and i got 2 small speakers off parts express by peerless. wired them in stereo and printed a case to mount on top of the PSU. this plays audio through the plastic cd rom cover that i glued in. with a bit of easy eq in software they sound decent and have some low end.
it was at this point i fitted things together and found they actually FIT! the whole dome went down on it all. i used some USB and TB extenders for my external ports. directly soldered cat5 to the new port i bought, cut it down, mounted it, and rj45 end into the NUC. it works a treat. the DP is also and extension but its a ribbon on one end with a 90 built in. JUST fits into the card. also used fuses and some RC car plugs for the 110v psu input
i had a problem i could nto shake tho.... it did not bong when i turned it on. how???? this is where i foudn a mini mp3 player about the size of a micro sd card. i paired this with an arduino nano i had laying aorund. its set to check the 5v refrence pin on the power headder of the NUC, then sense power button pulling the 2 pin low for more than .5 seconds but less than 2.5 seconds, and then rx/tx to the mp3 player which sends pre-amp to the 15w amp for the startup bong. it does NOT bong if you hold down to shut off OR if you press it for sleep when the system is already on. i got the sound off YT and chose the performa era of bong. this took about a week to get working
i had that second black screen id been using but wanted something period correct. i found a cinema display on marketplace for free. no ide if it worked. i used magic eraser and dawn to clean the outside, retro bright on the cables, and painted the bezel with pebble grey. in the end it worked out well and looks nearly new again. im waiting on a dvi to DP cable later this week to get it plugge din but i tested it on my G4 QS and it does work. the ADC to DVI to miniDP to DP did not work tho.
i may add to this or if you have questions ig. i think this is mostly everything.