Here is a short description of my own project for #Marchintosh 2025 that is nearing completion. An RGB 900 ") .
.
But first a short background, I have several Quadra 900 logic boards that I have been thinking about what to do with(besides the obvious – playing with them on my bench). Since long I’ve been thinking about building a rack based 900, but then one day the crazy idea of putting one of the boards into a modern ATX case with some RGB struck me. It’s crazy of course, but I couldn’t let the idea go, so I decided to see what was possible .
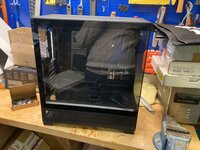
After searching a while for suitable cases (and even trying out a few different ones) I came across a good offer on a Phanteks XT View:

After a first “trial fit” I realized that this otherwise massive board would actually fit this case!
Of course, one realizes immediately that the Nubus cards are opposite compared to PCI, but for this build I anyway do not intend to use any Nubus slots. Otherwise, it would be quite possible to make a cut out or even make a completely new rear piece for the case.
The next “issue” is that the 900 board has a completely different hole pattern compared to an ATX board, and it would not hurt to be raised a little, so what to do?? Well, I decided to just make a simple “ATX-dummy board” that fits to the case and where I then can mount the 900 board:

Would have been nicer to also include mounting holes for the 900 directly, but I just drilled the holes “on the fly” once I had the dummy board from China. There are of course many other ways to do this, but PCBs are fairly cheap, also large ones, so I figured this was a good enough solution for me.
The next topic that needed attention was the fact that although the 900/950 looks like it has an “ATX-connector”, nothing could be more wrong! The pinning is totally different and the logic how to start the PSU is also opposite. Since I also wanted some kind of modern storage for this build, I decided to redesign a bluescsi board by extending it to fit a 120x120mm fan position (there are plenty of those in the case) and include an ATX to Quadra adapter on it:

The last thing to tackle was making an interface for the Power, Reset and Speaker, once again the 120x120mm fan mounting was found to be suitable:

I also did include a simple VU-meter but that unfortunately did not work as intended, so I will probably just leave it out in the end.
Then it was time to build:

At the top of the case, I’ve put 3 aRGB fans and a water cooler. For graphics I’m using an FPGA (carrier and software designed by Melkhior) that uses the PDS-socket. This card does full acceleration and 1920x1080 natively over HDMI. Through a short adapter cable I’m able to utilize the PCI brackets (although shortened at the bottom) which makes the rear look very nice. At a later stage I plan to make a little PCB to cover the hole around the top connectors.
The RAMs are based of simmba’s 16MB 30 pin RAMs available on github but with added LED for the R/W signal. For ROM I’m not using my normal 8MB uniROM but instead a special 16MB (two banks with a switch between) SIMM designed by Zigzagjoe. This ROM is very clever in the sense that it also includes an RP2040 for in system programming. ROM is then connected to one of the USB-ports on top of the case, and the onboard reset, so I can reflash the ROM and have the machine to reboot without opening the case or turning off the machine, very nifty.

At this point I was quite happy, but that ATX-extension cable looked kind of dull so after some googling, I stumbled upon a nice aRGB ATX-extension cable.


The final step was to make a bracket for the CPU to hold the water cooler and by turning the Bluescsi board, the cable management turned out a little nicer.

Some minor adjustments are still necessary, more cable management of course, but so far I’m pretty happy with the result. The aRGB can be controlled also on the case (this case has a built in controller) from two buttons, one for the mode and one for color combination. The whole thing is of course very silly, but it was a long time ago since I had this much fun doing something . Did I tell you that my kids absolutely L O V E it! At some point I might also make video about it.
#Marchinstosh
.But first a short background, I have several Quadra 900 logic boards that I have been thinking about what to do with(besides the obvious – playing with them on my bench). Since long I’ve been thinking about building a rack based 900, but then one day the crazy idea of putting one of the boards into a modern ATX case with some RGB struck me. It’s crazy of course, but I couldn’t let the idea go, so I decided to see what was possible
.After searching a while for suitable cases (and even trying out a few different ones) I came across a good offer on a Phanteks XT View:
After a first “trial fit” I realized that this otherwise massive board would actually fit this case!
Of course, one realizes immediately that the Nubus cards are opposite compared to PCI, but for this build I anyway do not intend to use any Nubus slots. Otherwise, it would be quite possible to make a cut out or even make a completely new rear piece for the case.
The next “issue” is that the 900 board has a completely different hole pattern compared to an ATX board, and it would not hurt to be raised a little, so what to do?? Well, I decided to just make a simple “ATX-dummy board” that fits to the case and where I then can mount the 900 board:
Would have been nicer to also include mounting holes for the 900 directly, but I just drilled the holes “on the fly” once I had the dummy board from China. There are of course many other ways to do this, but PCBs are fairly cheap, also large ones, so I figured this was a good enough solution for me.
The next topic that needed attention was the fact that although the 900/950 looks like it has an “ATX-connector”, nothing could be more wrong! The pinning is totally different and the logic how to start the PSU is also opposite. Since I also wanted some kind of modern storage for this build, I decided to redesign a bluescsi board by extending it to fit a 120x120mm fan position (there are plenty of those in the case) and include an ATX to Quadra adapter on it:
The last thing to tackle was making an interface for the Power, Reset and Speaker, once again the 120x120mm fan mounting was found to be suitable:
I also did include a simple VU-meter but that unfortunately did not work as intended, so I will probably just leave it out in the end.
Then it was time to build:
At the top of the case, I’ve put 3 aRGB fans and a water cooler. For graphics I’m using an FPGA (carrier and software designed by Melkhior) that uses the PDS-socket. This card does full acceleration and 1920x1080 natively over HDMI. Through a short adapter cable I’m able to utilize the PCI brackets (although shortened at the bottom) which makes the rear look very nice. At a later stage I plan to make a little PCB to cover the hole around the top connectors.
The RAMs are based of simmba’s 16MB 30 pin RAMs available on github but with added LED for the R/W signal. For ROM I’m not using my normal 8MB uniROM but instead a special 16MB (two banks with a switch between) SIMM designed by Zigzagjoe. This ROM is very clever in the sense that it also includes an RP2040 for in system programming. ROM is then connected to one of the USB-ports on top of the case, and the onboard reset, so I can reflash the ROM and have the machine to reboot without opening the case or turning off the machine, very nifty.
At this point I was quite happy, but that ATX-extension cable looked kind of dull so after some googling, I stumbled upon a nice aRGB ATX-extension cable.
The final step was to make a bracket for the CPU to hold the water cooler and by turning the Bluescsi board, the cable management turned out a little nicer.
Some minor adjustments are still necessary, more cable management of course, but so far I’m pretty happy with the result. The aRGB can be controlled also on the case (this case has a built in controller) from two buttons, one for the mode and one for color combination. The whole thing is of course very silly, but it was a long time ago since I had this much fun doing something
. Did I tell you that my kids absolutely L O V E it! At some point I might also make video about it.#Marchinstosh
 !
!