NABU superthread

Mu0n

Active Tinkerer
Oct 29, 2021
609
560
93
Quebec
www.youtube.com
This has made the rounds on youtube and on Twitter, so here goes an attempt to make a comprehensive thread about it.

A Canadian computer called the NABU, which didn't have disk drive storage, tape cassette or anything (just a keyboard, joystick port and expansion ports for printer, disk drive etc), it took its software from a cable subscription channel, held on from 1983 to 1986 and didn't make it outside of the Ottawa region.

PellMill LLC is selling 2000+ NOS units that were bought in 1989 and held onto during all that time. When the NABU computer was featured in an Adrian's Digital Basement video, the floodgates opened while everyone scrambled to get one, even if most had never heard of it. Since then, the whole network has been revived online, you have the full catalog resurrected (thanks in part from some help from an original era programmer Leo Binkowski) and a handful of reverse engineers. And now, the entire way bigger MSX game catalog can also run on it since they both use a Z80 processor.
After fighting the urge, I succumbed to canadian computer history collector mode and FOMO.

Specs:
CPU: 3.58MHz Zilog Z80
RAM: 64K DRAM
ROM: 4/8K EPROM
Video: Composite Color Video (NTSC Compatible) or TV RF Modulator (Ch 3 or Ch 4)
Audio: AY-3-8910 Sound Generator
Keyboard with ALPS switches (close but not exactly like a Mac Plus keyboard)
Cool things it now does as of March 2023: run most software from the resurrected NABU network (now in web) + run CP/M + run new homebrew software + run MSX games + will soon run a GUI over CP/M

Where to get one (FOMO):
On ebay, one seller has been dutifully selling hundreds of them since November: https://www.ebay.ca/usr/pellmill-llc


unit I personally got in March 2023


References to watch for:

YOUTUBE:

https://www.youtube.com/@DJSures has been the main hype man (after Adrian's initial push) and been excellent at explaining both hardware and software and making sure everyone knows of every little new development for it. He's programming new content as well. His content is must-watch for this space.

https://www.youtube.com/@leo.binkowski the original programmer for several games, he's been active at explaining his days back then and more

Adrian's Digital video that helped kick off this madness:

WEB:

https://www.thenabunetwork.com/ very comprehensive website with information, guides, links to adaptor programs

https://nabu.ca/ another website aiming at centralizing information, videos, articles about the NABU. Contains DJ Sure's content.

Rudy's Diagnostics Manual: https://github.com/RudyRetroIntel/Vintage-Computer-Diagnostics

Rudy's Adapator building guide: https://github.com/RudyRetroIntel/Vintage-Hardware

(both Rudy's guides are being translated by yours truly to French, so we have two official languages of Canada represented instead of only English)

1678596581028.png
 
Last edited:

Mu0n

Active Tinkerer
Oct 29, 2021
609
560
93
Quebec
www.youtube.com

THIS GUIDE IS NO LONGER VALID, IT WILL BE KEPT FOR ARCHIVING REASONS - A BETTER GUIDE WILL FOLLOW WHEN READY​


Another lengthy guide, HOW TO:
(I made a few revisions in these steps on January 23rd 2024, as I faced roadblocks while trying to redo the whole method)


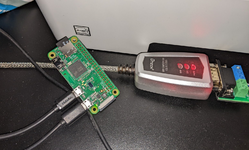
Use a raspberry pi to act as a headless server for your NABU!

1683610021338.png


Detailed Goals:
-run NabuAdaptor.exe in command line mode from Raspbian on a Raspberry Pi
-have this setup as autobooting (power on your pi, wait approx 30-40s, power your NABU)
-select which software to run from the Nabu
-the pi will not require a keyboard, a mouse or a screen (headless aspect)

This frees up having to run the adaptor software on a modern PC and makes the NABU much more independant along with its new friend from the Raspberry foundation!

Major thanks and credits to: RetroTech Chris

Materials I used:
  • Raspberry Pi Zero W*
  • Dongle for microUSB Male to USB A Female
  • microSD card
  • microUSB power adaptor
  • (temporarily) USB hub connecting a keyboard
  • (temporarily) a mini-HDMI to regular HDMI adapter so I see my prep steps
1683610042388.png


Prepping stuff on the Pi Zero W side:
  1. Get a modest uSD card (I used a 8gb) and used the (for Windows) Raspberry Pi Image utility from https://www.raspberrypi.com/software/
  2. Running the tool I:
    1. went into Raspberry Pi OS (Other), selected Raspberry Pi OS Lite 32-bit (no desktop environment)
    2. clicked EDIT SETTINGS and went ahead and prewrote a bunch of settings related to my home wifi so that it can automatically connect on my network as it's powered on, as well as the main account on the pi that I'll use (username/pwd)
    3. Let it format and install the OS on my microSD card
  3. Booted up the Pi Zero W
  4. Ran these commands on the Pi Zero W:
    1. sudo apt-get update
    2. sudo apt-get upgrade
    3. sudo apt-get install mono-complete gtk-sharp2
  5. (optional, to set up wirless transfer of files to the pi zero W, if you have a W capability on your pi):
    1. sudo raspi-config
    2. go to Interfacing Options
    3. go to SSH
    4. answer Yes to enabling SSH
    5. Go back to the main menu, go to System Options
    6. go to Boot/Auto Login
    7. Select Console Autologin
    8. Exit out
    9. you can now connect to the pi zero W and dump files (I use WinSCP on my Windows 11 machine). Port 22 is used by default
  6. (optional, if you want to use CP/M, which is a big YES because it enables a ton of software), use these commands to copy some files, this might change in the future depending on what else will be available. From /home/*yourusername*/ where you replace *yourusername* with your...user name
    1. mkdir cpm
    2. cd cpm
    3. wget https://nabu.retrotechchris.com/cpm/CPM22.SYS
    4. wget https://nabu.retrotechchris.com/cpm/FONT.GRB
    5. wget https://nabu.retrotechchris.com/cpm/NDSK_A.IMG
    6. wget https://nabu.retrotechchris.com/cpm/NDSK_B.IMG
    7. wget https://nabu.retrotechchris.com/cpm/NDSK_BOOT.nabu
    8. cd ..
    9. chmod -R 777 cpm
Prepping the NabuAdaptor software from (to do: add missing link)
  1. You can get compiled binairies in the releases page of my fork of the NabuAdaptor project (to do: add missing link)
  2. Edit NabuAdaptor.exe.config and for IgnoreCertificateErrors, you need to change "False" to True"
  3. Connect/send files to the pi zero W using a FTP client from your modern computer and send these 3 files over to /home/*yourusername*/ where you replace *yourusername* with your...user name that you hopefully remember from defining it with the Raspberry Pi Imager utility.
    1. NabuAdaptor.exe
    2. NabuAdaptor.exe.config
    3. Targets.xml (this file could be changed in the future to include more linked games; easy to edit, to understand and to extend and refresh what's on the raspberry pi)
Prepping the headless, autobooting aspect of things, optional, but it makes it so cool in my mind!
  1. sudo nano /etc/rc.local
  2. right before the last line of text that has 'exit 0' add these:
    1. cd /home/*yourusername*/
    2. /bin/mono /home/"yourusername"/NabuAdapter.exe -Mode Serial -Port /dev/ttyUSB0 -path headless&
  3. sudo chmod +x /etc/rc.local
  4. reboot your pi zero W! it should prepare the NabuAdaptor software within about 30-50s. You can attemp to start the NABU at the 30-40s mark and have it receive data from the adaptor cable fed with the NabuAdaptor command line version! The order in which you power the NABU and/or the pi zero W is not important. It will eventually send the data the Nabu needs, whether it has time to show an 'ADAPTOR ERROR' message or not.
  5. Congrats!
1683610060626.png


*Need help sourcing a Pi? I literally checked while writing the thread and units were available for purchase in both the US and Canada. Check this website:
https://rpilocator.com/?country=CA,US&cat=PI4,PIZERO (change the filters if you want a different unit or country)
Check out their tips/tricks page to increase your rate of success. https://rpilocator.com/tips-and-tricks.cfm
In my opinion, the extreme pi drought is over. I was able to buy in 2023: a pi zero, a pi zero W and a pi 3a without too much difficulty following the tips and tricks.
 

Attachments

  • 1683610009603.png
    1683610009603.png
    765.5 KB · Views: 79
Last edited:

Eric's Edge

Tinkerer
Oct 31, 2021
122
87
28
Another lengthy guide, HOW TO:

Use a raspberry pi to act as a headless server for your NABU!

View attachment 12186

Detailed Goals:
-run NabuAdaptor.exe in command line mode from Raspbian on a Raspberry Pi
-have this setup as autobooting (power on your pi, wait approx 30-40s, power your NABU)
-select which software to run from the Nabu
-the pi will not require a keyboard, a mouse or a screen (headless aspect)

This frees up having to run the adaptor software on a modern PC and makes the NABU much more independant along with its new friend from the Raspberry foundation!

Major thanks and credits to: RetroTech Chris and Geek with Social Skills

Materials I used:
  • Raspberry Pi Zero W*
  • Dongle for microUSB Male to USB A Female
  • microSD card
  • microUSB power adaptor
  • (temporarily) USB hub connecting a keyboard
  • (temporarily) a mini-HDMI to regular HDMI adapter so I see my prep steps
View attachment 12187

Prepping stuff on the Pi Zero W side:
  1. Get a modest uSD card (I used a 8gb) and used the (for Windows) Raspberry Pi Image utility from https://www.raspberrypi.com/software/
  2. Running the tool I:
    1. went into Raspberry Pi OS (Other), selected Raspberry Pi OS Lite 32-bit (no desktop environment)
    2. clicked on the gear button in the bottom right and went ahead and prewrote a bunch of settings related to my home wifi so that it can automatically connect on my network as it's powered on, as well as the main account on the pi that I'll use (username/pwd)
    3. Let it format and install the OS on my microSD card
  3. Booted up the Pi Zero W
  4. Ran these commands on the Pi Zero W:
    1. sudo apt-get update
    2. sudo apt-get upgrade
    3. sudo apt-get install mono-complete gtk-sharp2
  5. (optional, to set up wirless transfer of files to the pi zero W, if you have a W capability on your pi):
    1. sudo raspi-config
    2. go to Interfacing Options
    3. go to SSH
    4. answer Yes to enabling SSH
    5. you can now connect to the pi zero W and dump files (I use WinSCP on my Windows 10 machine). Port 22 is used by default
  6. (optional, if you want to use CP/M, which is a big YES because it enables a ton of software), use these commands to copy some files, this might change in the future depending on what else will be available. From /home/*yourusername*/ where you replace *yourusername* with your...user name
    1. mkdir cpm
    2. cd cpm
    3. wget https://nabu.retrotechchris.com/cpm/CPM22.SYS
    4. wget https://nabu.retrotechchris.com/cpm/FONT.GRB
    5. wget https://nabu.retrotechchris.com/cpm/NDSK_A.IMG
    6. wget https://nabu.retrotechchris.com/cpm/NDSK_B.IMG
    7. wget https://nabu.retrotechchris.com/cpm/NDSK_BOOT.nabu
    8. cd ..
    9. chmod -R 777 cpm
Prepping the NabuAdaptor software from https://www.nabunetwork.com/
  1. There will possibly be a compiled version somewhere soon, but for now, get Visual Studio 2022 Community (https://visualstudio.microsoft.com/fr/vs/community/)
  2. Use your git software of choice to clone Geek with Social Skills' repository found here: https://github.com/nabunetwork/Adaptor
  3. Open the locally cloned project folder's main solution and build the /console/ project file
  4. Your compiled program will be found in \console\bin\Debug\ inside your local clone of the repo
  5. Edit NabuAdaptor.exe.config and for IgnoreCertificateErrors, you need to change "False" to True"
  6. Connect/send files to the pi zero W using a FTP client from your modern computer and send these 3 files over to /home/*yourusername*/ where you replace *yourusername* with your...user name that you hopefully remember from defining it with the Raspberry Pi Imager utility.
    1. NabuAdaptor.exe
    2. NabuAdaptor.exe.config
    3. Targets.xml
Prepping the headless, autobooting aspect of things, optional, but it makes it so cool in my mind!
  1. sudo nano /etc/rc.local
  2. right before the last line of text that has 'exit 0' add these:
    1. cd /home/*yourusername*/
    2. mono NabuAdapter.exe -Mode Serial -Port /dev/ttyUSB0 -path headless
  3. sudo chmod +x /etc/rc.local
  4. reboot your pi zero W! it should prepare the NabuAdaptor software within about 30-50s. You can attemp to start the NABU at the 30-40s mark and have it receive data from the adaptor cable fed with the NabuAdaptor command line version! The order in which you power the NABU and/or the pi zero W is not important. It will eventually send the data the Nabu needs, whether it has time to show an 'ADAPTOR ERROR' message or not.
  5. Congrats!
View attachment 12188


*Need help sourcing a Pi? I literally checked while writing the thread and units were available for purchase in both the US and Canada. Check this website:
https://rpilocator.com/?country=CA,US&cat=PI4,PIZERO (change the filters if you want a different unit or country)
Check out their tips/tricks page to increase your rate of success. https://rpilocator.com/tips-and-tricks.cfm
In my opinion, the extreme pi drought is over. I was able to buy in 2023: a pi zero, a pi zero W and a pi 3a without too much difficulty following the tips and tricks.
Much appreciated. I have a PI zero gathering dust.