This is something that has been almost two years in the making.
VCF West 2023. I was there with my table o' Macs, the SATA-equipped 9600 and Blue and White G3 in tow. My good friend brought his SE/30 and G4 Cube. Not sure what triggered it, but I came away from this VCF mega wanting a Cube. There was just something about it that enamored me.
As luck would have it, The Call would come: I put out feelers on a local Discord and @Stephen just so happened to have a Cube! And he just so happened to need an SE/30, which I had (and after getting it fixed up I had a big 'ol "now what?" moment with it, so this trade was perfect). A long drive later (went on a birthday trip that day), I had a G4 Cube, ready to go.
Of course, I wanted to take this thing further. My friend who had his Cube had already upgraded the crap out of it, and I wanted to do the same. Luckily, fortune smiled upon me: I had a Sawtooth G4 that was given to me by @Garth Beagle, and it had a 1.4GHz Sonnet Encore in it. One of the ones that despite not being designed specifically for the Cube, would fit in perfectly.


The Cube was ripped apart, a cooling fan was installed (I'd go back and do this proper later), and a 128GB SSD (installed by way of a Startech SATA to IDE adapter) was put in. We were kinda rolling at this point. This Cube had come with a Radon 7000 (that sadly had failed) and a GeForce 6200. The 6200 is the most powerful card you can put in here, but it comes at a cost: It locks you to Tiger or Leopard. Previous Mac OS versions will run, but they lack graphics drivers and therefore run with no acceleration. Not a big issue if you plan to run the maximum Mac OS this thing can handle, but for me? I'm nostalgic about Classic. And Panther. (And maybe Jaguar.)
I had the best card for this Cube but it was clearly a suffering from success problem, as I had no desire to stay in Tiger. I wanted OS 9, dang it!
Little did I know, however, that fate would smile upon me in a big, BIG way. I had been posting about this Cube in our local Discord, going through the motions of upgrading it. Within earshot was a certain person: Dave. Dave is a legend. Because he found a horribly beat up beyond repair Sawtooth G4, and guess what was in it?
A GeForce 3.
Yes, THAT GeForce 3. The one that is literal unobtainium. The Apple-spec one. I couldn't believe it. And he was willing to just give it to me.
Holy. Shit.
The only request was that I take this system to VCF West 2024. Oh, you betcha.
Some weeks passed, and eventually a little box arrived in the mail, and I had in my hands the ultimate OS 9 card (at least, one that can just be dropped in) for the Cube. Everything was coming up Milhouse!

...until it wasn't.
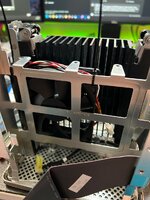
This is the point at which I installed a proper base fan; previously I had just stuck a fan in the spare space where the hard drive used to sit. In doing this, I realized what was causing the problems: There are little spacers that go between the CPU card and the logic board, and as you're reinstalling the logic board and CPU sandwich into the Cube's chassis, it is VERY EASY for these spacers to get knocked slightly out of place so the CPU's heat spreader doesn't sit fully flush against the Cube's core. That's exactly what happened.
Once that was fixed, the Cube ran perfect.
There was another problem to contend with, though: This GeForce 3 was never meant to be in a Cube, at least I don't think it was. It ran ridiculously hot, to the point where I could smell that hot smell. You know what I'm talking about. It also lightly smelled of a PCB getting really hot, like when you're blasting it with a hot air station.
Worse yet, the back of the Cube (where the GPU is) is also home to the VRM, which is another problem I had to deal with because the stock VRMs are known to not handle upgrades so well.
This was going to be a problem if this Cube was to survive VCF, as I didn't trust it to be powered on and just baking in its own heat that long.
I began mulling my options. I considered doing something as heinous as punching a hole in the inner metal chassis, to allow the GeForce 3's fan to pull in air from the outside. There's a small space between the metal inner chassis and the acrylic, enough space for the GF3 to pull air through. Hey, maybe it wouldn't look too bad...
Thankfully, that wasn't necessary: A friend of mine (and a person who's really good at 3D modeling) had an idea: Why not make a fan duct that forces air through the top vent? He knew a guy with a Cube, so he borrowed it, took measurements, and whipped up something that should work. (This WAS supposed to be a one-off but I convinced him to let me post the STL, so...yeah)
Now, my first thought was to have the fan in a pull configuration, because it would asssist the convection effect, right? Except...that didn't happen. I had a thermal probe wedged into the GeForce 3's RAM heatsink, taking temperature readings. They were still getting alarmingly high with the fan in pull. For science, I decided to just...flip the fan, thinking there was no way this would work...AND IT DID. Temps took a sharp drop and remained cool, even with extended UT99 play.
Well. Okay then. Guess that's that.
I still needed to solve the VRM problem (and did, later) but as a temporary measure I borrowed a Stratos VRM from a friend of mine just to get the Cube through VCF. With that, we were locked, loaded, and ready to go.


The Cube's thermal fixings absolutely stood and delivered: It made it through the entire two days without a single hiccup. Temps indoors got up to 95F, and other tables began having hardware die on them due to the heat. It was janktastic, but damn if it worked. (I later made it a little less jank by running a fan connector out the back of the Cube so that the rear fan can be powered on with the Cube, and not need its own power supply.)
(Though most of the attention that day was on my graphite iBook running OS X Public Beta. Hah.)
The friend who had his Cube at our exhibit in 2023? He had moved out of state, and was needing to downsize. As such, most of his collection had to go, his Cube included. We worked out a deal, and I managed to get his Cube, Stratos VRM and all. All he asked was that I just sell the remaining Cube (after moving parts around and such) for whatever I could get so he could recoup a little bit of the money he spent on it. Sold it not long after, everyone was happy, and now I got a beefed up VRM so my Cube can actually be used without fear of exploding.
(And don't worry, the new owner was informed of all this before money changed hands, even gave them the stock CPU with it so they could downgrade if they so pleased and never have to worry about the VRM.)
The Stratos VRM has one small flaw though, that I had to correct later: The fan headers on it are controlled by a thermistor on the VRM itself. Seeing as the back of the Cube stays relatively cool, this thermistor would never get hot enough to spin the fans as fast as they needed to go, so I ended up just running the fan off straight 12v from the molex connector for the optical drive.
That addressed, now that I had a beefy VRM, there of course was thoughts of where I could go next. I didn't want to go as hard on this as Action Retro, but a little more horsepower would be nice.
Such a thing would actually end up falling into my lap: a 1.6GHz PowerLogix upgrade showed up in a Quicksilver G4 at ewaste. I managed to scoop it up for ridiculously cheap. Began thinking about how to go about this. Mentioned it all in earshot of Garth. Who was then like "actually, I've got a 1.8GHz NewerTech I don't want, you're welcome to it."

I never expected this, but hell yeah this Cube was going to go wild.
There was, unfortunately, an issue: Later G4 CPUs used the 7447a chip (which can be worked around with a patcher) but worse: They're all in the dual CPU footprint. So for single CPU cards, this means that the PCB for the CPU card was designed for dual CPUs, but only one CPU + its passives are populated. This was a problem, because this meant the CPU chip and die were offset enough that they didn't contact the heat spreader. Fsck.
I know there's someone on 68kmla who makes CPU upgrades with custom heatspreaders for the Cube. Unfortunately, 1. It seemed like they weren't super active, 2. It seems like the spreaders aren't sold a la carte, and 3. Anything involving CNC is going to likely run this project significantly over budget. I'm not made of money.
Screw it. I have a dremel, and a dream. I purchased some copper shims online, and began scheming. I was able to stack two of the shims, and it actually was the same exact thickness of the center bar (that normally contacts the CPU on the Cube's stock CPU). Sweet. We're getting close. At first I opted to make a really complicated thermal sandwich, everything held together just with thermal paste. This was a mess, and it didn't work (for other reasons!)
The whole thing didn't sit right because some coils were bumping into that center bar I mentioned earlier. Fair enough. I got the dremel out and painstakingly sanded away a cutout so the spreader would hopefully sit flush. It did. Yay.
I got it all back together enough to test, and...rats, it didn't work. The Cube would boot (after plenty of false starts, figured out it was because the capacitive power button needed to be touching the chassis for proper grounding, oops) but after about 3 minutes...lockup. Because it got too hot. The heatsink was getting slightly warm, so I suspected it was passing heat, just not fast enough.
I also decided to try simplifying the thermal sandwich, here: I actually went out and soldered the two copper shims together, ensuring a nice bond between them. It didn't add enough thickness to be noticeable, either. Yay.
Reassemble. Test. No change. Feh. It was at this point I decided to go for broke and try something stupid. I took out my dremel, sanded through the top coating of the CPU heat spreader, exposing bare copper. Now, my hot air station was NOT going to be able to get this hot enough, it simply can't outdo the heat spreader. So I cut off a little bit of solder from my spool, placed it between the exposed copper on the heat spreader, and the new soldered shim sandwich I made...and stuck it in my oven.
Pleased to report that actually worked, and after a few minutes, the whole thing was hot enough that I was able to press the shim sandwich into place, and the whole thing fused together, with no discernible change in thickness. SWEET.


Excited that I potentially solved this, I got it all back together again...and no change. Except wait a second...now that everything is fused together, the...CPU die is no longer making contact? I held it up to a bright light and sure enough, there was a wee little gap between the CPU die and the shim stack. FEH. I guess the 7447a sits lower than the 7450 that was in here.
I got to work, trying to whittle down one of the copper shims I had on hand to fit between that gap. It got to the point where I just had to give up because I was warping the shim and it was no longer sitting right, and I was absolutely shredding my fingers trying to get this to work.
I took a break, doing some research on other shims. Someone on reddit suggested cutting out a piece of an aluminum can. I was desperate, so I shrugged, said why not, grabbed a can out of the recycle and cut a ittle piece to place between the die and shim stack. I put the Cube back together enough to test. I hit the power. I started up Quake 3. And damn if it didn't keep running for a full hour. That was it. That was really it. That little gap had punked me the entire time.
I talked about this in another Discord and it was mentioned that oh, aluminum and copper do NOT mix, do not use them together. I initially floated buying copper sheets online. But wait. Nickel can work too, apparently! And I just so happen to have a roll of nickel strip in my toolbox! I grabbed some, cut a piece to go between the shim stack and die, put it all back together and... THAT WORKED!
I let the Cube sit, running games for hours. Diablo II/Quake 3/UT99. Ran it through Cinebench. Ran it through XBench. No crashes at all, as stable as can be.
For good measure, I also swapped the base fan with one that had better static pressure (and moved more air, too). As I type this, the Cube has been running a botmatch in UT99 for the last four hours. And it hasn't wavered one bit.

I mentioned this in earshot of @mmu_man on discord, and he offered graciously to model the exact thing I was looking for. After a bunch of back and forth, we finally got it, The G4 Cube Lightbase. This was fun to assemble, mostly because trying to wire up RGB LEDs in situ really tested my ability to solder in small places. But eventually, I got it, and now the Cube looks awesome. And evil. Truly befitting of the name "Satanicube". (Named partially because this was Stephen's Cube, and he's part of the Satanic Mac Club.)


I was able to run the LED strips off the 12v already present in the Cube, I ran a cable out the back of the Cube (that can be disconnected in case the light base needs to be removed) so that way the LEDs can turn on and off with the Cube. Pretty slick.
I know this was a long post. But this little thing has been my unintentional passion project for the last year and some change, and I'm glad to see it finally in its final form. Could I take it further? Sure, I guess. But 1.8GHz is plenty fast for me, and especially for OS 9.
Right before VCF West last year, I got to talking with someone on a Discord I'm in, who had an awesome Cube he called the "drug trip Cube".. Someone had painted the innards with green iridescent paint and gave it some white accents. Further, it had one of those faaaaancy PowerLogix ClearCube cases. Really cool. I never could see myself owning one, until fate smiled upon me.
This Cube needed a CPU upgrade! And he just so happened to have a spare ClearCube case. Well, I just so happened to have an orphaned 1.4GHz Sonnet upgrade, so we got to talking...and he agreed to trade me. CPU for the ClearCube case. Neato. I got it all moved over, and that was that. It was nice to not have to worry about cooling the GPU's thermal zone as the GPU could now pull in enough air to keep itself from suffocating.
But man. The innards looked kinda eh, just sitting there in the case. I know Action Retro put an Apple logo on the optical drive's cover, but I wanted to do something...more. I tried painting the cover blue, but it didn't really stand out, at least not yet.
In the run-up to VCF SoCal 2026, I wanted to bring this Cube along AND make it something to remember. So I began hatching an idea: I was going to paint the innards of this Cube.
I settled on an iridescent paint, much like the Cube I mentioned earlier. But also, blue is my favorite color. I found a paint that checks all the boxes: Rust-Oleum Blue Cosmos. It looked absolutely amazing in photos, and I thought it would look amazing on this Cube.
So I got to work, meticulously scouring all the parts I wanted to paint, primering them (with automotive primer) and applying the blue paint:


Oh yeah. That looks good. I added some splatters of white and orange paint to kind of accent the front just a bit.
Finally putting it all together...

Looks pretty damn good! And with that, we have Satanicube Prime, ready to go!
...I would say if I didn't have to do some other things.
I had to take it back apart for something, and in the process I found the paint hadn't fully cured and caused some of the parts to stick together, ripping the paint off when I pulled it apart. Feh. So I had to sand and repaint the top frame and the metal grating. That all done, the gears began turning in my head while the paint was curing.
I have translucent filament and a 3D printer, and quite a few LEDs. Let's make this thing truly Satanic.
First thing I did was designing a better means of securing the SSD to the inside of the Cube. While this model won't really work for a general release (as I made it for an SSD I shucked from its casing), I'd like to make something like this that'll work for a 2.5" SSD. That's a later thing, though.

In designing this, though, I figured I can do something else: Stick some LEDs on it. I didn't want to use the RGB ones I had on hand because they weren't every dense and wouldn't kick out much light, so one quick order from Amazon later and I had a set of red LEDs that were a lot more flexible in where I could cut the strip (and had a LOT more LEDs per segment). I applied them as such:

Yeah, I printed the drive adapter out of the transparent filament even though the LEDs wouldn't be facing inwards. Was lazy. Didn't want to swap filament.
With the next part, however, the plan comes into focus. I replaced the now-cosmetic HDD heatsink with something else.

Yep. My own "heatsink" made out of translucent filament to help pipe the light up to the top. It worked pretty damn good (as you'll also see in the final photos).
Giving it a quick test, it looked like we were in business! To tidy up the wiring in the Cube, I opted to solder some JST connectors onto the back of the optical drive adapter board, since the solder joints for the molex connector were just...out there and very accessible. I plugged the LEDs and base fan into this.


Finally, it was time to tackle another thing: The sides. I thought about painting the Cube's core to have it blend in a bit more, but why do that? There's enough room to slip something in there, and I have some basic CAD knowledge and a 3D printer. Let's see if we can make some 3D-printed side pieces instead!
After many, many hours of prototyping...
 View attachment IMG_7725.jpeg
Oh Inland Glass Purple, my beloved.
I also decided to make something Satanic because, well, as I'm sure I said before, this Cube was acquired from Stephen, of the Satanic Mac Club. Why not make it more demonic (and use one of their mascots in the process?)
Finally, after all of this, after many hours of dialing it in to get the fit right, I put it all back together...only to have the power button absolutely flip out on me, because in painting the top frame I forgot that it has to be electrically grounded to the rest of the Cube for it to work properly. Scraped off a little bit of paint in a non-visible part that touches the rest of the Cube, screwed it back together...and it works!
The final photos, pardon the messy table.
 View attachment IMG_7727.jpegView attachment IMG_7734.jpeg

If you want to see this absolute monstrosity in person, it'll be at both VCF SoCal and VCF West 2026.
I'm honestly super psyched with how this turned out. I always have that feeling big projects like this are going to fail at some point midway, but this, this came out better than I could have imagined. Hopefully you enjoyed reading this big update.
VCF West 2023. I was there with my table o' Macs, the SATA-equipped 9600 and Blue and White G3 in tow. My good friend brought his SE/30 and G4 Cube. Not sure what triggered it, but I came away from this VCF mega wanting a Cube. There was just something about it that enamored me.
As luck would have it, The Call would come: I put out feelers on a local Discord and @Stephen just so happened to have a Cube! And he just so happened to need an SE/30, which I had (and after getting it fixed up I had a big 'ol "now what?" moment with it, so this trade was perfect). A long drive later (went on a birthday trip that day), I had a G4 Cube, ready to go.
Of course, I wanted to take this thing further. My friend who had his Cube had already upgraded the crap out of it, and I wanted to do the same. Luckily, fortune smiled upon me: I had a Sawtooth G4 that was given to me by @Garth Beagle, and it had a 1.4GHz Sonnet Encore in it. One of the ones that despite not being designed specifically for the Cube, would fit in perfectly.
The Cube was ripped apart, a cooling fan was installed (I'd go back and do this proper later), and a 128GB SSD (installed by way of a Startech SATA to IDE adapter) was put in. We were kinda rolling at this point. This Cube had come with a Radon 7000 (that sadly had failed) and a GeForce 6200. The 6200 is the most powerful card you can put in here, but it comes at a cost: It locks you to Tiger or Leopard. Previous Mac OS versions will run, but they lack graphics drivers and therefore run with no acceleration. Not a big issue if you plan to run the maximum Mac OS this thing can handle, but for me? I'm nostalgic about Classic. And Panther. (And maybe Jaguar.)
I had the best card for this Cube but it was clearly a suffering from success problem, as I had no desire to stay in Tiger. I wanted OS 9, dang it!
Little did I know, however, that fate would smile upon me in a big, BIG way. I had been posting about this Cube in our local Discord, going through the motions of upgrading it. Within earshot was a certain person: Dave. Dave is a legend. Because he found a horribly beat up beyond repair Sawtooth G4, and guess what was in it?
A GeForce 3.
Yes, THAT GeForce 3. The one that is literal unobtainium. The Apple-spec one. I couldn't believe it. And he was willing to just give it to me.
Holy. Shit.
The only request was that I take this system to VCF West 2024. Oh, you betcha.
Some weeks passed, and eventually a little box arrived in the mail, and I had in my hands the ultimate OS 9 card (at least, one that can just be dropped in) for the Cube. Everything was coming up Milhouse!
...until it wasn't.
Cube Thermal Crisis
Unrelated to the GeForce 3, one of the times I had to rip the Cube apart down to the CPU, I noticed it was acting really erratic and crashing a lot, sometimes even crashing out to Open Firmware. I tried so many things. Reinstalling Mac OS. Replacing the RAM. All the things you'd do in a case like this. Nothing changed. I'd freeze soon after startup, if it even made it to the desktop. That's when my brain clicked. I wonder what happens if I just...sit the Cube in front of the air conditioner? Sure enough, it ran indefinitely with the A/C blasting it. Which confirmed that yes, this was thermal related.This is the point at which I installed a proper base fan; previously I had just stuck a fan in the spare space where the hard drive used to sit. In doing this, I realized what was causing the problems: There are little spacers that go between the CPU card and the logic board, and as you're reinstalling the logic board and CPU sandwich into the Cube's chassis, it is VERY EASY for these spacers to get knocked slightly out of place so the CPU's heat spreader doesn't sit fully flush against the Cube's core. That's exactly what happened.
Once that was fixed, the Cube ran perfect.
There was another problem to contend with, though: This GeForce 3 was never meant to be in a Cube, at least I don't think it was. It ran ridiculously hot, to the point where I could smell that hot smell. You know what I'm talking about. It also lightly smelled of a PCB getting really hot, like when you're blasting it with a hot air station.
Worse yet, the back of the Cube (where the GPU is) is also home to the VRM, which is another problem I had to deal with because the stock VRMs are known to not handle upgrades so well.
This was going to be a problem if this Cube was to survive VCF, as I didn't trust it to be powered on and just baking in its own heat that long.
I began mulling my options. I considered doing something as heinous as punching a hole in the inner metal chassis, to allow the GeForce 3's fan to pull in air from the outside. There's a small space between the metal inner chassis and the acrylic, enough space for the GF3 to pull air through. Hey, maybe it wouldn't look too bad...
Thankfully, that wasn't necessary: A friend of mine (and a person who's really good at 3D modeling) had an idea: Why not make a fan duct that forces air through the top vent? He knew a guy with a Cube, so he borrowed it, took measurements, and whipped up something that should work. (This WAS supposed to be a one-off but I convinced him to let me post the STL, so...yeah)
Now, my first thought was to have the fan in a pull configuration, because it would asssist the convection effect, right? Except...that didn't happen. I had a thermal probe wedged into the GeForce 3's RAM heatsink, taking temperature readings. They were still getting alarmingly high with the fan in pull. For science, I decided to just...flip the fan, thinking there was no way this would work...AND IT DID. Temps took a sharp drop and remained cool, even with extended UT99 play.
Well. Okay then. Guess that's that.
I still needed to solve the VRM problem (and did, later) but as a temporary measure I borrowed a Stratos VRM from a friend of mine just to get the Cube through VCF. With that, we were locked, loaded, and ready to go.
VCF West 2024, or "The Great Sauna Incident"
I was so right to worry about thermals as much as I did. I got the Cube set up at my table, and...as we'd find out later, it turns out the venue had a catastrophic HVAC failure and there'd be no air conditioning. On a hot August weekend in the Bay Area. Yeeeeeep.The Cube's thermal fixings absolutely stood and delivered: It made it through the entire two days without a single hiccup. Temps indoors got up to 95F, and other tables began having hardware die on them due to the heat. It was janktastic, but damn if it worked. (I later made it a little less jank by running a fan connector out the back of the Cube so that the rear fan can be powered on with the Cube, and not need its own power supply.)
(Though most of the attention that day was on my graphite iBook running OS X Public Beta. Hah.)
The Final Upgrades
Post West, I really wanted to get this Cube to a point where I could actually use the thing. As you can recall, I was still on the stock VRM, and that meant using it was a dice roll with the Grim Reaper. I know the GeForce 3 and 1.4GHz Sonnet upgrades were pushing it. I put heatsinks on the MOSFETs to try and help them along a bit, but eventually looked at replacing the MOSFETs altogether. This ended up not working out (I think I got the wrong ones), but once again, fortune would smile upon me.The friend who had his Cube at our exhibit in 2023? He had moved out of state, and was needing to downsize. As such, most of his collection had to go, his Cube included. We worked out a deal, and I managed to get his Cube, Stratos VRM and all. All he asked was that I just sell the remaining Cube (after moving parts around and such) for whatever I could get so he could recoup a little bit of the money he spent on it. Sold it not long after, everyone was happy, and now I got a beefed up VRM so my Cube can actually be used without fear of exploding.
(And don't worry, the new owner was informed of all this before money changed hands, even gave them the stock CPU with it so they could downgrade if they so pleased and never have to worry about the VRM.)
The Stratos VRM has one small flaw though, that I had to correct later: The fan headers on it are controlled by a thermistor on the VRM itself. Seeing as the back of the Cube stays relatively cool, this thermistor would never get hot enough to spin the fans as fast as they needed to go, so I ended up just running the fan off straight 12v from the molex connector for the optical drive.
That addressed, now that I had a beefy VRM, there of course was thoughts of where I could go next. I didn't want to go as hard on this as Action Retro, but a little more horsepower would be nice.
Such a thing would actually end up falling into my lap: a 1.6GHz PowerLogix upgrade showed up in a Quicksilver G4 at ewaste. I managed to scoop it up for ridiculously cheap. Began thinking about how to go about this. Mentioned it all in earshot of Garth. Who was then like "actually, I've got a 1.8GHz NewerTech I don't want, you're welcome to it."
I never expected this, but hell yeah this Cube was going to go wild.
There was, unfortunately, an issue: Later G4 CPUs used the 7447a chip (which can be worked around with a patcher) but worse: They're all in the dual CPU footprint. So for single CPU cards, this means that the PCB for the CPU card was designed for dual CPUs, but only one CPU + its passives are populated. This was a problem, because this meant the CPU chip and die were offset enough that they didn't contact the heat spreader. Fsck.
I know there's someone on 68kmla who makes CPU upgrades with custom heatspreaders for the Cube. Unfortunately, 1. It seemed like they weren't super active, 2. It seems like the spreaders aren't sold a la carte, and 3. Anything involving CNC is going to likely run this project significantly over budget. I'm not made of money.
Screw it. I have a dremel, and a dream. I purchased some copper shims online, and began scheming. I was able to stack two of the shims, and it actually was the same exact thickness of the center bar (that normally contacts the CPU on the Cube's stock CPU). Sweet. We're getting close. At first I opted to make a really complicated thermal sandwich, everything held together just with thermal paste. This was a mess, and it didn't work (for other reasons!)
The whole thing didn't sit right because some coils were bumping into that center bar I mentioned earlier. Fair enough. I got the dremel out and painstakingly sanded away a cutout so the spreader would hopefully sit flush. It did. Yay.
I got it all back together enough to test, and...rats, it didn't work. The Cube would boot (after plenty of false starts, figured out it was because the capacitive power button needed to be touching the chassis for proper grounding, oops) but after about 3 minutes...lockup. Because it got too hot. The heatsink was getting slightly warm, so I suspected it was passing heat, just not fast enough.
I also decided to try simplifying the thermal sandwich, here: I actually went out and soldered the two copper shims together, ensuring a nice bond between them. It didn't add enough thickness to be noticeable, either. Yay.
Reassemble. Test. No change. Feh. It was at this point I decided to go for broke and try something stupid. I took out my dremel, sanded through the top coating of the CPU heat spreader, exposing bare copper. Now, my hot air station was NOT going to be able to get this hot enough, it simply can't outdo the heat spreader. So I cut off a little bit of solder from my spool, placed it between the exposed copper on the heat spreader, and the new soldered shim sandwich I made...and stuck it in my oven.
Pleased to report that actually worked, and after a few minutes, the whole thing was hot enough that I was able to press the shim sandwich into place, and the whole thing fused together, with no discernible change in thickness. SWEET.
Excited that I potentially solved this, I got it all back together again...and no change. Except wait a second...now that everything is fused together, the...CPU die is no longer making contact? I held it up to a bright light and sure enough, there was a wee little gap between the CPU die and the shim stack. FEH. I guess the 7447a sits lower than the 7450 that was in here.
I got to work, trying to whittle down one of the copper shims I had on hand to fit between that gap. It got to the point where I just had to give up because I was warping the shim and it was no longer sitting right, and I was absolutely shredding my fingers trying to get this to work.
I took a break, doing some research on other shims. Someone on reddit suggested cutting out a piece of an aluminum can. I was desperate, so I shrugged, said why not, grabbed a can out of the recycle and cut a ittle piece to place between the die and shim stack. I put the Cube back together enough to test. I hit the power. I started up Quake 3. And damn if it didn't keep running for a full hour. That was it. That was really it. That little gap had punked me the entire time.
I talked about this in another Discord and it was mentioned that oh, aluminum and copper do NOT mix, do not use them together. I initially floated buying copper sheets online. But wait. Nickel can work too, apparently! And I just so happen to have a roll of nickel strip in my toolbox! I grabbed some, cut a piece to go between the shim stack and die, put it all back together and... THAT WORKED!
I let the Cube sit, running games for hours. Diablo II/Quake 3/UT99. Ran it through Cinebench. Ran it through XBench. No crashes at all, as stable as can be.
For good measure, I also swapped the base fan with one that had better static pressure (and moved more air, too). As I type this, the Cube has been running a botmatch in UT99 for the last four hours. And it hasn't wavered one bit.
It's lit, fam.
Running parallel to all this, I also had an idea in the back of my head that I wanted to really utilize the acrylic case of the Cube to do some slick effects with LEDs. Around when I first got the Cube, I actually put a ring light under it and it looked really cool, but I wanted to do this in a far more elegant way.I mentioned this in earshot of @mmu_man on discord, and he offered graciously to model the exact thing I was looking for. After a bunch of back and forth, we finally got it, The G4 Cube Lightbase. This was fun to assemble, mostly because trying to wire up RGB LEDs in situ really tested my ability to solder in small places. But eventually, I got it, and now the Cube looks awesome. And evil. Truly befitting of the name "Satanicube". (Named partially because this was Stephen's Cube, and he's part of the Satanic Mac Club.)
I was able to run the LED strips off the 12v already present in the Cube, I ran a cable out the back of the Cube (that can be disconnected in case the light base needs to be removed) so that way the LEDs can turn on and off with the Cube. Pretty slick.
I know this was a long post. But this little thing has been my unintentional passion project for the last year and some change, and I'm glad to see it finally in its final form. Could I take it further? Sure, I guess. But 1.8GHz is plenty fast for me, and especially for OS 9.
Later in 2025...Satanicube Prime/v2
Well, I certainly thought I was done, but fate had more in store for this lil' Cube.Right before VCF West last year, I got to talking with someone on a Discord I'm in, who had an awesome Cube he called the "drug trip Cube".. Someone had painted the innards with green iridescent paint and gave it some white accents. Further, it had one of those faaaaancy PowerLogix ClearCube cases. Really cool. I never could see myself owning one, until fate smiled upon me.
This Cube needed a CPU upgrade! And he just so happened to have a spare ClearCube case. Well, I just so happened to have an orphaned 1.4GHz Sonnet upgrade, so we got to talking...and he agreed to trade me. CPU for the ClearCube case. Neato. I got it all moved over, and that was that. It was nice to not have to worry about cooling the GPU's thermal zone as the GPU could now pull in enough air to keep itself from suffocating.
But man. The innards looked kinda eh, just sitting there in the case. I know Action Retro put an Apple logo on the optical drive's cover, but I wanted to do something...more. I tried painting the cover blue, but it didn't really stand out, at least not yet.
In the run-up to VCF SoCal 2026, I wanted to bring this Cube along AND make it something to remember. So I began hatching an idea: I was going to paint the innards of this Cube.
I settled on an iridescent paint, much like the Cube I mentioned earlier. But also, blue is my favorite color. I found a paint that checks all the boxes: Rust-Oleum Blue Cosmos. It looked absolutely amazing in photos, and I thought it would look amazing on this Cube.
So I got to work, meticulously scouring all the parts I wanted to paint, primering them (with automotive primer) and applying the blue paint:
Oh yeah. That looks good. I added some splatters of white and orange paint to kind of accent the front just a bit.
Finally putting it all together...
Looks pretty damn good! And with that, we have Satanicube Prime, ready to go!
...I would say if I didn't have to do some other things.
I had to take it back apart for something, and in the process I found the paint hadn't fully cured and caused some of the parts to stick together, ripping the paint off when I pulled it apart. Feh. So I had to sand and repaint the top frame and the metal grating. That all done, the gears began turning in my head while the paint was curing.
I have translucent filament and a 3D printer, and quite a few LEDs. Let's make this thing truly Satanic.
First thing I did was designing a better means of securing the SSD to the inside of the Cube. While this model won't really work for a general release (as I made it for an SSD I shucked from its casing), I'd like to make something like this that'll work for a 2.5" SSD. That's a later thing, though.
In designing this, though, I figured I can do something else: Stick some LEDs on it. I didn't want to use the RGB ones I had on hand because they weren't every dense and wouldn't kick out much light, so one quick order from Amazon later and I had a set of red LEDs that were a lot more flexible in where I could cut the strip (and had a LOT more LEDs per segment). I applied them as such:
Yeah, I printed the drive adapter out of the transparent filament even though the LEDs wouldn't be facing inwards. Was lazy. Didn't want to swap filament.
With the next part, however, the plan comes into focus. I replaced the now-cosmetic HDD heatsink with something else.
Yep. My own "heatsink" made out of translucent filament to help pipe the light up to the top. It worked pretty damn good (as you'll also see in the final photos).
Giving it a quick test, it looked like we were in business! To tidy up the wiring in the Cube, I opted to solder some JST connectors onto the back of the optical drive adapter board, since the solder joints for the molex connector were just...out there and very accessible. I plugged the LEDs and base fan into this.
Finally, it was time to tackle another thing: The sides. I thought about painting the Cube's core to have it blend in a bit more, but why do that? There's enough room to slip something in there, and I have some basic CAD knowledge and a 3D printer. Let's see if we can make some 3D-printed side pieces instead!
After many, many hours of prototyping...
Oh Inland Glass Purple, my beloved.
I also decided to make something Satanic because, well, as I'm sure I said before, this Cube was acquired from Stephen, of the Satanic Mac Club. Why not make it more demonic (and use one of their mascots in the process?)
Finally, after all of this, after many hours of dialing it in to get the fit right, I put it all back together...only to have the power button absolutely flip out on me, because in painting the top frame I forgot that it has to be electrically grounded to the rest of the Cube for it to work properly. Scraped off a little bit of paint in a non-visible part that touches the rest of the Cube, screwed it back together...and it works!
The final photos, pardon the messy table.
If you want to see this absolute monstrosity in person, it'll be at both VCF SoCal and VCF West 2026.
I'm honestly super psyched with how this turned out. I always have that feeling big projects like this are going to fail at some point midway, but this, this came out better than I could have imagined. Hopefully you enjoyed reading this big update.
Attachments


Last edited:
