Reviving a sad looking Quadra 840av

max1zzz

Moderator
Staff member
Sep 23, 2021
233
566
93
27
Quite a few years ago I got my hands on a Quadra 840av for a very reasonable price (£20)
I wasn't really looking for a Q840 and tried to avoid buying it, but no one else at the sale I got it from seemed interested in it and given it's very reasonable price I couldn't resist it in the end!

That was way back in 2014, since then I have done exactly noting to it except powering it up twice to see if it chimed (Ok that's not fully true, I removed the battery and at some point stole the HDD from it and didn't replace the mounting sled....)

It's perhaps a good thing I am not a collector that looks for pristine examples because this is far from pristine, It's missing the CD bezel, the plastics are pretty yellowed and that metal part of the case has it;s fair share of dents and scrapes
IMG_2089.jpg
IMG_2090.jpg


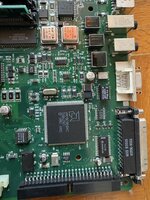
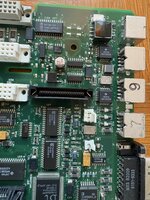
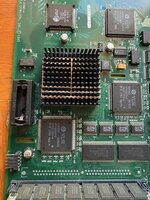
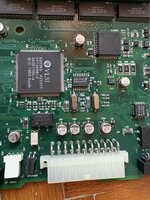
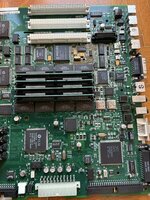
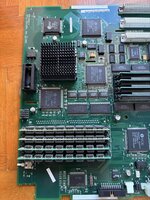
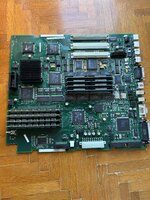
Anyway, the case can wait for another day (year?) It's time to have a look at the logicboard, I seemed to remember that although it chimed back in 2014 the board did not look in great shape and given it hadn't been recapped in the intervening years I was expecting the worse
IMG_2085.jpg
IMG_2086.jpg
IMG_2087.jpg

Yeah not great.... The camera is actually doing the board a favor here, it looks much worse in real life (the top row of pins on the AT&T chip in the first picture and ALL the pins on the ITT chip in the third are green even though they don't really look it in the pictures)
It's going to be a long process to get this board cleaned up as lots of chips need lifting for cleaning underneath and there is lots of corrosion to deal with

However there is good news! as bad as the board looks I have lifted several chips off it now for cleaning and am yet to find any trace breaks :)

Hopefully a good clean and recap will be all the board needs, I don't want it to end up like @Mac84's Q840 board :)
 

max1zzz

Moderator
Staff member
Sep 23, 2021
233
566
93
27
Oh and as a bit of a aside I noticed U47 on my board was a GAL16V8 and since I needed to desolder it for cleaning I figured I might as well throw it into my Galdurino and see if it was crackable, and it was! 9V on VPP got the chip to divulge it's contents

Attached is the JED and Equation file generated by JED2EQN
I haven't tested this but the fact JED2EQN likes it suggests it is a good dump

Hopefully this will be of use to someone one day :)
 

Attachments

  • U47.zip
    1 KB · Views: 118

Kai Robinson

TinkerDifferent Board President 2023
Staff member
Founder
Sep 2, 2021
1,163
1
1,173
113
42
Worthing, UK
Is that a known trick to make the contents of a PAL/GAL reveal themselves if locked? :)
 

max1zzz

Moderator
Staff member
Sep 23, 2021
233
566
93
27
Is that a known trick to make the contents of a PAL/GAL reveal themselves if locked? :)
Yep :) applying something between about 7v and 20v on VPP just before VCC goes high will often bypass the lock bit on GAL's. The exact voltage and timings vary between chips

In theory this can be done manually with something like a TL866 and a bench power supply (I believe @Bolle dose it this way) but I never had any luck doing it this way (it's extreamly hard to get the right timing) the Galdurino is a little arduino board that semi automates this process which I have had really good success with so far

This only works one GAL's though, PAL's will apparently be instantly destroyed if you try this on them!
 

max1zzz

Moderator
Staff member
Sep 23, 2021
233
566
93
27
@max1zzz Did you get your 840AV board working?
Not yet, It's been cleaned up and recapped and had some minor trace repair done but dose not chime when powered on, after not being a easy fix it's slipped back down my list of stuff to work on....
 

erdilmen

New Tinkerer
Jul 28, 2022
1
0
1
Quite a few years ago I got my hands on a Quadra 840av for a very reasonable price (£20)
I wasn't really looking for a Q840 and tried to avoid buying it, but no one else at the sale I got it from seemed interested in it and given it's very reasonable price I couldn't resist it in the end!

That was way back in 2014, since then I have done exactly noting to it except powering it up twice to see if it chimed (Ok that's not fully true, I removed the battery and at some point stole the HDD from it and didn't replace the mounting sled....)

It's perhaps a good thing I am not a collector that looks for pristine examples because this is far from pristine, It's missing the CD bezel, the plastics are pretty yellowed and that metal part of the case has it;s fair share of dents and scrapes
View attachment 4813View attachment 4814

Anyway, the case can wait for another day (year?) It's time to have a look at the logicboard, I seemed to remember that although it chimed back in 2014 the board did not look in great shape and given it hadn't been recapped in the intervening years I was expecting the worse
View attachment 4815View attachment 4816View attachment 4817
Yeah not great.... The camera is actually doing the board a favor here, it looks much worse in real life (the top row of pins on the AT&T chip in the first picture and ALL the pins on the ITT chip in the third are green even though they don't really look it in the pictures)
It's going to be a long process to get this board cleaned up as lots of chips need lifting for cleaning underneath and there is lots of corrosion to deal with

However there is good news! as bad as the board looks I have lifted several chips off it now for cleaning and am yet to find any trace breaks :)

Hopefully a good clean and recap will be all the board needs, I don't want it to end up like @Mac84's Q840 board :)
Dear max as i understand you have a good working galduriono,im trying to build it but i have small problems related vpp voltage.When i connect resistor to pin2-10 its dropping almost half.Can u please help me?
 

max1zzz

Moderator
Staff member
Sep 23, 2021
233
566
93
27
Time to return to this after another 18 months, With progress this time!
IMG_3249.JPG

It lives :)

How did we get here?
Well first off I ended up killing the PSC when removing it for cleaning. This was entirely my fault for using too much heat as I couldn't be bothered to get the IR preheater out or the low melt solder and just tried to use hot air only. One loud pop later and 5V and GND where shorted together.
At this point I thought the board was done for, the PSC is a custom chip that is only used on the Q840 and Q660 so is not exactly a easy part to track down but I asked around and @RetroTheory had a spare Q840 donor board which he was willing to send my way :)

I then went down a bit of a rabbit hole, when I got the donor board it actually looked in better condition than my original so I decided to use my original as a donor and repair that board but whatever I tried I could not get this board to do anything, it would power on but not chime or do anything else. The closer I looked at the board the more scratches I found on it, I found and fixed a few trace breaks but never managed to get it to boot, I strongly suspect there is a scratch through a trace somewhere preventing it from booting but could never find it

After 18 months of prodding and probing the board I decided last night to swap the PSC and DSP (Which was missing from the board RetroTheory sent me) back on to my original board as although it is not on great condition I knew it at least chimed back in 2014, after swapping these the board started powering on but like the other board did noting else. A couple of hours of prodding and probing revealed nothing untoward except the pins of the ABT245's under the ROMs looking a little green, I didn't think they looked bad enough to be a issue but since I had my RCT on the desk from working on another project I figured it was worth quickly removing them and verifying they where all good

3 of the 4 failed.

I pulled 3 ABT245's off the donor board, verified they worked with the RCT and soldered them on. The board then booted on the first try :)

The root cause of all the original issues where these guys:

IMG_3251.JPG

(shown after replacement as I honstly didn't think they where bad so didn't take a picture beforehand)

And this is why I originally tried to repair the other board, my original board is one of those ones that pads start falling off as soon as you apply any heat to the board
IMG_3248.jpg

Soldering wires to the legs of those chips is not fun.

Next step will be to run this guy through the ultrasonic after which I can finally thing about putting it back together. Hopefully after 10 years I might actually be able to play around with it :)

And thanks again to RetroTheory for sending me the donor board, without that it would have been impossible to repair this board :)
 

RetroTheory

Tinkerer
Oct 17, 2021
77
118
33
Wow great job, congrats on getting it going again.

That board was with a stack of 4 840AV boards that originally was part of Apple waste back in the day when the 840av was current. Apple were less careful with their waste back then and these were thrown out due to cosmetic issues. At the time in that stack was one , its only defect was a 68040 socket installed at a angle. That board worked fine and lived inside a modified AT case for years lol.
 

croissantking

Tinkerer
Feb 7, 2023
89
37
18
I'm soon to get started on restoring a couple of 840AV boards which have heavy cap corrosion. I think it will be quite a challenge.

What is the PSC?

The ABT245s look like RAM muxes bus transceivers. What is an RCT?
 

jfl2507

New Tinkerer
Apr 4, 2024
3
5
3
Time to return to this after another 18 months, With progress this time!
View attachment 14914
It lives :)

How did we get here?
Well first off I ended up killing the PSC when removing it for cleaning. This was entirely my fault for using too much heat as I couldn't be bothered to get the IR preheater out or the low melt solder and just tried to use hot air only. One loud pop later and 5V and GND where shorted together.
At this point I thought the board was done for, the PSC is a custom chip that is only used on the Q840 and Q660 so is not exactly a easy part to track down but I asked around and @RetroTheory had a spare Q840 donor board which he was willing to send my way :)

I then went down a bit of a rabbit hole, when I got the donor board it actually looked in better condition than my original so I decided to use my original as a donor and repair that board but whatever I tried I could not get this board to do anything, it would power on but not chime or do anything else. The closer I looked at the board the more scratches I found on it, I found and fixed a few trace breaks but never managed to get it to boot, I strongly suspect there is a scratch through a trace somewhere preventing it from booting but could never find it

After 18 months of prodding and probing the board I decided last night to swap the PSC and DSP (Which was missing from the board RetroTheory sent me) back on to my original board as although it is not on great condition I knew it at least chimed back in 2014, after swapping these the board started powering on but like the other board did noting else. A couple of hours of prodding and probing revealed nothing untoward except the pins of the ABT245's under the ROMs looking a little green, I didn't think they looked bad enough to be a issue but since I had my RCT on the desk from working on another project I figured it was worth quickly removing them and verifying they where all good

3 of the 4 failed.

I pulled 3 ABT245's off the donor board, verified they worked with the RCT and soldered them on. The board then booted on the first try :)

The root cause of all the original issues where these guys:

View attachment 14918
(shown after replacement as I honstly didn't think they where bad so didn't take a picture beforehand)

And this is why I originally tried to repair the other board, my original board is one of those ones that pads start falling off as soon as you apply any heat to the board
View attachment 14920
Soldering wires to the legs of those chips is not fun.

Next step will be to run this guy through the ultrasonic after which I can finally thing about putting it back together. Hopefully after 10 years I might actually be able to play around with it :)

And thanks again to RetroTheory for sending me the donor board, without that it would have been impossible to repair this board :)
Max I need to look at these chips to see if this is the cause of an inconsistent boot, I am very confortable with soldering and have an omniscospe for the small stuff lol but at the end of the day I am an amateur electronics tinkerer but very willing to learn. My question is if I desolder these chips how to check them with the RTC device you mentioned. not a step by step but a helpful link to get going :).

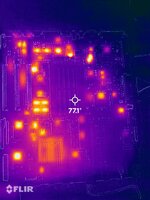
Current setup for mine is logic board is flat on my bench, I am using an ATX power supply with a MACATX adapter I found online and ordered the PCBs for. No simms or vram. the board will only chime if I put pressure by bending the corner upwards around were the memory simm slots. I have visually verified cold solder joints on CPU, RAM slots and power connector basicly all the holethrough joints an reflowed. I also put pressure on top of all the VLSI chips and others in that area but do not believe it is a cold solder joint on the small legs of any IC since I've looked with microscope. I do hear a cracking noise when I bend it slightly. Maybe its one of these chips? worth it to look into, I am attaching also a thermal image I took to see it would help but it looks very similar to another working 840av board I have.

Any suggestions are welcome, and BTW if I keep the corner bent a little, I can boot with DB25 Bluescussi and mac runs fine.
 

Attachments

  • VSBH3187.JPG
    VSBH3187.JPG
    215.5 KB · Views: 46

jfl2507

New Tinkerer
Apr 4, 2024
3
5
3
As it turned out it was a leg of the ROM chip U41 that had a cold solder joint, I had tested continuity on those legs but just a bit of pressure was enough to lift the pad and give inconsistant chimes, I had already caught several others on the VLSI chips ( huge pain to reflow lol) and on the underside of the board so not surprised at all and if it wasnt for the omniscope I would have missed them entirely. There was alot of rot but luckily no broken traces and I have tested a good chunk of the board point to point using bomarc schematics. So glad its over, now I need to figure out how to do hardware tests inside the operating system and see if the MAC does operate fully.

@maxx1zzz I think I figured it out, the RCT is a retro chip tester , I found the website of the guy that sells it and have put one on order. Looks like a fun project and im sure it will come in handy in the future, thanks for that tip. Anyway after 10 years in my closet this quadra 840AV logic board is again booting consistenly. So glad to see it live again after poking at it for years.

840av logic board.jpg

840av boot.jpg
 

croissantking

Tinkerer
Feb 7, 2023
89
37
18
I found the website of the guy that sells it and have put one on order. Looks like a fun project and im sure it will come in handy in the future, thanks for that tip. Anyway after 10 years in my closet this quadra 840AV logic board is again booting consistenly. So glad to see it live again after poking at it for years.
Please could you share the website?
 

jfl2507

New Tinkerer
Apr 4, 2024
3
5
3
Please could you share the website
Hello there, yes the website is from a nice german fellow that keeps it updated, he will only sell you the PCB and you will have to put it together after buying all the components from mouser/digikey ect. it will take a good chunk of time. You can contact him when visiting his site 8bit-museum.de for more infos.
 

croissantking

Tinkerer
Feb 7, 2023
89
37
18
Hello there, yes the website is from a nice german fellow that keeps it updated, he will only sell you the PCB and you will have to put it together after buying all the components from mouser/digikey ect. it will take a good chunk of time. You can contact him when visiting his site 8bit-museum.de for more infos.
Thank you!

I fixed my 840AV. After cleaning up and recapping it was powering on but not chiming. I found a single broken trace going to the AT&T DSP, I ran a wire and then it came fully to life. 100% working.
 
  • Like
Reactions: jfl2507 and Mac84