New profile posts

Hello!

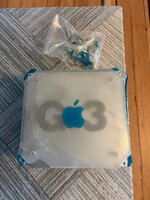
With a repaint and a 3d printed logo it looks like your cube came from Rob at Black Hole Inc. Curious what you paid for it if you don't mind telling; I try to keep a view on pricing trends. But the real reason for reaching out is your printed logo effort - how is it going? Do you intend to offer them? My logo is trashed... and I am not a fan of the 3D printed reproductions.
-Rory
wottle
wottle
No directly from Rob, but I suspect the same. I got it from vintage-computer-parts-store on eBay. Paid about $1700 for it shipped to me (ouch), but I had sold a decent bit of my collection to raise money for it and have always wanted one. I had never seen one locally and felt my chances of scoring one at a bargain were likely not going to happen.

The recreation logos came in, but I was having problems trying to get the gloss finish to look good. The gloss finish from JLC3DP cuts down on the crisp edges that better match the original. Also, the colors are not quite right - a bit too dull. The colors do improve with the gloss finish though. I tried using a gloss spray paint but it tends to pool and there are areas I just cannot get it to stick. My plan was to try getting a brush on coating to give me more control and get the thickness right, but then got side tracked on other projects. I have 9 of the resin prints with no coating if you wanted to try to gloss coat them yourself.

The lineup of two I sprayed with gloss paint, the one gloss finished from JLC3DP, and an unfinished one, underneath the FDM 3d printed on with marker on my Cube. On the FDM one, the N is too red, and the T is too purple.
IMG_1452.jpeg

Here is the unfinished one next to my NeXT Monitor logo:

IMG_1454.jpeg

And here is the gloss painted one:

IMG_1455.jpeg
R
rory040
I'd love to take a shot at applying gloss to one! What would you like for one?
-Rory
wottle
wottle
They cost me about $7 each, so $8 to ship in an envelope via USPS?
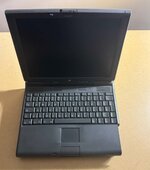
Added this nice PowerBook 3400c to my collection

I will have to send it to get it recapped since it's only making a popping noise and yes I did remove the PRAM battery out of it

I will also need to get a replacement front bezel for it since it's cracked

Attachments

  • cc5e653d-fa0f-46eb-9c42-49b01e30377d.jpg
    cc5e653d-fa0f-46eb-9c42-49b01e30377d.jpg
    88.5 KB · Views: 3
RetroTechTom
RetroTechTom
PRAM Battery is out of it

I will have to send it to get recapped since it only does a popping noise when my charger is plugged in

Attachments

  • c7ac5efb-7a3a-46b9-bbf5-83f5730cd2db.jpg
    c7ac5efb-7a3a-46b9-bbf5-83f5730cd2db.jpg
    157.5 KB · Views: 0
R
I love these machines though the plastics can make you want to rip your hair out!

I want to 3D print a replacements for a few machines... Its a process...
Got a beautiful Power Macintosh G3 Blue and White for a good deal on eBay!

Me: "Hi, can you make sure to ship with enough immobilizing/buffering packing material so that the vintage Mac arrives in the condition pictured. It's my understanding that the corners are pretty fragile and need lots of bubble wrap. Thanks in advance!"

Seller: "No problem."

Narrator: "It would definitely be a problem."

IMG_8953.jpeg

IMG_8965.jpeg
phunguss
phunguss
I learned I will drive half way across the country to pick it up, rather than trust a seller to ship it. I have gone from Minnesota to Idaho to pickup a purchase.
Fizzbinn
Fizzbinn
I think you have it right if you want to be absolutely sure. I guess my luck ran out after getting some other machines (PM 6500/300, PM 8500/300, SuperMac C600/200 and a PowerCenter Pro 240) in the past ~year which were shipped with awesome packing jobs with similar notes to the seller.

The seller did provide a full refund and said to dispose of it as I wanted, so I guess I might have some salvageable parts, will need to see if the internals survived after I pry the thing open. Definitely some things bouncing around in there...
Heres a setup guide, notes on scaling and positioning and my LCD mounting bracket. Let me know if you need anything else I have a TON of notes but mostly partaining to my specific setup.

Attachments

  • MicroMacMinimalSetup.zip
    10.9 KB · Views: 3
🌈NiziMac
🌈NiziMac
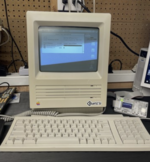
Hey Tavis, thanks again for sending all the files and notes — I really appreciate it.

I went through the setup guide and display config. The way you handle the screen positioning with wlr-randr and the Mini vMac build at 576×430 makes a lot of sense. That was exactly the part I was curious about.

I also opened the LCD bracket STL — really clean design. Very clever way to mount the display inside the MacClock.

I'm going to study everything and start experimenting with my own MacClock build.

One question I had: how are you generating the floppy / system sounds? Is that coming from the ATtiny using PWM?

Tsuyoshi
Hey it’s tavis with the micro Mac project. Let me know what you need and I’ll get them together. There’s an lcd mounting bracket and then I have some other various mounts I made for my other boards and speaker and stuff.
Long time, no post and a Happy New Year to all!
Greetings from my slightly cranky PowerBook 180 the typical exploding hinges included!
Thank goodness for 3D printers!

Attachments

  • IMG_3179.JPG
    IMG_3179.JPG
    232.1 KB · Views: 3