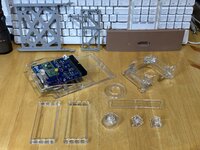
Alongside my CRT Protector came all the knobs and another two sets of my Mac SE and SE/30 metal chassis DESK SAVERS. Below are all high resolution photos so be sure to click them to see the detail.
People who want to print the knob (normal inner diameter version or the slightly larger 6.2 version) should grab the download here.
At bottom right in the photo below you can also see the stock knob and the replacement POT which can be used on the Dummy Analog board of the LCD Retrofit Kit by
@zigzagjoe .

Here's a zoom of the Desk Savers, with the black being SLS 3201PA-F Nylon and gray being MJF PA12-HP Nylon. Note that the Gray MJF is slightly smoother and less gritty to the touch so I would highly recommend that for people wanting to print these!

I printed the Fan Mounting Bracket by
@alxlab using FDM PA12-CF (carbon fiber), and it is perfect for use on the
@zigzagjoe LCD Retrofit Kit's Dummy Analog board, although it would require you to
buy machine screws and nuts, whereas the stock metal bracket only needs the stock machine screws. The carbon fiber should make it stand up well over time despite the vibrations of the fan mounted to it.


I printed the standard knob (not the 6.2 version) in TPU just for fun, but it mounts easily on the POT due to its flexibility, although it is only semi-transparent. And sadly, JLC3DP wouldn't process it without the silly brim due to their min. size restrictions, which means if you print it in TPU at JLC, you will need to spend time removing the brim. Should be easy but I've not done it yet.


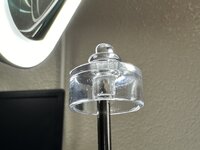
I then printed two versions in 100% transparent SLA 8001 resin, one being the standard inner diameter and the other being the 6.2 version.


Hands down, print the 6.2, not the smaller diameter version STL! Because even the 6.2 didn't slide on as easy as the factory knob does, neither on the factory Analog Board POT, nor on the replacement POT for the
@zigzagjoe Dummy Analog Board. Note that in the two photos below, I didn't slide the transparent one on all the way because it's tighter than the factory knob and I knew that sliding it on all the way would mean I would need to fight and riddle to get it off, and I didn't want to do that. I wanted to get my photos edited and uploaded for you folks faster.
")


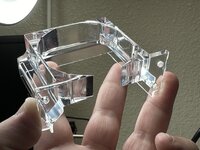
And here's the transparent on the POT for the LCD Retrofit Kit, which I bought separately and is not included with the kit. Because the shaft is shorter, I was able to slide it on all the way and didn't need to worry about fighting to get it off. Again, even the 6.2 is tighter than the factory knob in terms of that inner diameter which fits onto the shaft.

And lastly, here is the knob printed in FDM PA12-CF (carbon fiber). Neither of these wanted to slide on, probably because this filament doesn't print smoothly like resin does, and while TPU doesn't print smoothly either, it's far more flexible. Note the seam on the side that would also need to be cleaned up as well. It would take a lot of work to make the 6.2 fit on, and even then I worry the gritty nature of this print would result in the knob not turning smoothly unless more work was put into making it be very finely sanded down. I don't really want to waste time doing that, so these are just test prints to inform you all that you shouldn't print the knob in PA12-CF.


Now, I've not installed these in the Mac yet so I cannot say how easily they turn. Specifically, the little protruding part that sticks out of the knob at the tip and which fits into the back side of the front plastics of the Mac must be smooth in order for the knob to turn smoothly. The TPU will obviously be harder to turn than the resin, but again, I won't know for sure until I've actually put it inside the machine and tested. But for now, I'd say the 100% transparent knob in the 6.2 inner diameter size is the winner, even though it takes more force to push onto the POT's shaft than the stock knob. (Not a lot more force, just a bit more.)
if it was difficult to put on, have you tried taking it off?
The
red CRT yoke protector was difficult enough to get on such that I won't be taking it off until I need to off. Because if I take it off now for a test, then I have to put it on again, and honestly, my blood pressure is high enough these days. Not impossible, but not fun either. If it only had to legs, it would be so easy to do! And I think it would hold one well enough too. But having 4 legs proves really good support such that it will protect the Yoke better, so I understand why it was made the way.