MINI QEMU guide for Windows 10/11 (etc, 64bit) - host a System 7.1 Quadra 800 equivalent inside the QEMU emulator, so you can join the fun going on in #globaltalk via appletalk
(this is the new and improved guide from February 2025)
Acknowledgements:
these are my notes on the TONS of help I received last year during the 2024 Marchintosh. Couldn't have figured this out on my own without stopping in frustration. thanks to all who helped (nulleric, Ian Scott, Ron, europlus, etc).
In 2025,
@RetroTechChris helped me massively revise the guide - a lot of material is from him so that even more people can be steered to victory. He provided me with a 23 page word and pdf documents, with tons of screengrabs. Thanks, Chris!
Why this guide needed a February 2025 revision:
Since last year, I spun my QEMU globaltalk setup by closing up shop, removing the UDP forwarded port needed for it (port 387) and removed my network bridge under my win11 configuation. You know, as an abundance of caution to remove a vulnerability point. Setting it back up following my own guide turned out to not be enough. I wasn't 100% sure of what address to pick and where. This guide will address those misinterprations.
Setting up QEMU with GlobalTalk has a few perils, but once they are overcome, it’s not too bad of a process. This guide should hopefully get you where you need to go! Screenshots were taken from a Windows 10 PC, but Windows 11 should be similar.
This guide assumes:
- A 64-bit Windows 10 or Windows 11 installation
- A network with a DHCP server
- The ability to connect using a wired Ethernet connection
Officials steps:
1)
First step is to download the latest QEMU build for windows. You can find it in the top-level directory here:
https://qemu.weilnetz.de/w64/
Last year, I got the qemu-w64-setup-20231224.exe there and at the time of writing this revised guide in Feb 2025, qemu-w64-setup-20250210.exe is available (
@Ron's Computer Videos confirms he made his own setup run just fine with that one) - there might yet be a newer version by the time you read this.
From there, go ahead and install QEMU. Installation is straight forward, just click “next “ through the dialogues. Make a note of where QEMU installs, this will be needed for the next step.
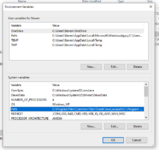
Next, we are going to edit the system environment variables. From the start menu, type “edit the system” so that the option to edit environment variables pops up. Then select “environment variables.” Then, under system variables, double click on “Path”.
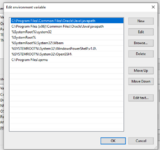
Add a new entry that contains the path to your QEMU install which we noted in a previous step. Most likely, it’s the same as show in this screenshot. Click OK to save your settings, then OK again to close the System Properties dialog
2)
Next up, we are going to configure networking, which requires using a TAP driver. This is a special network which QEMU can connect to, but it won't be able to access the internet on its own - on a step further down below you'll have to give it a nudge by making a bridge between it and your regular ethernet connected network which is your regular access to the internet
Navigate to this URL and download the latest available TAP driver:
https://github.com/OpenVPN/tap-windows6/tags
After clicking on the version, you will be presented with some options. Choose “dist.win10.zip”.
Unzip the dist.win10.zip file in your Downloads folder. This can be performed by right clicking on the zip file and choosing “Extract All…” The default location to extract is fine, it will be in your downloads folder, but make a note of it, you will need it for the next step. Click “Extract” to perform the extraction.
Now launch a command prompt in administrator mode. You can search the start menu for “cmd” and then right click on the result to “Run as administrator”.
In the command window, change to the directory where you extracted the TAP driver using the "cd" command, as shown below
We also need to CD a few levels deeper: “cd dist.win10\amd64”
Now run a command to install the TAP driver. The command is: “devcon install OemVista.inf TAP0901”
Once complete, you should see that install was a success!
3)
Next, we need to make a bridge with the TAP driver, as well as rename it to a sensible name. From the start menu, search for “View Network Connections” and select the result
For the connection with the description “TAP-Windows Adapter V9”, click on the connection name to rename the connection. Rename it to be “TapQemu1”
Next, we need to make a bridge. A couple of things to note:
- Bridges often fail when created with Windows, but that’s fine. We can fix that by hand. [Mu0n's note: this turns out to be where it failed for me in 2025 when I tried to revive my globaltalk access. You think that the bridge will be established, but then when you actually verify the properties of the bridge, only one of the 2 networks is checked in - not good!]
- I strongly suggest bridging to a wired adapter for guaranteed success.
- More often than not, wireless adapters in bridges will not pass GlobalTalk packets.
- More often than not, wireless adapters in bridges need to be set to promiscuous mode to even work (as outlined here: https://ftp.zx.net.nz/pub/Patches/ftp.microsoft.com/MISC/KB/en-us/302/348.HTM).
- The author of this guide [RetroTechChris] has tried bridging to multiple different wireless adapters without success.
To create the bridge, CTRL click the TapQemu1 adapter and your wired connection, then right click and choose “Bridge Connections”
You should now have a bridge! And even if Windows logged an error, that’s okay, we are going to verify the bridge anyway. Right click on the newly-created bridge and select “Properties”
Check to make sure that your wired Ethernet adapter and the TapQemu1 adapter are “checked”. If the bridge failed, one of the two will be unchecked. Go ahead and check whichever one is missing, then click OK.
Next, we need to confirm that your bridge got a valid IP address. This is a pitfall that we have encountered often when setting up a bridged connection. Back in your Administrator command prompt, type “ipconfig” Make sure that the bridge has an address on your network. Also, make a note of your Default Gateway and Subnet Mask. In my case, the Default Gateway is 192.168.1.1 and the Subnet Mask is 255.255.255.0.
[Mu0n: For me, it's 192.168.0.1 - I've seen both addresses in my time on the globe!]
If your IP Address starts with 169, then that means that your bridge did not get an address from your DHCP server. Try to reboot the PC, then launch a new Administrator command prompt and check again. As we can see below, mine is correctly assigned an IP address from my DHCP server of 192.168.1.175.
4)
Next up, let’s make a new directory for QEMU. Navigate back to the Administrator command prompt session. For purposes of this guide, I’ll call it C:\qemu. You are free to put it elsewhere, just make a note of it. You can make a directory using the “md” command as shown below.
Next up, we are going to download an image that has GlobalTalk preinstalled in a Quadra 800 setup.
Several options:
option 1: February 2025 GlobalTalk setup files from
WOzFest HQ
option 2: older
GlobalTalk 1.0.3 setup files (for legacy relevance)
Once downloaded, unzip the contents of the “GlobalTalk-Setup-v1.0.3” or "GlobalTalk-Setup-v1.0.4" depending on what you chose to the folder to the C:\qemu folder (or another folder if you chose a different location).
5)
Next, let’s create a batch file to start QEMU. Back in the Administrator command prompt, change to your QEMU directory using the “cd” command. Then type “notepad qemu-startup.bat” to open a new notepad session.
Copy the following into the Notepad document and save it. Note: if you installed QEMU to a location other than C:\Program Files\qemu, adjust the second line below. This batch file you're preparing should be added in your personal, easily accessed folder where you unzipped the contents of “GlobalTalk-Setup-v1.0.3” or “GlobalTalk-Setup-v1.0.4” - in the previous step, this folder was C:\qemu
NOTE: your Windows installation may be finicky about capitalizing letters for folders. Make sure the previous step PATH variable and the following batch instruction have the exact same writing of "Program Files" for the folder name and not something like "program files". This is a relatively
new quirk of Windows 10+, unfortunately.
Code:
qemu-system-m68k.exe ^
-L "C:\Program Files\qemu" ^
-M q800 ^
-m 128 ^
-g 1152x870x8 ^
-display sdl ^
-bios Q800.ROM ^
-rtc base=localtime ^
-nic tap,model=dp83932,mac=08:00:07:63:67:60,ifname=TapQemu1 ^
-drive file=pram.img,format=raw,if=mtd ^
-device scsi-hd,scsi-id=0,drive=hd0 ^
-device scsi-hd,scsi-id=3,drive=cd3 ^
-drive format=raw,media=disk,if=none,id=hd0,file=GlobalTalk_HD.img ^
-drive format=raw,media=cdrom,if=none,id=cd3,file=Sys7.1-GlobalTalk_Install.img
6)
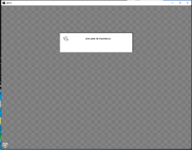
Okay, time to give this a run! In your Administrator command prompt window, type “qemu-startup” and we are off to the races. Your “virtual Quadra 800” should fire right up!
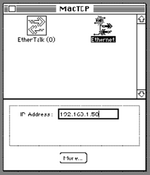
Now it’s time to configure a few things. Double click on “System Folder” on the “GlobalTalk HD”, then “Control Panels”, then “MacTCP”
First, select Ethernet as oppose to EtherTalk (0), otherwise NOTHING WE DO NEXT IS GOING TO WORK.
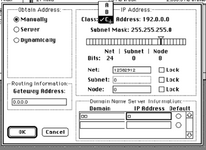
Next, click on “More…” Change “Obtain Address” to “Manually”.
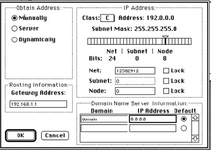
Now, several steps back we made a note of your Default Gateway and Subnet Mask, we are going to need that now. Assuming that your network starts with 192, it is a “class C” network. Change the dropdown to “C”. Otherwise, you will need to manually edit the Net, Subnet, and Node fields to match your Subnet Mask.
Next, put in your Gateway Address, and for Domain Name server, put in a domain of a single period "." (without the quotation marks) and 1.1.1.1 for a Cloudflare DNS server. Then click the “Default” radio button for the Domain Name Server you entered. Click OK.
[Mu0n my own gateway address is 192.168.0.1]
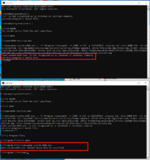
Now we need to choose an IP address, and best to choose a “free” one on your network. Launch a new Command Prompt window. Pick what you think is an unused address on your network. In this example, we picked 192.168.1.50. Try to ping it and make sure that you don’t get a “ping response”. The output should indicate that the destination host is unreachable.
[Mu0n I personally tested 192.168.0.69 and picked that one on my own network since it wasn't used by anything. experiment to find one!]
Once you find a suitable IP address, put it in the MacTCP configuration! Make a note of it, we will need it later.
Close the MacTCP dialogue and reboot! When the reboot finishes, on the “GlobalTalk HD”, go back into System Folder, then Control Panels, then click on Network. Make sure that “EtherTalk Built In” is selected.
Back on “GlobalTalk HD”, double click on Router Manager to launch it
Expand Ethernet and double click on EtherTalk.
Change “Port” to “Seed”. Put in the Network Range that you requested for your GlobalTalk, or pick a unique one not in use in the GlobalTalk spreadsheet. Once you select it, be sure to put it in the spreadsheet so that no one else overlaps with your range! Also, put in the Zone Name that you requested, and click add. I am going to leave these items blank here in my screenshot, since you shouldn’t copy my values J. Once you put your values in, click “Define”
Next, double click on “IP Tunnel”
In IP tunnel, you define all of the nodes that you want to connect to, you can choose anyone’s nodes in the spreadsheet! If you happen to KNOW for sure that a node is up, you should include it for testing purposes. To add a node, enter it in the Host ID box and click “add”.
You should also uncheck “Use only the host IDs listed” if you don’t want to limit which hosts can connect back to you.
When finished click “Define”.
Next, give your router a name and then select File | Save. Give the definition file a name.
Next choose “Control | Start Router” to get things going
. You’ll get a few prompts, just click through them. Once started, you should have a dialog like this!
With the router started, we should verify that the IP address is reachable. Back in your command prompt window from earlier, let’s try to ping the address that we chose in MacTCP. For me, it was 192.168.1.50
[Mu0n: for me it's still 192.168.0.69] . Unlike the last time we pinged this address, we should now get replies!
Note that we won’t get replies from this address unless MacTCP has been started. One pitfall of mine was assuming that just starting the virtual machine would make the address pingable. Not true.
7)
We also need to add the port to our router configuration. This will differ depending on your router type. But basically, you need to set up a rule in your router’s port mappings to allow external UDP port 387 to route to internal UDP port 387 for the IP address that you set in MacTCP. Recall from above that my IP address is 192.168.1.50
Here is what it looks like in Google WiFi for me, your router will probably be different.
[Mu0n: for me, my router is accessible through a LAN web address of 192.168.0.1 (my gateway) and defining the rule looks like the image below]
Okay, back in “Router Manager” we can check to see if we see some hosts! Go to “Windows”, then “Network Information” and you should see any GlobalTalk servers that are currently online!
With this, you should be set! You can use Chooser to access other user’s folders (via AppleShare) and printers.
You can also share your files and devices! Check out the first few steps under “Configuring your Mac” in this most excellent guide for details:
https://biosrhythm.com/?p=2767
Above all, have fun!
[Mu0n: seconded!]
(Massive thanks to RetroTechChris again!)