SATANIC MAC CLUB
Arcade Adventures
.gif")
At this point in time I have purchased, modified and sold a few arcade machines locally which typically funds the next project. One type of cabinet I haven't had experience with was the cocktail cabinet. This week I lucked upon a marketplace listing for a "Pacman video game" listed for $175 CAD, usually at these prices the competition is steep and things get scooped fast. 16 hours after being listed I messaged and offered $150 CAD, The owner said I could pick up immediately!

I was pleasantly surprised to discover the cocktail cabinet was a lot smaller than I had expected, being used to gigantic towering machines this 33" wide table seemed cute and easy to lift.

The cabinet easily opens up and locks in place from the player 1 side with two hinges and a brace. Upon first looks it was obvious this machine hadn't been cleaned since 1981 (this is the date on the built in game PCB. Which turns out to be a "pac-1" clone board of Puckman (Don't tell Namco!) This was later named "Pacman" in North America. The cabinet documentation and parts also indicate this is an original Japanese arcade cabinet. It's not likely this was intended just for Puckman but rather, a generic cabinet operators could install a chosen game, graphics and controls to fit their needs.

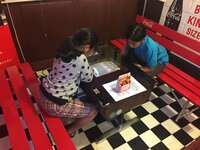
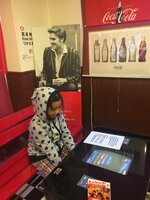
Above, an example of typical cocktail cabinets in a Japanese arcade. Here young folks could enjoy getting high scores and smoke SO MANY cigarettes!


Arcade Adventures
At this point in time I have purchased, modified and sold a few arcade machines locally which typically funds the next project. One type of cabinet I haven't had experience with was the cocktail cabinet. This week I lucked upon a marketplace listing for a "Pacman video game" listed for $175 CAD, usually at these prices the competition is steep and things get scooped fast. 16 hours after being listed I messaged and offered $150 CAD, The owner said I could pick up immediately!
I was pleasantly surprised to discover the cocktail cabinet was a lot smaller than I had expected, being used to gigantic towering machines this 33" wide table seemed cute and easy to lift.
The cabinet easily opens up and locks in place from the player 1 side with two hinges and a brace. Upon first looks it was obvious this machine hadn't been cleaned since 1981 (this is the date on the built in game PCB. Which turns out to be a "pac-1" clone board of Puckman (Don't tell Namco!) This was later named "Pacman" in North America. The cabinet documentation and parts also indicate this is an original Japanese arcade cabinet. It's not likely this was intended just for Puckman but rather, a generic cabinet operators could install a chosen game, graphics and controls to fit their needs.
Above, an example of typical cocktail cabinets in a Japanese arcade. Here young folks could enjoy getting high scores and smoke SO MANY cigarettes!
The original Puckman CPO (Control Panel Overlay) is 13.75" x 4.25", Obviously the name wouldn't work in North America as you're already likely making the obvious joke in your head while reading this. I intend to recreate these original graphics for this project and source original style controls.
The operators guide gives options for bonus scores, display orientation (currently set to vertical) and options for free play vs. quarters. Currently it is set to free play and the coin mechanism is missing the carrier. I will replace the coin mechanisms parts to enable quarter plays, this will teach my daughter responsibility while also robbing her of allowance and this generations assumption of entitlement.
Speaking of quarters, There were no original keys for the tubular cam locks. Despite my best efforts to pick the locks or use alternative keys I resorted to drilling out the lock. Inside the coin box was a 1972 quarter and two copies of "hungryman" dip switch settings and pcb pinout for the edge connector. I was hoping for a lot more cash but 25 cents will do.
At the rear of the coin box tray is the coin mechs counter, this shows us that the cabinet has made over $11,000.00 since it's purchase. That's a lot of quarters!
The Sanyo CRT was honestly the dirtiest part and given the static nature of Pacman/Puckman there was expected burn in of the first map/scores. None of which is visible during play.
Much better! I'll need to purchase a new can of Deoxit to clean up connectors and pins. There's surprisingly no signs of leakage or damage given the age of this machine. Refreshing considering my main stay of rework jobs all involve Apple computers!
The Game PCBs themselves and the questionable edge connector. The game itself is split into 8 roms, The machine is operated by an NEC D780C, a 4mhz 8 bit microprocessor.
The entire cabinet performs well without any adjustments or repairs, I will still preemptively recap some of the electrolytics just for safety sake.
A quick list of things I intend on completing over the coming months:
- Recap
- Cut new glass
- repair coin mechanism
- reproduce vinyl graphics
- replace controls with Puckman originals
- rewire power switch
- refinish metal furnishings
- replace tubular cam locks
- Hide it from my wife
Sept.15 - Removed the glass edge retainers to polish them, used WD40 to soften and remove the adhesive strip that was applied underneath the glass. I am convinced that the glass was replaced at some point as it's not quite the full size of this table. I have a contractor coming to install a wall mirror soon so I will see what he quotes to match the table top with new glass. Taking a look at the tinted acrylic I also notice it's chipped and scratched so I will cut a new piece for that as well. All the painted wood on the tabletop polished up well and I think with new t-molding it will look great.
Sept.17 - Took a wire wheel to the corner brackets to remove the rust and pitting as best as I could. Looking at reference photos the finish looks about right although I would be tempted to have these coated with a mirror finish.
If you have an arcade project please post it! Would love to share knowledge, parts and support!
- Drake
Last edited: