Hey TinkerDifferent!
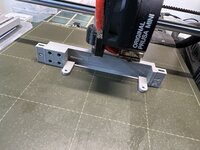
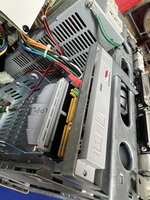
I'm very excited to finally release my latest printed bracket design, which mounts the BlueSCSI 1.1a in the Expansion Slot on a Macintosh SE or SE/30!

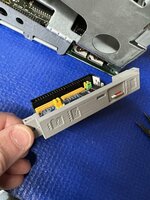
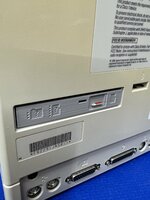
The main goal of this bracket is to make the microSD card as easily accessible as possible, while keeping your Mac fully "enclosed" (e.g. with no obvious holes in it). The microSD card "sticks out" as much as possible while maintaining a 0.8 mm wall (which is about the thinnest that you can go with a 0.4 mm nozzle). Because of the recess of the Macintosh SE bracket in the case, it's still not super easy to get the microSD card out. I can work it out with one finger on each side, but tweezers do make it a lot easier. Reinstalling it is a snap - I have no trouble installing the microSD card with my bare hands. An ejector-style microSD slot might help this, if you're building your own BlueSCSI for this application.
Also features:
Flush fit: This printed bracket sits flush with the face of the Macintosh SE bracket for a clean look.
LED Light pipe: Very useful for troubleshooting microSD card and image issues. The light pipe uses a simple press fit. In a well-lit room, the red LED is pretty dim, but the green LED is nice and bright. I also made the lens on the light pipe the exact same size as the activity LED lens on the front of the Macintosh SE. It's all about the details!
Blink code indicators: What does 3 blinks mean?! The glyphs on the bracket tell you what you need to know.
Extra hard drive screw storage: When you remove your old failing SCSI hard drive to replace it with a BlueSCSI, you can attach the screws to this bracket. That way, when you stumble on an Asante Maccon Ethernet card, or maybe a Micron Xceed videocard (heavy breathing), you'll have the original hard drive screws waiting and ready to move your BlueSCSI to the hard drive bay.
M3 nuts slotted into the bracket! M3 nuts inside the bracket mean you can snug the M3 screws down nice and snugly. Yeah... that's not going anywhere.
Potato: It has a potato on it.


There are two ways for you to get one! If you have a 3D printer, and want to take a crack at printing your own, you can grab the files, instructions, and hardware list from Prusa Printers.
If you don't have a printer, you can buy one from my Etsy shop, and it will include all of the hardware. If it's not in stock, check back in a day or two. 100 percent of the proceeds go towards keeping the 3D printers fed, and additions to my retro Macintosh collection (I can stop whenever I want, right? Right?). But seriously - I love making stuff, and getting to connect with other vintage Macintosh enthusiasts.
Massive thanks to the BlueSCSI team for creating an affordable, reliable, performant solid-state SCSI hard disk replacement! Expect to see at least one more BlueSCSI-related part soon.
I'm very excited to finally release my latest printed bracket design, which mounts the BlueSCSI 1.1a in the Expansion Slot on a Macintosh SE or SE/30!
The main goal of this bracket is to make the microSD card as easily accessible as possible, while keeping your Mac fully "enclosed" (e.g. with no obvious holes in it). The microSD card "sticks out" as much as possible while maintaining a 0.8 mm wall (which is about the thinnest that you can go with a 0.4 mm nozzle). Because of the recess of the Macintosh SE bracket in the case, it's still not super easy to get the microSD card out. I can work it out with one finger on each side, but tweezers do make it a lot easier. Reinstalling it is a snap - I have no trouble installing the microSD card with my bare hands. An ejector-style microSD slot might help this, if you're building your own BlueSCSI for this application.
Also features:
Flush fit: This printed bracket sits flush with the face of the Macintosh SE bracket for a clean look.
LED Light pipe: Very useful for troubleshooting microSD card and image issues. The light pipe uses a simple press fit. In a well-lit room, the red LED is pretty dim, but the green LED is nice and bright. I also made the lens on the light pipe the exact same size as the activity LED lens on the front of the Macintosh SE. It's all about the details!
Blink code indicators: What does 3 blinks mean?! The glyphs on the bracket tell you what you need to know.
Extra hard drive screw storage: When you remove your old failing SCSI hard drive to replace it with a BlueSCSI, you can attach the screws to this bracket. That way, when you stumble on an Asante Maccon Ethernet card, or maybe a Micron Xceed videocard (heavy breathing), you'll have the original hard drive screws waiting and ready to move your BlueSCSI to the hard drive bay.
M3 nuts slotted into the bracket! M3 nuts inside the bracket mean you can snug the M3 screws down nice and snugly. Yeah... that's not going anywhere.
Potato: It has a potato on it.
There are two ways for you to get one! If you have a 3D printer, and want to take a crack at printing your own, you can grab the files, instructions, and hardware list from Prusa Printers.
If you don't have a printer, you can buy one from my Etsy shop, and it will include all of the hardware. If it's not in stock, check back in a day or two. 100 percent of the proceeds go towards keeping the 3D printers fed, and additions to my retro Macintosh collection (I can stop whenever I want, right? Right?). But seriously - I love making stuff, and getting to connect with other vintage Macintosh enthusiasts.
Massive thanks to the BlueSCSI team for creating an affordable, reliable, performant solid-state SCSI hard disk replacement! Expect to see at least one more BlueSCSI-related part soon.
Last edited:


