Yesterday I decided to open up a Color Classic I’ve had on the bench for a while. My Post-It note said that the analog board was inside, but the caps were removed… cool! I opened it up and got to replacing them. Strangely, I noticed some flux residue and fresh solder on the leads of the flyback (part 157-0146). Strange, not something I remember doing.
After the recap, I was delighted to have a crisp display with near-perfect geometry. But wait, was that a click I just heard? Oh yeah. Now I know what someone was trying to do with the reflow.
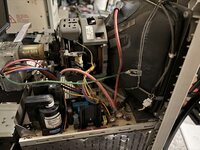
A few years back I bought a couple of spare analog boards for the 5xx series all-in-ones, and still hadn’t done anything with them. Decided to take the plunge and remove a flyback from that analog board (Part 157-0149) and solder it to the recapped CC analog board. Went in just fine, although the lead is much longer and the flyback is slightly taller than the stock part.
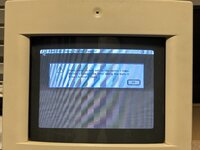
Upon doing a smoke test, I found that the picture was extremely dim, and the image size was reduced maybe 25%. Adjusting the pots got me a little closer to the correct image size, but obviously that’s not the right way to go about things. I don’t really understand how flybacks work. My thinking was that a flyback from a larger trinitron should have no problem with a smaller trinitron, but it seems I’m mistaken.
Just wanted to share these results in case anyone has thought of a similar thing but been afraid to try it. It works, kind of. Now you know.
After the recap, I was delighted to have a crisp display with near-perfect geometry. But wait, was that a click I just heard? Oh yeah. Now I know what someone was trying to do with the reflow.
A few years back I bought a couple of spare analog boards for the 5xx series all-in-ones, and still hadn’t done anything with them. Decided to take the plunge and remove a flyback from that analog board (Part 157-0149) and solder it to the recapped CC analog board. Went in just fine, although the lead is much longer and the flyback is slightly taller than the stock part.
Upon doing a smoke test, I found that the picture was extremely dim, and the image size was reduced maybe 25%. Adjusting the pots got me a little closer to the correct image size, but obviously that’s not the right way to go about things. I don’t really understand how flybacks work. My thinking was that a flyback from a larger trinitron should have no problem with a smaller trinitron, but it seems I’m mistaken.
Just wanted to share these results in case anyone has thought of a similar thing but been afraid to try it. It works, kind of. Now you know.