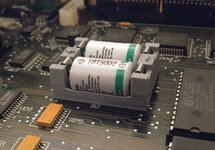
Macintosh II & IIx replacement battery holders

rdmark

Moderator
Staff member
Oct 3, 2021
155
223
43
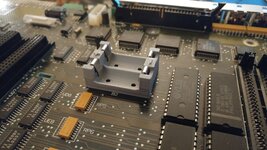
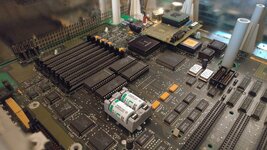
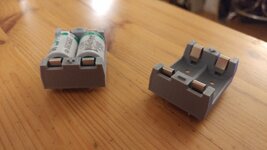
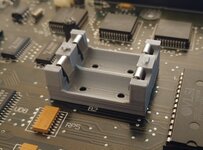
I prefer this other holder type for several reasons. The batteries are in an awkward spot under the drive carrier. It's easy to forget about them or to consider it not worth the effort to take them out when you store your Mac II or aren't sure if you'll use it for a long time. These carriers let you use CR2032s much less likely to leak, positions them above the carrier and they have off switches so you can save battery life when the Mac is in storage.

I paid $6 for 12 holders, installed them in eight different II's and Iix's without any issues. Give them a try next time!
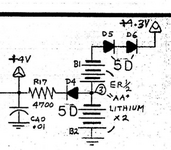
I happen to have one of these holders, and I'm not sure yours are different but mine actually has space for two CR2032s in serial = 6V. So it got me thinking: Can one of these holders replace both original 1/2 AAs?

So tracking down the original Mac II schematics, at a glance the two batteries look like they're connected in serial, but perhaps someone who actually knows anything about electrical engineering can tell us why this wouldn't work?

Edit: I think I found my answer on Downtown Doug Brown's blog:
The 3.3V voltage is for powering the PRAM and clock while the computer is turned off. The 7V voltage is for turning the power supply on when you press either of the computer’s power buttons.
So no, you can't just use 6V! :-/
 

Attachments

  • macii_batteries.png
    macii_batteries.png
    26.9 KB · Views: 86
Last edited:

rdmark

Moderator
Staff member
Oct 3, 2021
155
223
43
I've come up with a solution that I think is pretty neat. Sharing here so that it may help others.

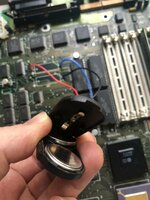
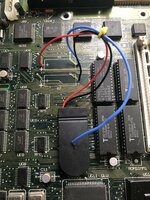
Looking at the schematics, I had the theory that pulling the 3V from between the two batteries in the off-the-shelf 2x CR2032 battery holder would have the same effect as the original battery configuration. Hence, drilling a hole in the middle of the holder and hooking a lead up to the little copper bridge between the two batteries would give me a holder that outputs 6V in one lead, and 3V in another. In the picture, the red lead is 6V, and blue lead 3V.

I also verified with a multimeter in continuity mode that B1 negative and B2 positive on the logic board were connected together, while B1 positive was connected to the D5 diode, and B2 positive to the D4 diode, so feeding 6V in the former and 3V in the latter should give the computer both what's needed for PRAM, and for kickstarting the PSU.

Lo and behold, this was all that this Mac II sold "for parts" needed to sputter to life! Once I get around to recapping the leaky SMD caps, I'll probably shorten the leads for a bit cleaner installation.
 

Attachments

  • IMG_4220.jpg
    IMG_4220.jpg
    547.9 KB · Views: 132
  • IMG_4221.jpg
    IMG_4221.jpg
    1.8 MB · Views: 124

rdmark

Moderator
Staff member
Oct 3, 2021
155
223
43
@rdmark Very clever! You might want to keep the leads long so you can mount it on the drive frame for easier access.
Thanks! I guess I could go your route and mount it on the drive bay; OR, make the leads even longer and put it on top of the space for a Bar Code between the sound chip and the PSU connector. I kind of like the idea of having the battery holder integrated onto the logic board.
 

rdmark

Moderator
Staff member
Oct 3, 2021
155
223
43
Update: Let me add one caveat and pitfall to using 2x CR2032 in a Mac II. After about 2 months had passed since I first installed the above battery mod, my Mac II wouldn't start today. I measured the voltage that the battery holder output, and got 5.09V. This was not enough to kickstart the PSU anymore. Swapping the batteries out for fresh ones got it back up and running.

The old batteries were Duracell brand, the new one Energizer. Let's see who wins this particular longevity contest.
 

Branchus

Tinker Different Public Relations Liaison 2023
Staff member
Founder
Sep 2, 2021
219
473
63
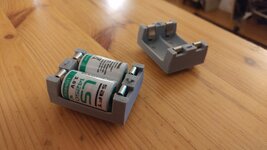
I'v come up with a solution for the Mac II battery holder issue for those with a 3D printer. I've made a double holder with the correct lead spacings to line up with the axial battery pins. Just buy a regular battery holder and use the metal pieces in the 3D printed holder.

IMG_9140 (1).jpg
Image 1 - 10 PCS Plastic Shell 1 x BH 1/2AA Button Cell Battery Sockets Holder Case Black


Just use the metal from these holders:

With the attached STL file.
 

Attachments

  • Double Battery Holder v3.zip
    29.4 KB · Views: 126

lilliputian

Tinkerer
Mar 6, 2022
231
96
28
Los Angeles, California, USA
Thought I would jump in to confirm that Bruce's battery holder for the Mac II works perfectly. I've attached some pictures from my machine. :)
 

Attachments

  • 20220211_180327.jpg
    20220211_180327.jpg
    1.6 MB · Views: 104
  • 20220211_183250.jpg
    20220211_183250.jpg
    1.9 MB · Views: 120
  • 20220211_184127.jpg
    20220211_184127.jpg
    2.5 MB · Views: 105
  • Like
Reactions: Branchus and eric

wottle

Active Tinkerer
Oct 30, 2021
519
272
63
47
Fort Mill, SC
Anyone know if I used a couple 3x AAA battery holders if it would work? If it's expecting 3v, the 3.6v of the AAAs would be a bit high. Too high?
 

wottle

Active Tinkerer
Oct 30, 2021
519
272
63
47
Fort Mill, SC
I guess that's my question. I've seen some documentation saying it's two 3.6v batteries (7.2v total) and others stating it is two 3v batteries, for 6v total. Anyone confirm what they are using in theirs and if it is 3v or 3.6v batteries for the two slots?
 

lilliputian

Tinkerer
Mar 6, 2022
231
96
28
Los Angeles, California, USA
My II came with two leaded Varta 1/2-AAs, which I then replaced with two standard Saft 1/2-AAs. I installed them using a 3D-printed battery holder designed by @Branchus specifically for the II. All you need to do is to poach the metal terminal leads from a couple of standard 1/2-AA holders and then install them in the new holder.

The Vartas as you can see did state "3V" on them.
PXL_20211227_034339563_crop.jpg


Meanwhile, the standard Safts are 3.6V each and work just fine.
20220211_180341.jpg20220211_18325_crop.jpg20220211_184053_crop.jpg

EDIT: My II is Rev. A board.
 
  • Like
Reactions: Branchus and wottle

ScutBoy

Administrator
Staff member
Founder
Sep 2, 2021
337
316
63
Northfield, MN USA
In these machines, isn't one battery for the startup circuit, and the other for the PRAM? I didn't think they were both feeding the same circuit, but I could be wrong! :)
 
  • Like
Reactions: retr01

lilliputian

Tinkerer
Mar 6, 2022
231
96
28
Los Angeles, California, USA
You are correct! I suppose you could omit the one for the clock/pram battery if you really wanted to, but the startup battery is required (well, you can jumpstart it, but that's a little impractical for normal use).
 

retr01

Senior Tinkerer
Jun 6, 2022
2,473
1
793
113
Utah, USA
retr01.com
By the way, on page 106 of that book regarding RTC issues:

The second cell in the lithium battery, B1, powers the real-time clock chip and the parameter random access memory (PRAM) chip, where control panel settings are stored.
 

wottle

Active Tinkerer
Oct 30, 2021
519
272
63
47
Fort Mill, SC
And how do you jumpstart a Mac II or IIx? :)

On page 105 in chapter 4 of Larry Pina's Macintosh II Repair and Upgrade Secrets (1991):

Yeah. Used this truck to jump start my II power supply. Unfortunately, no startup or error chime. Going to do a recap at some point as it looks like it was done with radial caps and it looks bad. Also unsure of the quality of the caps, so restarting with fresh caps feels like a good start. No board corrosion, though, from what I can see.
 
  • Like
Reactions: retr01

wottle

Active Tinkerer
Oct 30, 2021
519
272
63
47
Fort Mill, SC
Yeah. Used this truck to jump start my II power supply. Unfortunately, no startup or error chime. Going to do a recap at some point as it looks like it was done with radial caps and it looks bad. Also unsure of the quality of the caps, so restarting with fresh caps feels like a good start. No board corrosion, though, from what I can see.
OK, so I did a recap the board and saw no change. I also added in some 3xAAA holders for the batteries (with switches), so I can access them and turn them off when not planning on using the machine. I used rechargeable as I've never observed them leaking. I did also add a quick connect connection to the battery holders so I can store them outside the machine when in storage. When recapping, I did notice some trace damage by the cluster of caps on the bottom left of the board (by C5, C140, C142 on Rev A board). I believe I was able to fix them with jumper wires, testing continuity. However, still no video out or chime from the machine. So I had put the unit aside to work on other things until I had a better plan of attack.

Fortunately, I recently picked up a second, working Mac II and due to suspicions of the speaker being bad, I swapped in the known working speaker and low and behold, I am getting a startup chime, followed by some error chimes. I played around with different combinations, and it appears the error chimes were due to the memory. Not sure yet whether it is bad RAM or bad RAM slots. However, I was able to get a successful boot chime, but still no video output. Recently, I bought a pack of 32 ohm speakers from Amazon so both my Mac IIs would have functional speakers, and was testing them out in the no-video machine. Surprisingly, when I booted it up, I was able to hear the chime (expected) AND I got a video signal and a missing boot disk icon. Unfortunately, after I powered off and added a BlueSCSI to see if it would boot, I am now back at no video out. It also doesn't appear to actually be booting because I don't see the activity indicators on the BlueSCSI indicating it is reading the SCSI disk.

Any idea on where to start troubleshooting?