The final conclusion of my earlier post is:
TRACKBALL REPAIR SUCCESS!
The tubing I ordered from this AliExpress seller ("ID 0.8mm OD 4mm") arrived last night, which enabled me to finish the repair today:
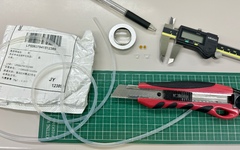
I tried all kinds of nippers and other tools, but in the end, what make the straightest cut was an Xacto Knife pressed straight down onto the tube, sitting atop a rubbery cutting pad. Of course, you need to get your glasses or magnifier so you can measure off a 3.0mm length.
You then need to carefully remove the shafts by disconnecting one end of the little spring, then remove the old yellowed roller, and then clean off the shaft with a tissue and 100% IPA. Then you can slide your new tube piece on rather easily. It slides on with pressure, but is grippy enough to turn the shaft when the trackball rolls against it.
Here's a photo showing how the new roller looks compared to the old. The old is actually tapered into the shape you see by pressure from the trackball over the years. The new roller is flat. It too will need to be replaced one day, but hopefully many years hence.
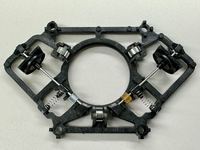
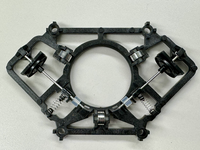
And here are both rollers replaced:
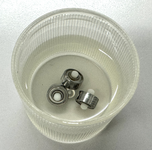
Now I also found that the metal rollers were mostly frozen up. So I took a little pair of curved tweezers and stuck that directly under one of the metal rollers (with the curved part of my tweezers facing up), and I then was able to pop the roller up and out. I repeated for the other two metal rollers. I put them in two baths of 100% IPA. The first bath came out yellow, which is why I gave them a second bath. Probably was old oil used on the ball bearings. Total bathing time was about 2 hours. I did not apply any fresh oil, as they now roll fine and I don't want to gunky up anything with oil.
The last repair was on the plastic under the trackball button because one side had cracked off from the mounts. So I searched and found some rubbery-when-cured epoxy here in Japan called Cemedine EP001N. But the the other big reason I selected that particular epoxy was because the manufacturer advertises it as being able to bond to polycarbonate (which is what the Portable is made of). You can use super glue, and I actually tried that first, but as you know, it dries rock solid hard. So when you press down on the button, it will crack your superglue. It was after that I chose the Cemedine, and because it is rubbery when dried, it takes all your button presses just fine.
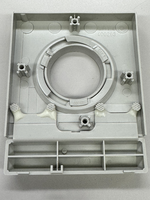
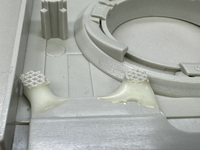
The last thing I did was put some silicone oil on the insider of that top piece of plastic, on the part of that "ring" which is supposed to turn counter clockwise to open and allow you to remove the trackball. Mine was frozen solid and not due to dirt either. I was only able to get the ring off by pressing on the parts on the inside of that top piece. Then I cleaned with IPA. Then I applied silicone oil around the ring sparingly. Then I tested and find the oil worked to make the ring turn. And silicone oil is safe for plastics too, so all is well.
Lastly, I reassembled, tested, and found it to work like new.
Oh, and although there are electrolytic caps on the PCB, I did not replace them, mainly because I didn't have any capacitors in my parts stock which would match the size requirements. But none had visibly leaked, so I didn't have a sense of urgency. That doesn't mean they are still as good as new, but I won't replace them right away.
I hope this helps those of you who have Macintosh Portable TRACKBALL issues!
TRACKBALL REPAIR SUCCESS!
The tubing I ordered from this AliExpress seller ("ID 0.8mm OD 4mm") arrived last night, which enabled me to finish the repair today:

I tried all kinds of nippers and other tools, but in the end, what make the straightest cut was an Xacto Knife pressed straight down onto the tube, sitting atop a rubbery cutting pad. Of course, you need to get your glasses or magnifier so you can measure off a 3.0mm length.
You then need to carefully remove the shafts by disconnecting one end of the little spring, then remove the old yellowed roller, and then clean off the shaft with a tissue and 100% IPA. Then you can slide your new tube piece on rather easily. It slides on with pressure, but is grippy enough to turn the shaft when the trackball rolls against it.
Here's a photo showing how the new roller looks compared to the old. The old is actually tapered into the shape you see by pressure from the trackball over the years. The new roller is flat. It too will need to be replaced one day, but hopefully many years hence.

And here are both rollers replaced:

Now I also found that the metal rollers were mostly frozen up. So I took a little pair of curved tweezers and stuck that directly under one of the metal rollers (with the curved part of my tweezers facing up), and I then was able to pop the roller up and out. I repeated for the other two metal rollers. I put them in two baths of 100% IPA. The first bath came out yellow, which is why I gave them a second bath. Probably was old oil used on the ball bearings. Total bathing time was about 2 hours. I did not apply any fresh oil, as they now roll fine and I don't want to gunky up anything with oil.

The last repair was on the plastic under the trackball button because one side had cracked off from the mounts. So I searched and found some rubbery-when-cured epoxy here in Japan called Cemedine EP001N. But the the other big reason I selected that particular epoxy was because the manufacturer advertises it as being able to bond to polycarbonate (which is what the Portable is made of). You can use super glue, and I actually tried that first, but as you know, it dries rock solid hard. So when you press down on the button, it will crack your superglue. It was after that I chose the Cemedine, and because it is rubbery when dried, it takes all your button presses just fine.


The last thing I did was put some silicone oil on the insider of that top piece of plastic, on the part of that "ring" which is supposed to turn counter clockwise to open and allow you to remove the trackball. Mine was frozen solid and not due to dirt either. I was only able to get the ring off by pressing on the parts on the inside of that top piece. Then I cleaned with IPA. Then I applied silicone oil around the ring sparingly. Then I tested and find the oil worked to make the ring turn. And silicone oil is safe for plastics too, so all is well.
Lastly, I reassembled, tested, and found it to work like new.
Oh, and although there are electrolytic caps on the PCB, I did not replace them, mainly because I didn't have any capacitors in my parts stock which would match the size requirements. But none had visibly leaked, so I didn't have a sense of urgency. That doesn't mean they are still as good as new, but I won't replace them right away.
I hope this helps those of you who have Macintosh Portable TRACKBALL issues!

