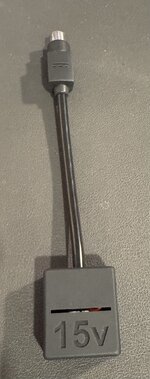
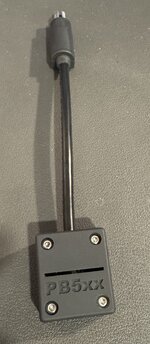
I finally smuggled a PowerBook 145B and 160 to Finland where I've lived for a year, which means I'm finally able to play with old Macs again! I opted to not bring the power adapter with me, since they're pretty heavy and would require a plug adapter to work. Instead, I hacked together a USB-C PD to PowerBook adapter!

The implementation is super simple: It's just a 15V USB-C Power Delivery trigger board, a variable step-down converter, and a pigtail in a 3D-printed case. Here's the complete bill of materials:

I also tested nearly all of my USB-C PD power adapters (and battery):
Here it is with my Apple 20W adapter that came with a 10th-gen iPad. This adapter outputs a max of 9V, so when the trigger board asks for 15V, the adapter simply outputs the highest voltage that if offers. Although I tuned the step-down board for 15V input, the output is still 7.55V.
My PowerBook 160 has been powered with this adapter for most of the weekend. With the adapter on it's side (so both sides of vents are exposed) I saw a max temperature of 38°C / 100°F on the exterior of the case. With the 9V adapter I see about 1.3A, and with a 15V adapter I see about 0.8A. Note that I don't have a battery in this machine, so I'm not sure what kind of load charging a battery would add.

To assemble it:

Of course, the printed case, BOM, and instructions are all available on Printables. There's also the Fusion 360 file, so if your pigtail wire is a different diameter than mine (6 mm), there's a single variable you can adjust. I've also included a PrusaSlicer file with the paint-on supports all done, so you can quickly slice and print it.
Special thanks to @MacintoshLibrarian, who I think suggested the step-down board when I floated this idea about 1.5 years ago.

As always, carefully check your voltages before connecting this to your PowerBook!
The implementation is super simple: It's just a 15V USB-C Power Delivery trigger board, a variable step-down converter, and a pigtail in a 3D-printed case. Here's the complete bill of materials:
- USB-C 15V Trigger Board
- Step Down Converter
- 2.1x5.5 mm Pigtail
- 10mm M3 screws
I also tested nearly all of my USB-C PD power adapters (and battery):
- Apple 35W Dual USB-C Adapter, Model A2571
- Ships with M2 and M3 13" MacBook Air
- Outputs 15V at 2.33A
- Apple 30W USB-C Power Adapter, Model A2164
- Ships with M2 13" MacBook Air
- Outputs 15V at 2.0A
- Apple 20W Adapter, Model A2935
- Ships with the 10th generation standard iPad
- Outputs max 9V, 2.22A
- Despite not supporting 12V, seems to work great with the PowerBook 160
- The Step Down Converter seems to maintain an even 7.5V, even though the input voltage is lower
- Ventev Wall Charger 585920
- Outputs 15V at 3.0A
- Anker PowerCore 20100 Nintendo Switch Edition
- Outputs 15V at 2.0A
Here it is with my Apple 20W adapter that came with a 10th-gen iPad. This adapter outputs a max of 9V, so when the trigger board asks for 15V, the adapter simply outputs the highest voltage that if offers. Although I tuned the step-down board for 15V input, the output is still 7.55V.
My PowerBook 160 has been powered with this adapter for most of the weekend. With the adapter on it's side (so both sides of vents are exposed) I saw a max temperature of 38°C / 100°F on the exterior of the case. With the 9V adapter I see about 1.3A, and with a 15V adapter I see about 0.8A. Note that I don't have a battery in this machine, so I'm not sure what kind of load charging a battery would add.
To assemble it:
- Solder together the boards
- Place them in the enclosure
- Connect a power supply
- Measure the output voltage, and adjust the potentiometer until the output is approximately 7.5 volts
- Connect it to your PowerBook, and boot it up
- Now that the adapter is under a normal load, carefully fine-tune the voltage to 7.5 with 1/16th turns
- Shut down the PowerBook, remove power, and install the top half of the case
Of course, the printed case, BOM, and instructions are all available on Printables. There's also the Fusion 360 file, so if your pigtail wire is a different diameter than mine (6 mm), there's a single variable you can adjust. I've also included a PrusaSlicer file with the paint-on supports all done, so you can quickly slice and print it.
Special thanks to @MacintoshLibrarian, who I think suggested the step-down board when I floated this idea about 1.5 years ago.
As always, carefully check your voltages before connecting this to your PowerBook!
Last edited:


