problem with MicroMac accelerator in SE

KennyPowers

Active Tinkerer
Jun 27, 2022
281
319
63
Here's the steps I took with the MultiSpeed accelerator in the SE today:

First, I moved all four SIMMs on the accelerator to different slots. My thinking was that if one of the SIMMs was bad, I would get a different range in the error message than "D7 - D0". The error message remained the same.

Then, I did as @Trash80toG4 suggested and installed all four SIMMs from the accelerator into the SE's logic board and booted the system without the accelerator installed. It booted fine.

At this point, I was convinced that the problem was with the accelerator board itself and not a bad SIMM.

I then reflowed all of my solder joints on the accelerator's new capacitors. Same error: "ERROR SIMM D7 - D0"

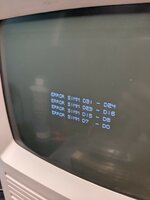
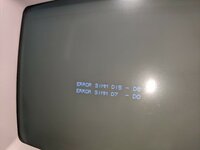
Then, I removed all four SIMMs from the accelerator and cleaned the SIMM slots and the SIMMs' contacts with 99.9% alcohol. After letting it dry and reinstalling everything, now the accelerator apparently can't see TWO of the SIMMs:
PXL_20220627_165447260.jpg

I then tried reordering the SIMMs on the accelerator again, but the errors remain the same.

So, that's where I'm at. I don't know if two of the SIMM slots aren't making good contact with their SIMMs or what. The addition of the "D15 - D8" error after cleaning and reseating suggests a mechanical issue with that slot, but I suppose the "D7 - D0" error that's been there from the start could be a deeper problem (worn trace, bad component, etc). That kind of stuff is beyond my ability to diagnose.
 

retr01

Senior Tinkerer
Jun 6, 2022
2,473
1
796
113
Utah, USA
retr01.com
Have you inspected the SIMM circuitry lines and solder joints at the SIMM sockets? From there, trace to the 68030 CPU and check the CPU lines and solder joints.

Solder joint cracks can happen and might be difficult to see with naked eye. Magnification would be a good idea.
 

KennyPowers

Active Tinkerer
Jun 27, 2022
281
319
63
Have you inspected the SIMM circuitry lines and solder joints at the SIMM sockets? From there, trace to the 68030 CPU and check the CPU lines and solder joints.

Solder joint cracks can happen and might be difficult to see with naked eye. Magnification would be a good idea.

I don't see any solder joints that look suspicious, but like you said, they're tiny.

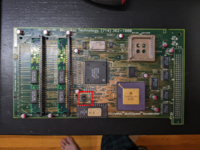
I wanted to try to figure out which two SIMM slots it's complaining about, so I booted up the accelerator with no SIMMs installed and got this:

PXL_20220627_181602484.jpg

After some experimentation, I came up with this mapping:

D31 - D24: slot 1
D23 - D16: slot 2
D15 - D8: slot 3
D7 - D0: slot 4

So the two SIMM slots it's complaining about are slots 3 and 4 (the two on the back of the accelerator board). I wish I could find some documentation for this thing, because maybe it's possible to run it with only two SIMMs installed on the front of the card? There are 4 jumpers on the board:

PXL_20220627_004907051.png

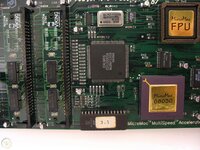
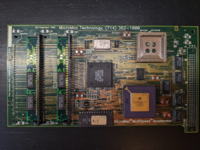
Every image I've seen of this board on the internet always had JP2 closed like mine, and I've even seen some revisions of this board that didn't have jumpers there and just had JP2 hard-wired closed.
 
  • Like
Reactions: retr01

retr01

Senior Tinkerer
Jun 6, 2022
2,473
1
796
113
Utah, USA
retr01.com
Excellent! :)(y):cool:

Now you know it is complaining that there is not a SIMM in one of those slots. Try no jumpers and then go from there? I am wondering if a jumper is there, must mean that have a SIMM in the corresponding socket or not?

I believe that MicroMac was clear that all those SIMM sockets must have a SIMM installed with at least 1 MB each for a minimum of 4 MB. Apparently, when it complained even though there is a SIMM there, either the SIMM is bad or something is up with the socket connections on the board.

@Trash80toG4 or @Kai Robinson, what do those jumper settings correspond to?
 

KennyPowers

Active Tinkerer
Jun 27, 2022
281
319
63
I played around with the jumpers. If JP2 isn't closed, I get garbage to the screen, regardless of what other jumpers are closed. This jives with other revisions of this board I've seen that didn't have jumpers and just had JP2 hard-wired...like this one:

unused-micromac-multispeed_1_23b9116818e4eaafc2507a184902dfa1.jpeg

If JP2 is closed and any other jumpers are closed, I also get garbage to the screen.

I reflowed the new capacitors again, and also reflowed the back two SIMM slots that it seems to be complaining about in case I'd cracked a solder joint with all the adding and removing of SIMMs I've been doing...no change.

About ready to give up and just put this SE back together sans accelerator. Whatever is wrong with this thing is probably beyond my capabilities.
 

retr01

Senior Tinkerer
Jun 6, 2022
2,473
1
796
113
Utah, USA
retr01.com
You will need to test the continuity to see where it drops along the line. I still suspect that somewhere on the board there is an interruption or two that should not happen.
 

JDW

Administrator
Staff member
Founder
Sep 2, 2021
1,577
1,373
113
53
Japan
youtube.com
I did replace all 13 surface-mount capacitors on the accelerator, so maybe one of the replacements isn't making a good connection or is bridged, but I doubt it.
Sorry, I didn't reply until now. I'm still quite busy finishing off SE Reloaded Part III, but I want you to know that I did spot your email to my Protonmail account a few moments ago. I just want to quickly ask if you really put enough solder on your replacement caps? The photo below looks like one of the feet may be a dry contact...

1656500734680.png
 

KennyPowers

Active Tinkerer
Jun 27, 2022
281
319
63
Sorry, I didn't reply until now. I'm still quite busy finishing off SE Reloaded Part III, but I want you to know that I did spot your email to my Protonmail account a few moments ago. I just want to quickly ask if you really put enough solder on your replacement caps? The photo below looks like one of the feet may be a dry contact...

View attachment 6063

I've reflowed/added-solder to all of the new caps multiple times since that first picture was taken. I suppose I could remove the caps again, clean the pads again, and install new caps. I do find this packaging a little easier to solder. My process for initially soldering the current caps was:

  1. Get the pads clean and shiny and free of old solder (cleaning with flux, gentle scrubbing with solder wick, etc)
  2. Apply flux to the pads
  3. Apply new solder to the pads
  4. Apply a little flux to the cap's feet
  5. Hold cap in-position and apply heat to the pad until solder melts and the cap sits down flush and is firmly attached

I did use hot air to remove the old caps (I don't own hot tweezers...maybe I should), but I masked off everything around the caps first like I've done on several other boards without issue, and they all came off pretty promptly. I hope I didn't cook something...
 
Last edited:

JDW

Administrator
Staff member
Founder
Sep 2, 2021
1,577
1,373
113
53
Japan
youtube.com
Well, it seems like you got this error even before recapping...

1656537408568.png


That indicates your recapping has nothing to do with the problem. I was merely curious if there was a dry contact. But if you've reflowed the caps, then they are probably ok.

It's a curious thing that you say you cleaned the board with IPA (after determining the RAM was good), only to find a new error then appears...

1656537602641.png


How long after you used the IPA did you test? I always use a hair dryer or heat gun (low heat from a distance) to ensure all IPA is dried from under sockets and chips before I test, and even then I often wait another day before testing to make absolutely sure it's dried. 99% IPA dries fast, but still, I am very cautious about potential shorts.

But let's assume your IPA was fully dried and it wasn't a matter of a residual liquid short when you powered it and got the second error. The question then becomes HOW you cleaned it with IPA? I used an old toothbrush when cleaning with IPA on my SE Reloaded board recently. Since the board is new, that brushing had no ill effects. And I wouldn't expect it would break any tiny traces on your board either, unless a trace had been mostly eaten away by leaked capacitor fluid or similar through the years.

Assuming the board is only 2 layers, I suppose you could start checking traces with a continuity checker. But if it's 4 layers, then that job gets complex real fast.
 

KennyPowers

Active Tinkerer
Jun 27, 2022
281
319
63
Well, it seems like you got this error even before recapping...

View attachment 6075

That indicates your recapping has nothing to do with the problem. I was merely curious if there was a dry contact. But if you've reflowed the caps, then they are probably ok.

It's a curious thing that you say you cleaned the board with IPA (after determining the RAM was good), only to find a new error then appears...

View attachment 6076

How long after you used the IPA did you test? I always use a hair dryer or heat gun (low heat from a distance) to ensure all IPA is dried from under sockets and chips before I test, and even then I often wait another day before testing to make absolutely sure it's dried. 99% IPA dries fast, but still, I am very cautious about potential shorts.

But let's assume your IPA was fully dried and it wasn't a matter of a residual liquid short when you powered it and got the second error. The question then becomes HOW you cleaned it with IPA? I used an old toothbrush when cleaning with IPA on my SE Reloaded board recently. Since the board is new, that brushing had no ill effects. And I wouldn't expect it would break any tiny traces on your board either, unless a trace had been mostly eaten away by leaked capacitor fluid or similar through the years.

Assuming the board is only 2 layers, I suppose you could start checking traces with a continuity checker. But if it's 4 layers, then that job gets complex real fast.

No, I got that initial error after recapping. I never attempted to use this board with the old capacitors since I could see some signs of leakage under a couple of them. So I don't know if the fault existed before I messed with it.

I'm pretty confident the board was completely dry each time I've powered it on.

I used a toothbrush and sometimes cotton swabs when I needed something absorbent.

I don't know how many layers it is, but I've already tried to visually follow some of the traces and got cross-eyed real quick. I did verify continuity between the individual SIMM contacts and the SIMM slots.

¯\_(ツ)_/¯​


retr01

Senior Tinkerer
Jun 6, 2022
2,473
1
796
113
Utah, USA
retr01.com
I was reading Apple's Macintosh Technical Notes #176: Macintosh Memory Configurations (Published November 1987, Revised April 1992). This caught my attention and I thought about the jumpers on your accelerator card for the SE. On page 6:

176_Macintosh_Memory_Configurations.jpg
 
Last edited:

retr01

Senior Tinkerer
Jun 6, 2022
2,473
1
796
113
Utah, USA
retr01.com
So, I wonder if MicroMac did similar for the memory jumpers on the MultiSpeed SE accelerator card? Apple put three jumper pins for some of the SE logic boards, while MicroMac put four jumper pins.

Cheers,
 
Last edited:

JDW

Administrator
Staff member
Founder
Sep 2, 2021
1,577
1,373
113
53
Japan
youtube.com
@retr01
But if one argues that it is the Jumpers, it then becomes a matter of "why did a second error appear after cleaning with IPA?"

If that board had been tested prior to the recap, it would have been informative insofar as we could rule out the new caps and related soldering as having been part of the problem. But what's done is done, so we can't test that.

If a teensy tiny bit of a teensy tiny trace had partially been eaten by spilled cap fluid, then I suppose it could be conceivable that a good scrub with an old toothbrush may have finished off that poor little trace, making a clean break and yielding the new error. In such a case, that would imply the first error is also due to the same broken trace issue.

We've basically ruled out it being (a) the jumper settings or (b) the RAM SIMMs, so that leaves broken traces as possible explanations. And if it is ultimately determine NOT to be a trace, then that would leave chips as being suspect. But that theory is weak because if a chip was bad, it cannot become more bad after an IPA cleaning such that a new RAM SIMM error would result. I therefore suspect it must be at least two broken traces somewhere.
 

retr01

Senior Tinkerer
Jun 6, 2022
2,473
1
796
113
Utah, USA
retr01.com
It would be nice to know about jumper settings to ensure the correct configuration. I am sure it was.

Yes, a trace issue. @KennyPowers, do you have a multimeter? You can use it to check traces and catch broken continuity.
 

KennyPowers

Active Tinkerer
Jun 27, 2022
281
319
63
Yes, like I said, I already did some continuity checks on the SIMM slots themselves, so I have a multimeter.

It's hard for me to follow traces on a multi-layer board like this to find the termination points to check continuity...and there are just a bunch of them too. Limiting it to traces that pass near an electrolytic cap that may have leaked doesn't really narrow it down either since there are 13 such caps on this relatively small board. I don't see any obviously broken traces, but I don't have great magnification either.

I'm going to be traveling for the next couple of weeks, so I'll get back to tinkering with this thing afterwards.
 
  • Like
Reactions: JDW and retr01

Mac84

Administrator
Staff member
Founder
Sep 4, 2021
192
270
63
New Jersey, USA
www.mac84.net
Went looking through this large haul of stuff I got from my dad to see if the box for that accelerator was in there. Got excited when I saw a MicroMac box, but "unfortunately" it was a different accelerator...unused and still sealed in the antistatic bag :p

View attachment 5996

There is a IIci in this lot it would work with, but I think there's already an accelerator in the IIci too :D The Mac Classic I restored before this SE also has an 040 accelerator in it...
Oh wow! Cool find!

If you aren't up for scanning / photographing those... I'd love to scan in those manuals / booklets to preserve them. :)
 
  • Like
Reactions: JDW

KennyPowers

Active Tinkerer
Jun 27, 2022
281
319
63
I therefore suspect it must be at least two broken traces somewhere.

I removed the caps again (with my new hot tweezers) and looked closer, and there are definitely some questionable/corroded traces near some of the caps:

PXL_20220707_191650934.png

So...rookie mistake :rolleyes:. Sorry for the noise. Looks like I get to learn how to repair traces. Is this the ideal/correct method?


Looks like a fun job without magnification. I suppose I could check continuity across the corroded section after scraping to bare copper on either side of it before repairing a trace that isn't broken...
 
  • Like
Reactions: retr01

lobust

Tinkerer
Nov 14, 2021
51
34
18
I removed the caps again (with my new hot tweezers) and looked closer, and there are definitely some questionable/corroded traces near some of the caps:

View attachment 6284

So...rookie mistake :rolleyes:. Sorry for the noise. Looks like I get to learn how to repair traces. Is this the ideal/correct method?


Looks like a fun job without magnification. I suppose I could check continuity across the corroded section after scraping to bare copper on either side of it before repairing a trace that isn't broken...

Don't forget the traces to the pads themselves and the vias they connect to - pretty much all of those look sketchy in your photo.
 
  • Like
Reactions: retr01