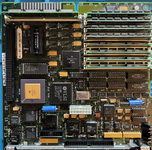
SE/30 sound issue

billbucks

New Tinkerer
Oct 23, 2023
40
9
8
Hi,

I noticed that my Mac SE/30 doesn't play any sound. Here are the tests I carried:
  • Checked the control panel to set the volume to max
  • Managed to get the built-in speaker to work when connecting it to a different Mac SE
  • When I use the audio output by connecting speakers or headphones, I can hear something but the sound is very low
The motherboard looks relatively ok.
 

François

Tinkerer
Aug 9, 2022
90
39
18
France
This is a symptom of a very common problem with SE/30s: a recap is in order! Fortunately, there’s a lot of resources about it: you can start here, for example.
 

billbucks

New Tinkerer
Oct 23, 2023
40
9
8
Thanks for the information. I was hoping to avoid recapping the board but it may be needed..
How difficult is it ? I saw the risky part of removing the existing capacitor ; should it work ok if the capacitor is gently twisted counter clock wise ?
I noticed on the video that he applied heat to remove the capacitors which sounds like a safer way.
Is there a specific capacitor that should fix the sound issue as an attempt not to replace all capacitors ?
 
Last edited:

croissantking

Tinkerer
Feb 7, 2023
89
37
18
Is there a specific capacitor that should fix the sound issue as an attempt not to replace all capacitors ?

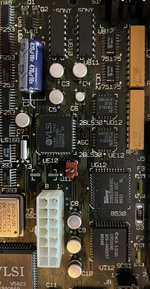
C3, C4, C5, C6. The ones arranged in a square shape next to the Sony sound chips. You could start with those but I'd recommend planning to replace them all eventually. If there's any sign of leakage, the responsible caps need to go, and the electrolyte needs to be cleaned up with isopropyl alcohol to avoid corrosion damage to the board.

Adrian Black's recent recapping video should be a useful resource for you:

Getting the old ones off with the twist method is the easy part. Soldering in the new components is trickier (requires patience and a steady hand) and I'd recommend using plenty of flux paste if you find the solder is not flowing nicely.
 

billbucks

New Tinkerer
Oct 23, 2023
40
9
8
I'll start with these capacitors thanks. I ordered some flux paste. Never used it before but it seems convenient indeed to help with the soldering. Does it protect the board from the iron heat when soldering ?
 

croissantking

Tinkerer
Feb 7, 2023
89
37
18
Nothing like that. It helps the solder 'stick' to the pad and component leg. Solder that you buy already has flux in it but sometimes its not enough. Without flux it would be extremely hard to do any soldering.
 

François

Tinkerer
Aug 9, 2022
90
39
18
France
If you can find another electronic board with electrolytic capacitors that is not working or you don’t have any use for, you can use it to practice recapping. Better ruin a disposable board than a precious vintage one!
 
  • Like
Reactions: wottle

billbucks

New Tinkerer
Oct 23, 2023
40
9
8
Should I clean the board after or before removing the capacitors? I read article on people putting it in demineralized water or vinegar + water before cleaning and drying it. Is it worth doing ?
 

croissantking

Tinkerer
Feb 7, 2023
89
37
18
Difficult to advise - we can’t see the board to see how relatively clean or filthy it is :)

Maybe post a photo of the board?

If relatively clean: don’t bother.

If very dirty: I wouldn’t use any vinegar as it’s very corrosive and really only necessary for neutralising battery acid. An IPA bath and scrubbing with a paintbrush, followed by a rinse with distilled water would be more sensible.
 

billbucks

New Tinkerer
Oct 23, 2023
40
9
8
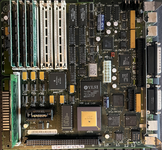
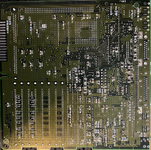
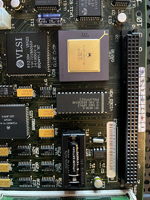
It's actually pretty clean as on the attached photos. I took pictures of some of the capacitors.
 

Attachments

  • mac1.png
    mac1.png
    677.2 KB · Views: 71
  • mac2.png
    mac2.png
    741.5 KB · Views: 66
  • mac3.png
    mac3.png
    287.9 KB · Views: 66
  • mac4.png
    mac4.png
    303.8 KB · Views: 67

croissantking

Tinkerer
Feb 7, 2023
89
37
18
It's actually pretty clean as on the attached photos. I took pictures of some of the capacitors.
It looks great. No need to do any cleaning, maybe a quick blast with compressed air if you fancy.

What I'd do is, remove the caps with the twist method (or whatever method you prefer), then use braid to clean up the pads. You could add fresh solder and then go over with braid again to get them really clean. Wipe all nasty residues away with 100% IPA and Q-tips/cotton buds. Then fit the new ones.
 

billbucks

New Tinkerer
Oct 23, 2023
40
9
8
Hi,

I started by replacing capacitors C3 ,C4, C5 and C6 and it solved the problem, hurray! The sound is working again :D
Thanks everyone for your help.

I continued replacing the remaining capacitors using the wiring diagram here: Wiring Diagram
I replaced C2 and I struggled a bit not only to remove the old one, but mainly to insert the new capacitor though the board. I'm not sure if it's due to the model I have (470µF). So I didn't replace C11.
I noticed C7 looks like a 47µF like most other capacitors, but the wiring diagram doesn't mention it so I left it as well.
 
Last edited:

croissantking

Tinkerer
Feb 7, 2023
89
37
18
Well done.

The through hole caps are not that crucial to replace. Some people snip them above the legs and then solder the new caps to the old legs.

You probably found it hard to insert the new cap as the old hole was not perfectly clean. I sometimes push a syringe needle through a few times to work out any residual solder.