SMC ROM SIMM Prototype

Kay K.M.Mods

Active Tinkerer
Sep 23, 2021
286
631
93
Tokyo
www.kerosmm.com
I made a ROM SIMM that can be programmed using a general-purpose ROM programmer.
See the details of my blog:


IMG_3932.jpeg
 
Last edited:

Kay K.M.Mods

Active Tinkerer
Sep 23, 2021
286
631
93
Tokyo
www.kerosmm.com
Create your own Bootable 2MB ROM SIMM

<< Last edit Feb 16, 2023 >>


Crucible App for the Mac OS
There were a lot of steps to create a ROM, but we made this easy !
We now have a MacOS-only app "Crucible" that allows you to skip some creation steps.
TD Crucible post is here
Here is my blog


<< Last edit Jan 25, 2023 >>

Finding cheap and delicious food can be difficult, but cooking yourself is a different story.
Of course, I think that you are people who enjoy the process of cooking. If you have good ingredients, you can provide a dinner that is as good as a professional, with the taste you like. This is a post that recommends such things... Cooking is finished in an instant if you get used to it, and unlike real cooking, data is your lifelong companion.
I've been trying to release a lot of kit-like things lately, but it's the act of repairing and hardware hacking that underpins vintage computers. And success encourages you.

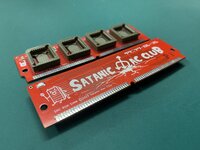
Now the SMC ROM SIMM is available in Kero's Mac Mods Store, $18.00-
Color: Black, Purple, Red

*Shipping to USA, CAN, AU is $7. Please contact us for other regions.

Pre Flashed ROMs (6.0.7 and some softwares) sold separately for $20.00-
Pre Flashed Recycled ROMs (Same Specs) Limited merchandise for $12.00- Only 10 Sets
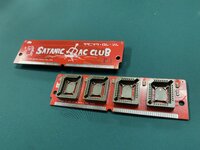
*4 ROMs will be tested and shipped to you on the SMC ROM SIMM card. Recommended for beginners


Non-flashed ROMs are available at Mouser (or DigiKey), but availability is erratic.
When I checked today(Jan 22,2023), it was 2.8 USD, the price goes up every year, so it's better to buy in bulk if you can.

_______________________________________
You can use the EEPROM listed bellow:

SST39SF040 (2MB for 4pcs)
AM29F040B (2MB for 4pcs)
SST29SF010 (512KB for 4pcs)
AM29F010B (2MB for 4pcs)
*AM29F is a discontinued chip, so NOS or used is the only choice.
_______________________________________

SST39SF040, SST39SF010 Datasheet:
スクリーンショット 2023-01-25 16.10.57.png
SMC ROM SIMM uses 39SF040 for 2MB, or 39SF010 for 512KB, The following 70 or 55 numbers are Ns (access time). You can use either.
4C refers to a minimum durability of 10000 cycles and a temperature range of 0 to 70°C. After that NH refers to PLCC32. If E is added after that, it is RoHS Compliant. These specifications are mixed in the market, but basically any of them will work if the capacity is the same.

Tools:

Xgecu ROM programmer T48 (former product TL866II+)
Used when flashing the ROM program. The link is for the full set on Amazon, but the single item on AliExpress is cheaper and recommended.

PLCC32 adapter
Adapter for attaching 39SF040 PLCC32 to T48 programmer. It may even come with the programmer.


PLCC IC Extractor
Pliers for removing the IC of PLCC. I use a slightly processed tip.


Creating a ROM is easy once you get used to it. At first, it is difficult because there are many things that you will not understand until you get used to the tools, but gradually you will find it easier.

CRI2.png


I would like to talk about ROM SIMMs so that everyone's interest can be a little stimulated.
My usual method is to use Mac's terminal and WIndows commands, which is usually due to me being a Mac user, but I'm using a ROM programmer on Windows.
Some people have suggested alternative programming methods, but all I can say is that there is more than one way to get to the top of the mountain!

1, Prepare a base ROM image

Normal ROM SIMM is 256KB or 512KB, but here it is 512KB. It contains information to boot your Mac. Common hacks include changing startup sounds, changing icons, skipping checksums, etc. All of these are in 512KB.(*Notes: Gestalt ID already exists on the logic board)
This 512KB ROM file is mainly based on IIsi(or IIfx). This is the same for ROM SIMMs from any company. IIsi's ROM-based advantages are:
- 32Bit clean, and the upper limit of the installed memory to be recognized is expanded to 128MB.
- HD20 hard disk connected to DB19 can be used
- OS7.6 and 8.1 can be installed (Resedit required)

ROM files download here:
*I also uploaded it to this post just in case. Please check the attached file IIsi.ROM.zip

Our goal is to disassemble the ROM file and complete the original ROM. I wish I could build this method and explain it in an easy-to-understand manner.

2, Make a 1.5MB boot disk

The other is the Boot-ROM image area, which is 1.5MB. The key is how many selfies you can pack into this narrow area, but of course the minimum system folders are included.In the case of BMOW, it is compressed and entered, and it is decompressed to RAM and started, so the capacity is a little large, but it eats RAM. This method is also possible.

cd <FOLDER where you create and store images>
dd if=/dev/zero of=romdisk.img bs=1 count=1572864

The file will be created in the folder you specified with cd command.

*I have attached the 6.0.8 and 7.0.1 boot images (they do not contain the software). check the SMC_ROM_Disk_images.zip

This Boot ROM image can be edited with an emulator such as minivMac.
mvminit.png

3, Combine the boot disk and ROM to create a 2MB bin file

Create a bin file with a total size of 2MB by combining the ROM of step-1 and the boot image of step-2.

Create an image using Terminal on OSX:
cd <FOLDER where you create and store images>
cat iisi+romdrv0.9+nomem+nosum.bin romdisk.img > rom.bin

SStm01.jpg
SS1218.jpg

4, Split the file into 4
This split work and this next flashing work were done on Windows 10.
I use the TL866II+ application for Windows, so I don't think it will be a problem. There is not only one way, as we did at the very beginning. I think that everything can be done on only the one Mac (or one windows machine) depending on the ingenuity.

Split the file created in step-3 into four. I used SRecode. Do it on Windows Command Prompt.

Create a working folder and put SRecode and the bin (ROM) file you want to split
Launch the Windows Command Prompt:

cd "<FOLDER where you create and store images>"
srec_cat rom.bin -binary -split 4 0 -o U4.bin -binary
srec_cat rom.bin -binary -split 4 1 -o U3.bin -binary
srec_cat rom.bin -binary -split 4 2 -o U2.bin -binary
srec_cat rom.bin -binary -split 4 3 -o U1.bin -binary

The binary is divided into
U4, U3, U2, U1
in the order
0,1,2,3
4,5,6,7
....
IMG_3974.jpeg
U4, U3, U2, U1 will be created in the folder you specified with cd.
IMG_3849.jpeg


There are other ways to split files as me and @eric wrote below.
But Homebrew always asks for a new OS, so you'll need a Big Sur or newer OS.
I'm a poor boy so my MacBook Air is only Big Sur, but I haven't tried this method since my main Mac is still Mojave.
Thank you Eric!

5, Flashing 4x EEPROM

Flashing the four files created in step-4(U4, U3, U2, U1) with ROM programmer.
Set SST 39SF040 and PLCC32 adaptor.
Many people use a programmer called "TL866II +", and I use it too. Now with the newest model "T48", there are more ROMs supported and the price has dropped.
There are easy to use applications available for Windows10, and recently I learned that a personal geek-made great application is being released for OSX. This seems a bit cumbersome to implement, but I haven't tried it yet.
IMG_3975.jpeg
Notes: I'd like to edit this method later to make it more perfect.

I have already uploaded a 2MB ROM file split into 4 as a sample. If you don't understand the meaning of the above, please try this free ROM file that we made for you.
Download and unzip "SMC607_SPLITx4.zip", and flashing U1.bin, U2.bin, U3.bin, U4.bin in the folder as they are to four 39SF040 with a TL866II+ programmer to complete your 2MB SMC ROM SIMM.
 

Attachments

  • SMC_ROM_Disk_images.zip
    1.4 MB · Views: 103
  • IIsi_ROM.zip
    1.5 MB · Views: 98
  • SMC607_SPLITx4.zip
    1.3 MB · Views: 101
Last edited:

JDW

Administrator
Staff member
Founder
Sep 2, 2021
1,296
1,147
113
53
Japan
youtube.com
4, Split the file created in step-3 into four. I used SRecode. Do it on Windows Command Prompt.
Create a working folder and put SRecode and the bin (ROM) file you want to split
Launch the Windows Command Prompt:
Amazing work, @Kay K.M.Mods !

Curious if anyone knows a way to use a Mac (modern or vintage) to accomplish the "Split" in step 4 so a Windows computer is not required.
 

Patrick

Tinkerer
Oct 26, 2021
434
1
223
43
@JDW i have _NEVER_ used this command. but i think we can do it with the split command
NAME


split – split a file into pieces


SYNOPSIS


split -d [-l line_count] [-a suffix_length] [file [prefix]]


split -d -b byte_count[K|k|M|m|G|g] [-a suffix_length] [file [prefix]]


split -d -n chunk_count [-a suffix_length] [file [prefix]]


split -d -p pattern [-a suffix_length] [file [prefix]]


DESCRIPTION

The split utility reads the given file and breaks it up into files of
1000 lines each (if no options are specified), leaving the file
unchanged. If file is a single dash (‘-’) or absent, split reads from
the standard input.
do a `man split` on your mac to get the full details.

I'm guessing this supports this set of computers ?
SE/30, IIx, IIcx, IIci, IIfx, and IIsi.
 
Last edited:

Kay K.M.Mods

Active Tinkerer
Sep 23, 2021
286
631
93
Tokyo
www.kerosmm.com
@JDW i have _NEVER_ used this command. but i think we can do it with the split command

do a `man split` on your mac to get the full details.

I'm guessing this supports this set of computers ?
SE/30, IIx, IIcx, IIci, IIfx, and IIsi.
If you can split correctly, I think you can do it in any way! My method is not the only correct answer.
My twitter friend gave me split.py script like this:
スクリーンショット 2022-12-16 13.21.24.png
I think you have a lot of split code. I usually program ROMs in Windows, so it was not a problem to switch to Windows in Step-4.

And programing a ROMs used TLL866 with MacOS:
It's personally made and not a genuine application, but it seems to work well. I'm not familiar with this and will dig into it later.

If I can establish a method to complete with only Mac, I can shift there. However, in the case of Mac, there are many cases where it depends on the latest OS (*Ventura now), so I don't think that method will continue for a while.

The Macs your assumed ROM SIMM supports is correct 👍 
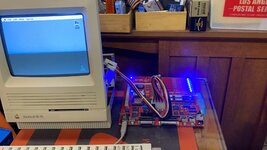
However, some 040 machines have empty lands for unpopulated 64pin ROM SIMMs. If you install a ROM SIMM (socket) in that place, it can be automatically recognized and booted from there. It is conceivable that some machines can be made to use ROMs that pass checksums, as booting is noticeably slower (two minutes each time lol) with maximum memory. BBraun has actually written a ROM that increases the maximum memory capacity of the Quadra650. I tried this and it worked well, but not for overclocking.
 
Last edited:
  • Like
Reactions: eric and Nitram78

eric

Administrator
Staff member
Sep 2, 2021
840
1,354
93
MN
scsi.blue
On a mac with homebrew installed you can also install the package `srecord` - i'd assume it's on most linux distros too.
 
  • Like
Reactions: Kay K.M.Mods

Patrick

Tinkerer
Oct 26, 2021
434
1
223
43
>I usually program ROMs in Windows, so it was not a problem to switch to Windows in Step-4.

thats a good point. i've only programed one rom once. but the programer i have only has windows drivers. So really, the splitting files in step 4 wouldn't be the biggest hurdle of doing this in the mac.

... finding a way to burn roms via a mac would be....
 

Kay K.M.Mods

Active Tinkerer
Sep 23, 2021
286
631
93
Tokyo
www.kerosmm.com
Tips: Only the SE/30 ROM socket is loose

This is the most common complaint from people using 3rd party ROM SIMMs. The following points have been pointed out as to why this happens:

- The thickness of the third-party SIMM card is slightly thin
- The catch of the plastic lock tab is shallow

The same socket is also used on other desktop Macs, so why are there so many bad sockets on the SE/30?
It may be due to the construction of SE/30 and other compact macs. See below for what I mean...
se30wapage.jpg

Warped logic board and state of each socket

RAM sockets: 8 sockets are reinforced with each other, so there is little warping of the board itself. The warping of the RAM socket is also small. The socket itself is short, resulting in less height difference between 1 to 30 pins. *Even in this case, defects may sometimes occur.

ROM socket: One piece is long, so it warps a lot. There may be a gap of about 0.5mm. In this case, when a thick ROM is inserted, a phenomenon is seen in which warping is corrected to some extent, but a thin ROM remains warped.

measures

Secure with a rubber band: Tightening with a rubber band not only makes the contacts tighter, but it also straightens the logic board slightly as a result. However, this method does not last long due to deterioration of the rubber band itself.

Use 3D-printed retaining tabs: These are specifically designed to tighten contacts. I think it's a way to make it better without repairing it.

Replacing the socket: This is the best, but be careful not to align the socket with the warp of the board and install it so that the socket itself is straight. The plastic 64pin SIMM socket is long and not tolerant to warping. It is important that the socket remains straight even when the board is warped.
IMG_3984.jpeg


Increase ROM SIMM thickness: The card itself is 1.2mm. Apply a small amount of solder so that the edge of the card is about 1.4mm. At this time, I think that it is good to increase only the solder on the mounting surface of the part. The reason is that the pins of the SIMM socket are long and the movement is large on the parts side, so there is little burden on the socket.
If you use a solder wick after sucking up the solder, you can make the solder more evenly. After the additional soldering is finished, the flux component is washed away to improve the contact. This method also works for RAM cards.
IMG_3956.jpeg


*For SIMM sockets with metal locking tabs, it's also a good idea to bend the locking tabs slightly inward to make the SIMM card more secure.

The reason why I noticed this warping is that when I replaced the ROM SIMM socket before, it was brand new, but the contact was bad. And I noticed the warp and fixed the socket again and was able to fix it...
 

JDW

Administrator
Staff member
Founder
Sep 2, 2021
1,296
1,147
113
53
Japan
youtube.com
I truly hate rubber bands. Using them to secure broken RAM SIMM slot tabs is easy, but they degrade and break after a few months. Some people say to "hot glue" RAM inside the slots, but that is silly when you are a crazy vintage Mac fan like me who often changes out RAM SIMMS! :)

I added solder to the ROM-inator II MEGA ROM SIMM in the past, but I had to add quite a bit to make it work. The problem was that the solder ends up being a little mountain (a hill?) and after repeated swapping, the solder breaks and thin flakes make contact with the adjacent solder tab, which causes all sorts of problems. I also found it very hard to get the exact same amount of solder on each ROM pad, such that they were all the same height.

Some people have told me that it's hard to make a PCB with the right thickness, but that doesn't matter so much because you can order the PCB with extra copper on all the traces to make those pads thicker/taller. Sure it costs more to do that, but getting the right thickness ROM SIMM is key to reliable performance over time. The only exception being WARPING, which the above post talks about very well!

Is the @Bolle SE/30 Reloaded board the same exact dimensions as the stock board such that it will warp over time like that too? Or maybe not all boards warp like that because it depends on the frame? (I've not checked my boards yet, so I don't know.)

Anyway, excellent post @Kay K.M.Mods !!!
 
  • Like
Reactions: Kay K.M.Mods

Kay K.M.Mods

Active Tinkerer
Sep 23, 2021
286
631
93
Tokyo
www.kerosmm.com
Some people have told me that it's hard to make a PCB with the right thickness, but that doesn't matter so much because you can order the PCB with extra copper on all the traces to make those pads thicker/taller. Sure it costs more to do that, but getting the right thickness ROM SIMM is key to reliable performance over time. The only exception being WARPING, which the above post talks about very well!
Actually, it was about 5 years ago that the problem of thin PCB thickness appeared, and at that time it was caused by the fact that the thickness was about 1.17mm. Now PCB manufacturers can make 1.2mm, so BMOW and other SIMM cards are made at 1.2mm now 2022. This also means that the accuracy of PCB manufacturers is higher and there is less variation in thickness when making PCBs of the same design.
*It becomes the past tense that it was a way to increase the thickness (1oz to 2oz) slightly 5 years ago. *was a 68KMLA?

As you pointed out, it is a method to increase the copper capacity, but it is not realistic.
If you do that, you can estimate that the PCB price will be 8.5 times. In fact, all manufacturers, including us, consider 1.2mm to be sufficient and sell it.
And the 1oz and 2oz standard values are about 10% more than the overall board thickness, but 10% in this case is for a PCB standard thickness of 1.6mm. There is a risk that the thickness will be too thick on the contrary.

From the above, we know that there are manufacturers that have introduced Goldfinger, but there are no manufacturers that have increased the weight of copper. If there is a way to increase copper reasonably in the future, we may be able to introduce it.

Thanks for the opinion.
 
  • Like
Reactions: Nitram78 and JDW

Kay K.M.Mods

Active Tinkerer
Sep 23, 2021
286
631
93
Tokyo
www.kerosmm.com
Finally finished this SMC ROM SIMM Card!!!


ROM chips are sold separately. It's one of the cheapest ways to get one if you want to make your own ROM SIMM!!!

Special Thanks to: @Stephen @Drake @OneGeekArmy
 

Willj

Tinkerer
Apr 28, 2022
60
34
18
Finally finished this SMC ROM SIMM Card!!!


ROM chips are sold separately. It's one of the cheapest ways to get one if you want to make your own ROM SIMM!!!

Special Thanks to: @Stephen @Drake @OneGeekArmy
Kay, on the Bolle reloaded board there are the spaces for PLCC sockets and chips but Bolle said something about the data lines or something is reversed and custom chips need to be used. Do you know anything about this and or how can make that type of custom rom chips so I can use the sockets instead of the simm?
 

Kay K.M.Mods

Active Tinkerer
Sep 23, 2021
286
631
93
Tokyo
www.kerosmm.com
Kay, on the Bolle reloaded board there are the spaces for PLCC sockets and chips but Bolle said something about the data lines or something is reversed and custom chips need to be used. Do you know anything about this and or how can make that type of custom rom chips so I can use the sockets instead of the simm?
Hahaha, I'm sorry, but I think it's no use asking me that. I've been using ROM SIMMs since the beginning, so I haven't tried that. Perhaps the stored data 0,1,2,3 usually fits from U4, U3, U2, U1 but I think it fits from U1, U2, U3, U4 and vice versa.
But it would be confusing if I had to do that, and I wanted to develop a SMC ROM SIMM that would work with a normal SE/30, so I wasn't interested in this and made my own ROM.

PS: It seems that Bolle is also participating in TD, so how about asking him?
 

Willj

Tinkerer
Apr 28, 2022
60
34
18
@Willj Sorry, but here is my POST for our SMC ROM SIMM and I want to separate it from the ROM information about Bolle's LogicBoard.
If we put the information you want here as it is, people won't know whether it's our SMC ROM SIMM information or Bolle's LogicBoard ROM information, so I'd like to focus on my ROM SIMM information here.
I don't want buyers to mistake what I said here about Bolle's boards and flash it into our ROM SIMMs, so please understand.
If you give up the post here and make another post, I will go see it !
I have removed it not to confuse things. Well understood. Will send you PM.
 
  • Like
Reactions: Kay K.M.Mods

JDW

Administrator
Staff member
Founder
Sep 2, 2021
1,296
1,147
113
53
Japan
youtube.com
@Kay K.M.Mods
Just to clarify for myself (yes, I am confused) and for everyone else reading this thread, too your new SE/30 ROM works fine in the stock Apple SE/30 motherboard. I believe that to be a fact. But is there an issue when your ROM is used on a Bolle motherboard? In other words, if you program your ROM and test it in a stock Apple SE/30 motherboard and confirm it works perfectly, if you then put that same ROM into a Bolle motherboard what happens? (1) Does it work fine? (2) Or does it not work without some kind of reprogramming or hardware mod? (3) Or is the only person who knows this @Bolle ?

Since the topic was brought up in this thread, and because people with your new SMC ROM may want to try your SMC ROM on both the stock Apple motherboard and the Bolle motherboard, it may be best to comment on compatibility.

If you don't know if it works in the Bolle motherboard, may say "untested" or "incompatible" regarding the Bolle SE/30 motherboard. Then it is 100% clear for everyone.

— — —

With that said, I think this project, just like so many of your other projects, Kay, is totally amazing. You have an awesome vintage Mac store, and people who don't know about it are really missing out!
 

robin-fo

Tinkerer
Feb 17, 2022
89
45
18
Switzerland
Any ROM SIMM working on a stock board will work in a replica board. (I can confirm that both the stock and Rominator II SIMMs will work)
However, if you remove the PLCC chips from any ROM SIMM and put them into the replica’s PLCC sockets (which don‘t exist on the stock logic board), they will apparently not work (I didn‘t test this) without reprogramming.
 
  • Like
Reactions: JDW

Kay K.M.Mods

Active Tinkerer
Sep 23, 2021
286
631
93
Tokyo
www.kerosmm.com
@Kay K.M.Mods
Just to clarify for myself (yes, I am confused) and for everyone else reading this thread, too your new SE/30 ROM works fine in the stock Apple SE/30 motherboard. I believe that to be a fact. But is there an issue when your ROM is used on a Bolle motherboard? In other words, if you program your ROM and test it in a stock Apple SE/30 motherboard and confirm it works perfectly, if you then put that same ROM into a Bolle motherboard what happens? (1) Does it work fine? (2) Or does it not work without some kind of reprogramming or hardware mod? (3) Or is the only person who knows this @Bolle ?

Since the topic was brought up in this thread, and because people with your new SMC ROM may want to try your SMC ROM on both the stock Apple motherboard and the Bolle motherboard, it may be best to comment on compatibility.

If you don't know if it works in the Bolle motherboard, may say "untested" or "incompatible" regarding the Bolle SE/30 motherboard. Then it is 100% clear for everyone.

— — —

With that said, I think this project, just like so many of your other projects, Kay, is totally amazing. You have an awesome vintage Mac store, and people who don't know about it are really missing out!
Oh No, You are starting to get confused too:LOL:! I asked @Willj to move the post to another place and not get confused. It's not about being mean to him, if he makes another post I will see the info there too, we can help him there!

And I've confused people by coexisting Bolle's logic board and our SMC ROM SIMM on some pix. I would like to explain as follows.
*We shouldn't be talking about Bolle boards here, but here's how I use my SMC ROM SIMM with SE/30 Recreation.

- A genuine ROM SIMM can be used when a 64pin ROM SIMM socket is attached to the SE/30 Recreation. Of course that means our SMC ROM SIMM works perfectly. Paradoxically again, if you don't use the onboard PLCC32 ROM socket on his board, by using a 64pin SIMM socket, you can handle ROM just like a normal genuine SE/30 logic board.

- The onboard ROM of Bolle's SE/30 Recreation is special and reverse byte, Our ROM SIMM (common ROM SIMM) has 4 bytes stored in U4,U3,U2,U1 in the order 0,1,2,3... but I think it means that his SE/30 Recreation is stored in order from the end. This is an issue that Bolle should clarify in detail. Please stop arguing here as it will cause confusion.

From the above, when using genuine SE/30 and Bolle SE/30 with SMC ROM SIMM, it can be used under exactly the same conditions. In that case there is nothing to distinguish between the two. Functions other than PCB layers and battery are exactly the same boards.

Finally, Bolle's SE/30 board is a real gem. I am deeply grateful to him.


Here's a topic for his board, and I encourage you to discuss it here.

Also, it is completely contradictory to recommend his onboard ROM instead of using the SMC ROM SIMM we developed, it's so sad:ROFLMAO::ROFLMAO::ROFLMAO:
Easy to replace and develop, compatible with other SE/30s, plz use our SMC ROM SIMM on Bolle's board too!
 
Last edited:
  • Love
Reactions: retr01 and JDW

JDW

Administrator
Staff member
Founder
Sep 2, 2021
1,296
1,147
113
53
Japan
youtube.com
Thank you for explaining. I was confused because I haven't looked at a recent revision Bolle SE/30 motherboard. I only remembered the first edition which did not have PLCC sockets.

Here's the newest edition Bolle SE/30 motherboard showing (in green) where those PLCC sockets go...

1674023880247.png

Photo Source

Basically, if you don't add the PLCC sockets to Bolle's board and just use Kay Koba's ROM (or use any normal SE/30 ROM) in the standard ROM socket, like you would do on any Apple SE/30 board, then there's no problem! And of course, there's no problem with Kay's ROM in any stock motherboard.


Thanks!