Using the Sun to restore a yellow Macintosh ☀️

I've been looking at the safest ways to restore the color of the Mac without over bleaching the unit or leaving streak marks.

Because the inside of a Mac 128/512/Plus is coated with a conductive covering, I want to avoid submerging the case into hydrogen peroxide as it induces rusting/oxidation. I also want to avoid buying gallons of hydrogen peroxide.

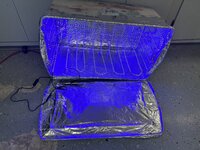
The two methods I tried were using just the sun (nothing else!), and a hydrogen peroxide cream. Here is a before/after gif of a platinum bezel using the two methods.

CreamBrite.gif
SunBrite.gif


Results Overview

As seen in the gif, the center bezel is before and after. The bezel was place between a lightly yellowed bezel on the left and a heavily yellowed bezel on the right just for reference.
The sun was able to restore the color to a modestly yellowed state.
The creme did a much better job and was able to restore the color to a very slight yellowed state.
I was impressed with both results in general

Please note that the cream did NOT over brighten the bezel! From the area under the logo, you can see that the original color was even brighter.
Screen Shot 2022-01-22 at 4.42.03 PM.png


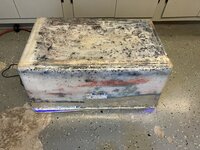
On the negative side for the cream. the bezel color was not evenly restored. On the left side of the inward CRT bend, there's extra yellowing, as highlighted in the image below. This is partially because it's difficult to get all the edges an equal amount of sun in such a short amount of time.
Screen Shot 2022-01-22 at 4.48.28 PM.png

Sun Method

Bezel was placed outside in the sun, in the middle of January, every day between 11am and 4pm (I get limit sun due to surrounding buildings). 2 of the days were sunny and 3 days were cloudy. Temperature was cold, about 6°C/43°F every day. I did check on it everyday and on cloudy days the bezel would get brighter as well. I would place the bezel at slightly different angles every day to ensure all edges got some sun. Only the top side came out a bit darker, but this can be easily fixed by placing it at an angle to focus on top side.

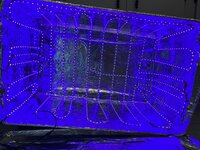
Below is an image of 4 Mac Plus platinum bezels. From left to right:
1. Original Color
2. Brightened via cream, original color can be seen where the logo was removed.
3. Brightened via sun for 5 days
4. Heavily yellowed bezel (right side bezel from above gifs)

Screen Shot 2022-01-22 at 5.34.20 PM.png


Lastly, I'd like to note that the 5 days of sun had no visible affect or discoloration on the badge, however I'm sure that if I did leave it out for a couple weeks it would.


Cream Method

I followed the method described in this youtube video.
Recipe (note this makes enough to do at least 5 macs!!):
  • 500ml 3% hydrogen peroxide
  • 1 tablespoon Xanthan Gum
  • 2 tablespoons Glycerin
  • 1/4 teaspoon Oxiclean power
I used a hand mixer to to mix everything, consistency came out very similar to video. I tried to re-apply cream every 15~20 minutes; I'd recommend every 15 as after 20 minutes it was starting to get a bit hard. It was in the sun for just about 2 hours.

Screen Shot 2022-01-22 at 5.19.00 PM.png
Screen Shot 2022-01-22 at 5.18.51 PM.png


Conclusion​

The sun did a surprisingly really good job! However it seems you'd probably need to leave it out in the sun for a month if you'd like to remove most of the yellowing.
The cream also did a great job, but it can be hard to get even results on a heavily yellowed bezel.
My final suggestion would be to leave the case out for 1~2 weeks in the sun, and then follow up with a 1 hour cream treatment to get that extra final mile.
 
Last edited:

davidg5678

Tinkerer
Oct 30, 2021
60
37
18
Well this is just what I have because Minnesota winters really zap your vitamin D.

My very un-scientific and ignorant question is this, if UV light is what causes the yellowing of these plastics over time then how is UV light alone helping restore the color on the plastics. Its not as dramatic as the HP but still he got results.
Experimenting on something of low value certainly couldn't hurt. :) I guess my concern is that if that lamp is powerful enough to give humans a sunburn in ~10 minutes (if the reviews are to be believed), what effect would that much UV have on a computer case over time? I don't know if the plastics would still need a few hours of exposure to whiten, or if increasing UV intensity scales the retrobriting speed proportionally. It looks like the lamp is only designed to run for only 15 minutes at a time, so I'm not even sure if there would even be a noticable change in the plastic colors in that short an interval. The easiest way to tell would be to give it a try and see what happens!
 

Javmast3r

Tinkerer
Oct 27, 2021
69
61
18
I'm a bit worried how he suggests using a glass for weight, if a strong enough light is used or someone does this with the sun, the glass's light reflection can possibly cause hotspots/streaks.
I also want to mention that I have health concerns about using the submersion method indoors. When I did try the submersion method, I ended up doing it outside due to the smell and large amount of hydrogen peroxide fumes created. Having a couple liters of hydrogen peroxide evaporate into your living area can't be good.
Just a quick reminder that hydrogen peroxide is used in hospitals to clean wounds, and in Dentists offices to clean teeth. Is not dangerous, if anything, fumes would sanitize your lungs 😜😄
Herbert has done indoor retrobrite for years with excellent results. But everybody is entitled to their opinions, fears and methods. Just trying to share real experience.
 

AndyDiags

Tinkerer
Dec 18, 2021
88
158
33
Just a quick reminder that hydrogen peroxide is used in hospitals to clean wounds, and in Dentists offices to clean teeth. Is not dangerous, if anything, fumes would sanitize your lungs 😜😄
Herbert has done indoor retrobrite for years with excellent results. But everybody is entitled to their opinions, fears and methods. Just trying to share real experience.
H2O2 is dangerous. Always make sure to use gloves when handling, treat it same as bleach. Inhaling and skin contact are two different things. CDC lists that vapor at only 75ppm would be deadly (compared to 1,200 ppm for carbon monoxide).
This CDC document has great information about the dangers of working with H2O2. It lists permissible vapor exposure to only 1ppm, which is 1.39 mg/m³!!

As mentioned in the document, H2O2 splashes to the eyes will cause damage, so alway be sure to not scratch your eyes while handling the liquid.
 

Javmast3r

Tinkerer
Oct 27, 2021
69
61
18
H2O2 is dangerous. Always make sure to use gloves when handling, treat it same as bleach. Inhaling and skin contact are two different things. CDC lists that vapor at only 75ppm would be deadly (compared to 1,200 ppm for carbon monoxide).
This CDC document has great information about the dangers of working with H2O2. It lists permissible vapor exposure to only 1ppm, which is 1.39 mg/m³!!

As mentioned in the document, H2O2 splashes to the eyes will cause damage, so alway be sure to not scratch your eyes while handling the liquid.
As previously stated, everybody is free to fear anything they choose. I handled peroxide 12% with my bare hands, heated it in the microwave for years, and had some splashed in my eyes. I’m still perfectly fine. Maybe is because I’m from the generation that grew up without seatbelts, bike helmets and drank from the hose. Enjoy life!
If you read and understand the link from the CDC, it states that the dangerous HP is 90%, we are using 3%. We need to understand science before getting frightened...
 
Last edited:

catboyjack

New Tinkerer
Apr 5, 2022
30
23
8
19
California
I recently used the submersion method on my IIc monitor and it came out pretty good, unfortunately my prime spot for retrobrighting doesen‘t get the best consistent sunlight so my peroxide container has been sitting there for days. After a lot of reading I came to the conclusion that maybe the peroxide cream would be my best option because of my tight time constraint and my inability to buy large quantities of peroxide. I still need to preform the treatment on my Macintosh SE and Apple IIc, should I buy the cream or make it from the recipe above? Or is there another method I should try?
 

Javmast3r

Tinkerer
Oct 27, 2021
69
61
18
I recently used the submersion method on my IIc monitor and it came out pretty good, unfortunately my prime spot for retrobrighting doesen‘t get the best consistent sunlight so my peroxide container has been sitting there for days. After a lot of reading I came to the conclusion that maybe the peroxide cream would be my best option because of my tight time constraint and my inability to buy large quantities of peroxide. I still need to preform the treatment on my Macintosh SE and Apple IIc, should I buy the cream or make it from the recipe above? Or is there another method I should try?
My opinion is that if you can't get consistent sun, try with a UV lamp. That way you cal leave it all night, just need peroxide, and you have full control. I have newer had good results with the cream as the creamer agent affects it.
 

wottle

Tinkerer
Oct 30, 2021
476
236
43
46
Fort Mill, SC
My opinion is that if you can't get consistent sun, try with a UV lamp. That way you cal leave it all night, just need peroxide, and you have full control. I have newer had good results with the cream as the creamer agent affects it.
Yeah, I recently switched from using the sun to building a UV box where I have much better control over everything. I've had a few splotchy results because I think I left it too long in the hot sunlight and the peroxide dried or there were air bubbles formed under the plastic wrap. Since switching to the uv LED strip box, I can get stuff done a lot faster and more consistently. I can run it at night, and rinse in the morning and it usually requires just a single 8-hour session.
 

catboyjack

New Tinkerer
Apr 5, 2022
30
23
8
19
California
Interesting, I should look into building one then. I had a more janky led box a while back, but it didn't work well at all. I was considering getting some more heavy-duty UV lamps and mounting them to the containers lid and wrapping the outside with a thermal insulating tape.
 

wottle

Tinkerer
Oct 30, 2021
476
236
43
46
Fort Mill, SC
Interesting, I should look into building one then. I had a more janky led box a while back, but it didn't work well at all. I was considering getting some more heavy-duty UV lamps and mounting them to the containers lid and wrapping the outside with a thermal insulating tape.
Basically, I just took an old storage bin my son had used for hydro-dipping (hence it looks terrible from the outside), lined the inside of the bin and the lid with heavy duty aluminum foil and reflective foil tape, the got a 50 foot spool of LEDs (https://www.amazon.com/gp/product/B08BLCNL9C/ref=ppx_yo_dt_b_asin_title_o09_s01?ie=UTF8&psc=1) and made a grid pattern.
I use the lid as a platform and then lower the box down on top of the lid. Hits it from all sides.

I just brush on some peroxide creme, wrap it in plastic wrap, try to get any bubbles out and ensure the plastic wrap is fully sealed to prevent it from drying out, and leave it overnight. I take it out and rinse it in the morning.

So far I’ve been really happy with the results. The comparison shot isn't exactly fair because one is a beige 512k and the other is a platinum SE/30. However, they were actually very similar in color before I did the SE/30.
 

Attachments

  • 277117EB-2BB7-4FED-BFB7-F289A362E173.jpeg
    277117EB-2BB7-4FED-BFB7-F289A362E173.jpeg
    1.7 MB · Views: 118
  • 73C147D1-B284-4F5D-8579-817A954AB136.jpeg
    73C147D1-B284-4F5D-8579-817A954AB136.jpeg
    1.9 MB · Views: 99
  • BE1C4DD3-9539-423C-BE24-C211CF8A5D52.jpeg
    BE1C4DD3-9539-423C-BE24-C211CF8A5D52.jpeg
    1.5 MB · Views: 130
  • 21636AE1-C92E-4BA6-BCE7-F612025B2E26.jpeg
    21636AE1-C92E-4BA6-BCE7-F612025B2E26.jpeg
    1.9 MB · Views: 144
Last edited:

Johnnya101

New Tinkerer
Dec 13, 2021
4
2
3
Does anyone know any long term effects of this light method yet? I thought I read on some other forum it caused really bad reyellowing in short time, with more brittleness.

I have some shattered yellow plastic I can try testing it on. You would think heat or light = yellowing, so how would more light help? I would guess the light is bleaching the yellow oxidation?

I had my IIx and something else that were both very yellowed left outside in a shed with really old windows. Wouldn't you know, the keyboard I left on top of both left the plastic underneath untouched, but both the IIx and the scanner have brightened up? Took a year. I don`t think I have noticed any extra brittleness.
 

Javmast3r

Tinkerer
Oct 27, 2021
69
61
18
PSA: NEVER, EVER, EVER wrap any retrobrite in plastic. Leave it directly. Whoever came with that "brilliant" idea has caused more harm than good. Only if you don't care about your items or like to live dangerously should use it.
Just stick to the proven methods and techniques, be patient and check constantly.
 

Javmast3r

Tinkerer
Oct 27, 2021
69
61
18
Does anyone know any long term effects of this light method yet? I thought I read on some other forum it caused really bad reyellowing in short time, with more brittleness.

I have some shattered yellow plastic I can try testing it on. You would think heat or light = yellowing, so how would more light help? I would guess the light is bleaching the yellow oxidation?

I had my IIx and something else that were both very yellowed left outside in a shed with really old windows. Wouldn't you know, the keyboard I left on top of both left the plastic underneath untouched, but both the IIx and the scanner have brightened up? Took a year. I don`t think I have noticed any extra brittleness.
Long term : none, other than, can get yellow again. Brittleness comes from the plastic composition, not retrobrite. I personally have a few Apple IIc's that have retrobited several times over the years, one about 4 times, they are still "bendable" and in perfect condition. But other plastics, like amigas, Mac Performas and such break even without applying anything.
 
  • Like
Reactions: Patrick

Johnnya101

New Tinkerer
Dec 13, 2021
4
2
3
I too have things that have been retrobrited a few times, and they all remained flexible. After all, retrobrite is a surface treatment, so if the plastic is brittle after, it was brittle to begin with.

Does anyone here remember how long it took for these Macs to yellow when new? I can't see how they would have stayed whiter longer versus with retrobrite. I have seen stories online about Macs becoming yellow in the mid 90s, so a few years, which seems about right in the right conditions.

I have tried using that salon cream inside a ziplock bag. I have had no issues yet. I did a keyboard that way, put it in a bag with cream, and moved it around about once an hour. Keeps it from drying out. Totally different in my eyes than plastic wrap.
 
  • Like
Reactions: wottle

wottle

Tinkerer
Oct 30, 2021
476
236
43
46
Fort Mill, SC
PSA: NEVER, EVER, EVER wrap any retrobrite in plastic. Leave it directly. Whoever came with that "brilliant" idea has caused more harm than good. Only if you don't care about your items or like to live dangerously should use it.
Just stick to the proven methods and techniques, be patient and check constantly.

Out of curiosity, what is the concern with plastic wrap? I've had more problems with the creme drying on devices during the process without a wrap than using the wrap method. Other than doing it wrong (i.e. having air pockets or not wrapping completely), what is the risk of plastic wrap to ensure the peroxide remains wet? I wouldn't do the plastic wrap in sunlight, as I think the UV is too intense and can heat up the peroxide creme under spots unevenly, leading to splotches.

Granted, I'm pretty careful when putting on the peroxide and plastic to ensure good coverage and even coat, minimal overlap of the plastic, etc. But incorrectly performing any retrobright has risks of a bad finish.
 

Javmast3r

Tinkerer
Oct 27, 2021
69
61
18
You said it: plastic wrap does not distribute evenly the peroxide, causing pockets of more retrobrite which causes the "streaking". Painting it and reapplying are the method I recommend. It lets you check the level and adding a fresh coat instead of just getting on top of the dried one.
 

wottle

Tinkerer
Oct 30, 2021
476
236
43
46
Fort Mill, SC
You said it: plastic wrap does not distribute evenly the peroxide, causing pockets of more retrobrite which causes the "streaking". Painting it and reapplying are the method I recommend. It lets you check the level and adding a fresh coat instead of just getting on top of the dried one.
I guess when I hear someone say "never, ever, ever do" something, it makes me believe there is a flaw in the method and a high chance of failure, even when following the steps correctly. However, when you explain the perceived risk, it sounds like what you are saying is there is a risk that can be mitigated by simply doing it correctly, but you believe it too difficult to be done. Then you describe a vague procedure for correcting issues when your method starts to go wrong. Seems like both methods involve risk, but both can

Doing the wrap method correctly with a UV light box indoors, from my experience, is easier than ensuring you don't put on a thin coat in the sun and let it dry out, or ensuring that you properly rotate it to get all sides. I've had a few streaky results doing it the "proper way", but messing up by not applying evenly, or doing it when the sun is too bright / hot, or not leaving the appropriate time between coats. Whereas since I started doing the wrap method in a UB box, I've not had a single instance of streaking or splotches. In my experience, the "apply directly and place in the sun method" seemed much more sensitive with too many variables. If I were taking your stance, I would make a statement that you should NEVER EVER EVER do retrobrighting in the sun. It's simply too risky. However, I know others have had great success with the method, so I simply add my experience to the process, and hope to provide alternatives to others who don't have the ability to baby-sit a retrobright for hours during the day.

Having a method you recommend is one thing, but to dismiss a method because you believe the risks are too high, while ignoring the risks of the method you recommend seems odd. Not trying to start a "vi vs emacs" war here, but I think it's fair for everyone to share their experiences and techniques, and letting others decide which way will work best for them.
 

davidg5678

Tinkerer
Oct 30, 2021
60
37
18
In my experience, there is no"fool-proof" retrobrite method, as all have tradeoffs to at least some extent.

I've personally abandoned the saran wrap/cream technique due to several bad experiences I've had with it, including completely "marbling" a Mac SE.

I prefer the total submersion technique, as I have been much more successful with it. I do it in a plastic bin with some overhead 60W LED UV panels and plain-old 3% drugstore hydrogen peroxide. This goes slowly (over the course of a day or two,) but I'm not usually in a hurry, and so I see the slow speed as an advantage. If something starts to go wrong, I have plenty of time to correct it. In addition, I do not rely on the weather conditions being favorable, so I have retrobrited overnight in the wintertime.

While some techniques work better than others, I don't really think there is only one best technique that everyone should use. I think that it is more a matter of experimenting until you find a technique that works reliabily for you. This may be why seemingly everyone claims that they have found the best method of retrobriting. My advice is to use whatever technique works best for you.
 

pfuentes69

Active Tinkerer
Oct 27, 2021
380
290
63
Switzerland
I tried myself different techniques and the one I like the most is using diluted peroxide cream, apply it WITHOUT wrapping, and then re-apply a fresh coat every 15-20 minutes. With this I got quick and nice results.
Of course, I didn't invent this... I saw it in a video:
 

wottle

Tinkerer
Oct 30, 2021
476
236
43
46
Fort Mill, SC
In my experience, there is no"fool-proof" retrobrite method, as all have tradeoffs to at least some extent.

I've personally abandoned the saran wrap/cream technique due to several bad experiences I've had with it, including completely "marbling" a Mac SE.

I prefer the total submersion technique, as I have been much more successful with it. I do it in a plastic bin with some overhead 60W LED UV panels and plain-old 3% drugstore hydrogen peroxide. This goes slowly (over the course of a day or two,) but I'm not usually in a hurry, and so I see the slow speed as an advantage. If something starts to go wrong, I have plenty of time to correct it. In addition, I do not rely on the weather conditions being favorable, so I have retrobrited overnight in the wintertime.

While some techniques work better than others, I don't really think there is only one best technique that everyone should use. I think that it is more a matter of experimenting until you find a technique that works reliabily for you. This may be why seemingly everyone claims that they have found the best method of retrobriting. My advice is to use whatever technique works best for you.
Out of curiousity, when you got marbling, were you doing the plastic wrap method in the sun? Or the same, controlled LED panels?
 

davidg5678

Tinkerer
Oct 30, 2021
60
37
18
Out of curiousity, when you got marbling, were you doing the plastic wrap method in the sun? Or the same, controlled LED panels?
I was using the cream and plastic wrap in the sunshine when this happened. I've never had marbling when using the LED panels and liquid.

Here's an old post I made about the problem almost five ago: https://68kmla.org/bb/index.php?threads/retrobrite-failure.7603/

Unfortunately, it seems I'm the top google search result for retrobriting failure right now. 😯Whoops!

The only real risk with my current indoor method is for the computer to float halfway through the retrobriting procedure. This can lead to uneven (and unsightly) results, but it is also fairly preventable if you are careful about positioning or use weights.
 
  • Like
Reactions: wottle