3D Printing & MacEffects Appreciation
- Thread starter wottle
- Start date
-
- Tags
- maceffects
You are using an out of date browser. It may not display this or other websites correctly.
You should upgrade or use an alternative browser.
You should upgrade or use an alternative browser.
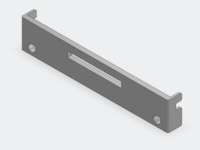
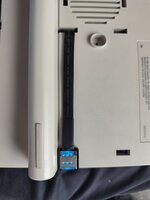
This is what I did. I used 3M VHB tape to stick the bare extender slot PCB to the bracket. I've attached the STL of a bracket I designed, but that reminds me I need to upload it to Printables too...You can easily remove the SD extender from its shell, and design/print a combined bracket/shell that I think would provide a better and more robust fit.
Attachments
What kind of connector does your video out use? I was thinking of making two variations SD card plate: one with a VGA connector and the other with a DB-15 connector to cover both types of video out.Wow. Great job!
I have the LCD color kit by ZZJ installed in my SE/30 and it has a video out connector, so your forthcoming video out connector version would be quite useful actually. I see uses for both of your versions.
What kind of connector does your video out use?
Screenshots from my LCD Color Kit Video…


But the ribbon cable is short and really made for the 15-pin connector to mount in the stock metal bracket as a result.
I had the following Expansion Slot bracket printed at JLC in the past, but it doesn't fit the SD Extender I have (but admittedly, I've not tried to remove it's black plastic case as @François suggested)...


Colin's bracket looks a bit similar, like this...

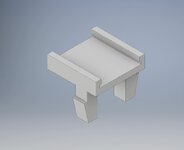
An Expansion Slot cover by @jmacz is like this...


And the we have the one by @Scorpio_ny here, which is known to fit the big black SD card's plastic body in perfectly...

Colin's bracket looks a bit similar, like this...
An Expansion Slot cover by @jmacz is like this...
And the we have the one by @Scorpio_ny here, which is known to fit the big black SD card's plastic body in perfectly...
Attachments

It seems that the rightmost edge of the LED is about where the rightmost edge of that rectangle is (with LED installed, and PLATE Bracked mounted atop Floppy Drive). LED diameter is 5mm, so (8 - 5) / 2 = 1.5mm (the amount of shift-to-the-left required for the LED hole).
When you say "rightmost edge", are you looking at that rectangle from inside the case or from in front of the case? It looks like you're saying right most as you look at it from inside the case but I want to confirm. If so, I'll shift it left (when looking at it from inside the case) by 1.5mm.
There are only 4 holes total on MacSD, and because the spacing doesn't match the PLATE bracket version that I printed, I used only 2 bolts to mount it as shown below...
I am assuming when you say "spacing doesn't match the plate bracket version", that you are NOT referring to the spacing between the holes on your MacSD, and that what you are referring to is the current position of the holes on the plate bracket which cause your MacSD to hang off the back end if you attempt to use all 4 holes. Is that correct? I am asking because the holes in the plate bracket are 44.5mm apart (center to center) which is what I measured for standard hard drives (all my quantum drives have the same bottom hole spacing -- it's only the side holes that are different) and seems to be the measurement you took between the holes on your MacSD. So I assuming that you meant was that the position of the holes is not ideal currently on the plate.
Nevertheless, if two more holes in the plate were added, it would give people the option to use 4 bolts if they want to.
I had asked you previously if you had a preference in how far shifted forward you want the additional holes. But looking at how you mounted it, it looks like I just need to add two more holes (not four) about the same 44.5mm (center to center) towards the front of the plate. I'll take care of this.
I only have the small Quantum ProDrive LPS units which don't fit even the stock metal brackets perfectly, and that is why you added the oval cut-out on the back hole in your latest revision. There are 3 holes on each side of my quantum drive, and here are the measurements:
Thanks, the measurements are close enough to what I had. The rear holes were 44.5mm apart (center to center) and I've made the rearmost holes an oval that ranges from 41.5mm (center to center) to 44.5mm (center to center). This should now fit all types of Quantum drives. The new front holes are 60mm (center to center) from what is now the second hole on the wall. These look to be right around what you measured and what I measured against my hard drives here so I think it's good.
All I'm waiting on is confirmation of left vs right for the LED hole shift of 1.5mm and then I'll publish these new models.
An Expansion Slot cover by @jmacz is like this...
Oh, you found those?
") That was before I gave up on the extensions. I think I had a variant for the Quadra Nubus slot covers also. But it was made specifically for the black plastic piece on the extension I purchased. I don't think those plastic pieces are universal in size.
That was before I gave up on the extensions. I think I had a variant for the Quadra Nubus slot covers also. But it was made specifically for the black plastic piece on the extension I purchased. I don't think those plastic pieces are universal in size.Inside, yes.When you say "rightmost edge", are you looking at that rectangle from inside the case or from in front of the case?
I stayed up too late last night and was losing my mind, sorry. I edited my earlier post to say this instead......when you say "spacing doesn't match the plate bracket version"...
So the bottom holes on MacSD are indeed matching your PLATE bracket. And I couldn't use all 4 of the holes on the PLATE bracket only because MacSD would hang off the back end of the PLATE when mounted that way. So because I need to flip MacSD 180° to keep MacSD centered on the PLATE, and because there are 2 holes missing toward the LED side of the plate, I am only able to use the two holes of the PLATE that are in the middle.
Correct.... looking at how you mounted [MacSD], it looks like I just need to add two more holes (not four) about the same 44.5mm (center to center) towards the front of the plate.
You're awesome, @jmacz ! Thank you for your incredible work. Because even the two brackets types that I have right now really are stunning. I wish more people would print them so they can appreciate your handiwork as I do! And toward that end, I will be showing them off in a video.
Yeah, I searched FAR & WIDE for a good bracket that would accommodate the rather huge black plastic extenders that I have now. But because I never had a good mounting solution, I've never really used the Extenders. And the implications of that are that you may be correct. For all I know, I may have the same trouble you did with errors and all that. Because why would you alone have issues and not other people too? So I will need to do more testing to see what happens when my own Extenders are used as the primary means of accessing the SD card.Oh, you found those?
With MacSD, it's not absolutely necessary to use an Extender because removing the back case will give me easy access to the SD card (troublesome, but available). But BlueSCSI v2 owners are out-of-luck, for reasons I specified in an earlier post about its SD card being right smack against the back side of the front plastic case of the computer, making it absolutely IMPOSSIBLE to remove the SD card UNLESS you do one of the following:
1. Remove BlueSCSIv2 from the PLATE bracket (which takes too much time), or
2. Use an SD Card Extender.
Because why would you alone have issues and not other people too? So I will need to do more testing to see what happens when my own Extenders are used as the primary means of accessing the SD card.
Well, I could have been totally unlucky
possible I got a bad batch or something. But I did see afterwards there were a lot of reviews on Amazon complaining about the same issue. Go figure.Ok, the new models are published.


I haven't tried printing these yet. But they should work. Only changes:
Macintosh SE SCSI Drive Bracket by jmacz | Download free STL model | Printables.com
This is a shorter SCSI drive bracket for the Macintosh SE and SE/30. | Download free 3D printable STL models
www.printables.com
Macintosh SE Minimal SCSI Drive Bracket by jmacz | Download free STL model | Printables.com
Small mounting bracket for SCSI drives for the Macintosh SE. | Download free 3D printable STL models
www.printables.com
I haven't tried printing these yet. But they should work. Only changes:
- Walled
- Rear holes are now ovals that extend from the original 44.5mm on center spacing (between second and third holes) to 41.5mm on center spacing. This is to accommodate newer Quantum hard drives.
- Added front pair of holes which are 60mm on center from the second set of holes.
- Shifted the LED hole by 1.5mm to the left (as you look from the rear of the bracket towards the hole).
- Decreased the diameter of the LED hole from 5.2mm to 5.1mm to try for a snug fit so that glue doesn't have to be used.
- Plate
- Added two more holes at the front of the plate that are 44.5mm on center from the second set of holes.
- Shifted the LED hole by 1.5mm to the left (as you look from the rear of the plate towards the hole).
- Removed four vents on the plate to accommodate the new set of holes.
- Decreased the diameter of the LED hole from 5.2mm to 5.1mm to try for a snug fit so that glue doesn't have to be used.
Last edited:
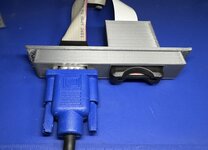
Hi @JDW,Screenshots from my LCD Color Kit Video…
View attachment 24037
View attachment 24038
View attachment 24039
But the ribbon cable is short and really made for the 15-pin connector to mount in the stock metal bracket as a result.
First thank you for the pictures. I remembered that I had a flashed video card for my G4 cube that had the same type of VGA connector. I needed that piece so I could make sure it would fit via the recessed area of the plate (it did not fit originally). On my VGA connector, it had measured 13MM tall. Could you measure yours just to check? Also, recessed the SD holder 2mm back more
Here is what final versions (I hope) look like now:


I tested connecting a VGA cable to make sure it fits well:

I will post the files later tonight if there are no other changes needed.
Attachments
Thanks! Here is the link to the files as promised: https://www.printables.com/model/1456001-macintosh-se-se30-sd-card-extension-holder@Scorpio_ny
Both look fantastic. Well done!
I came across this impressive 100% transparent Apple "Hello" model today:

Here's one of the images from that web page:

It probably would look fantastic if printed in JLC 8001 Transparent Resin, but alas there are only photos and no downloadable STL files. I believe that whoever created it was using the pattern from this photo, which seems to be from this year's WWDC...

Unlike other "hello" models I've seen, this one hasn't any flat sides on it. Moreover, it is designed as a single strand throughout. And it appears to be able to sit on a flat surface without tipping over too. Pretty impressive design work!
SLA 3D Printed Apple Liquid Glass Hello Ornament
Discover how this Apple-style “hello” sculpture was 3D printed with SLA clear resin, achieving a stunning glass-like finish through precision printing and polishing.
facfox.com
Here's one of the images from that web page:
It probably would look fantastic if printed in JLC 8001 Transparent Resin, but alas there are only photos and no downloadable STL files. I believe that whoever created it was using the pattern from this photo, which seems to be from this year's WWDC...
Unlike other "hello" models I've seen, this one hasn't any flat sides on it. Moreover, it is designed as a single strand throughout. And it appears to be able to sit on a flat surface without tipping over too. Pretty impressive design work!
I have made a very simple yet sturdy and well placed SD card slot holder for the LC475, i'd like to share it.
It snaps in to a slot in the bottom and latches there, so no cutting or alteration to the case is required.
if your case is biscuit-brittle, pre-heat the 3D printed plastic part with hot air to soften the plastic before snapping it in.
it uses a thick type SD card extender in to microSD i find these to be sturdy, they have an opening frame, but you can cut the notch that keeps the card in, and that converts it to a slot-in type.
Attachments
Ibook G3 battery pack
Oh, found another one, this one is tricky to print, and im not 100% happy with it but it is the Ibook G3 battery pack shells, i have assembled a pack like this and it does all fit, but it is not as strong as i want it to be.
Oh, found another one, this one is tricky to print, and im not 100% happy with it but it is the Ibook G3 battery pack shells, i have assembled a pack like this and it does all fit, but it is not as strong as i want it to be.
i forgot the STP file there, so i have added it. IPT is for inventor
I can open and rotate STL files merely by selecting the file on my Mac and pressing the Spacebar for QuickLook, but how are STP files viewed?