A takky Mac…..

-SE40-

Tinkerer
Apr 30, 2022
416
161
43
The Netherlands
pin.it
Hello all,
Ive been wondering where to start this topic about combining a 630 board inside a SE/30 case.

Nothing new you may say, and technically, you are correct.
But then, its all about the “tinkering“ fun, right?
I like modern stuff aswell as the older. combining that into something pretty and more usefull is my fetish.

08FD947D-EAED-46C8-A54D-97A0E732DB20.png
Looking at the CC forum faq, they talk about CC Conversions as a -Takky CC- so I can call this a Takky SE/30….but (sadly) as nothing from the original SE internal components is available to me, it could be anything you place this subassembly in.
The aim for me is that this framework should fit any mini Macintosh….
As I use a SE/30 enclosure for now, I call it SE40 because the 630 board uses a 68040 processor, obviously…..🍀 many other similar sized Apple boards can also be made to fit.

Anyhow, anyway……new to me is:
creating this alternative model baseframe, ATX 12V DC conversion, IDE to compact flash install (if possible) and a CRT-glass LCD conversion/combination.

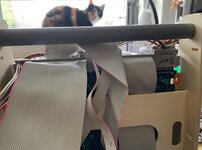
Here some pics showing the current status:

41FC2CBD-F577-4CDB-A6EA-CEB9E11A7FE0.jpegE0F777EF-3B53-4F0A-ACDF-695E4F03D34C.jpeg31E494BA-8940-460A-888F-5DC90232ED14.jpegD9D6B05F-A5E6-4494-8C78-26FAC9E80B7C.jpeg5F20FB58-92D5-4083-85FD-77BF89B9175F.jpeg


Waiting for a new display to arrive, that may take a while. The time in between I can use to sort out to place the remaining components plus PSU and further cabeling.

Looking forward to your all’s suggestions.
Maybe impovements to the 630 board?
Or what would be the next best 68040 one could create?

Greetings, Chris

6C6E923C-6A6C-4F7B-9906-E36CDAD20FA2.jpeg
 

-SE40-

Tinkerer
Apr 30, 2022
416
161
43
The Netherlands
pin.it
Hi,
Good question!

I do think the space underneath is sufficiënt. But if somehow the bottom-backpanel needs to be placed higher for more additional (cable) space, that is possible. (Perhaps for a SCSI cable, these can be bulky)
There is some extra space on top where the cabletree is stuck to the board that can be used.

As this is just a plywood prototype, no harm done….😇 I hope this trialbuilt will be succesfull and worth a nice aluminium shiny framework in the future🍀
 
Last edited:

Trash80toG4

Tinkerer
Apr 1, 2022
807
244
43
Bermuda Triangle, NC USA
Fabulous! love it as it stands, but can think of a few tweaks offhand based on other hacks I've seen over the years.

Are you getting enough space to connect the cables (i.e. ADB connector) ?
Good point, it looks like there's plenty of room to move the logic board higher up in the frame, where an opening underneath would allow standard cables and A/V Card's cables to make a leisurly backwards turn toward the ports panel.

About that panel, I think it it was Al Miner (of CD in CC fame) who was doing a recasing of some sort and we worked out a solution. Do a PCB the length of the ports panel with the connectors soldered to it in all the right places, save for the FDD opening. You'd cut a set of cables to length and solder the wires into thruholes on the board.

As for the FDD opening, line up extension cables for Composite and S-Video inputs with a stereo input jack replacing converted audio jacks and you're covered.

With the available Sony Remote or the one that comes with the A/V kit you won't need the volume control and power on buttons, desolder the I/R receptor from the I/O box and put it on an extension cable. you can then poke it out the bottom of the brightness control wheel's opening.

Alternately, you could do one small irreversible case mod by drilling out the convenient circle in the center of the brightness icon and install the standard rheostat/wheel in place for use as volume control.

Been working with @max1zzz on LCIII board options for Compacts. FDD port opening's reserved for an SD slot for that, but as the Quadra 630 family has an IDE drive, you won't need that. As you probably won't need SCSI peripherals for your purposes(?) you're free to mount a compact flash in its place'

CF-Converter.JPG


This is the one I use in my 6500/6500 testbed, works a treat and the card would be very handy for media swap sticking out the back of the compact, standoffs could reduce the protrusion, but it's very convenient for reach around the back without turning the Mac. Much easier than any kind of SD card swapout.

Disk access LED would be removed and tethered to front bezel.

Been wondering about options since you showed it to me in PM. My Classic 6500 took the Neanderthaler toolmaker hacking approach, the drawer replaces the ports section on the backside of the case. Your reversible approach is a whole different kind of fun. ;)
 
Last edited:

Trash80toG4

Tinkerer
Apr 1, 2022
807
244
43
Bermuda Triangle, NC USA
I do think the space underneath is sufficiënt. But if somehow the bottom-backpanel needs to be placed higher for more additional (cable) space, that is possible. (Perhaps for a SCSI cable, these can be bulky)
AHA! you posted this whilst I was typing. No need to run a SCSI cable on the drawer front connector to the back of the case. If you don't go with the Compact Flash in SCSI port option there are plenty of inexpensive SCSI header to DB-25 breakout options like the one above. SCSI is on the ribbon cable harness for the CD. :p

edit: extending CD connection to follow the cable path would be easy. I'd cut a ribbon cable extension to length, desolder the 2x25 headers on the adapter and solder the IDC wires in their place. Strain relief would be easily handled, hot glue being the most simple, mechanical would be more reliable, but likely not necessary.
 
Last edited:

-SE40-

Tinkerer
Apr 30, 2022
416
161
43
The Netherlands
pin.it
Hello again and thanks for your input here.


i try to reply asfar as i do understand the question /remark……

1: space on top….
It looks spacious, but the two frame sides run all up to the top of the inside case. This way the “drawer” cant move anymore when closed locked in by the front.
Next to that I did choose to do so as there the two round luggs/screwholes to avoid with the cable loom and I wish to have a carry handle next. This for mobile use without enclosure. But about 20 mm can be gained without the carry option.
No worries 😇

2: Connector for peripherals….
About removing the connector and soldering on the various cables…… ive had thoughts, as the board did not fit in the botton layout for the small mac. Vertical mount does not need soldering at al, and its more conveniant, keeps the board easy interchangeable.

3: My thought is to use the FDD slot for a shiny aluminium floppy replica with a compact flashcard in its edge. There is sufficiënt space to do so.

4: The remote LED placed somewhere in the front is a great idea, I did not come to that yet.
It makes installation of that IR box much simpeler. Only setback, where to find the original or replacement remote?

5: Although there are still enough original and now replacement compact Apple cases, I now prefer to use these without any modifications (remains optional if wished ofcourse)
A clear SE/30 would be nice to have in combination with a stainless or alu frame🍀

6: IDE is here an extra alternative for scsi, and hope that works out well. Its also good to know that the 50pin scsi from the CD can be used as a standard internal scsi (for a bluescsi or such)
Or just keep it available for CD installation (?) that remains possible.
Dont know at this point, we will see😇

Hope this topic gives some inspiration to others…
Ideas are welcome!

Greetings,
Chris
 
Last edited:

Trash80toG4

Tinkerer
Apr 1, 2022
807
244
43
Bermuda Triangle, NC USA
2: Connector for peripherals…. :p
About removing the connector and soldering on the various cables…… ive had thoughts, as the board did not fit in the botton layout for the small mac. Vertical mount does not need soldering at al, and its more conveniant, keeps the board easy interchangeable.
I don't think I was clear on that. The 630 board remains stock and easily interchangeable.

I suggested designing a ports panel for the rear of the case with new connectors soldered to it where they belong, wires plugged into the Mobo would be clipped to length, stripped ans soldered into holes meant for them.making optional use what might e seen as legacy interfaces . . .

Compact-Mac-IO-MACendz-Panel-00.JPG


. . . ^$%(* with WORDS! Here you go!

Words always fail me. This is how I think and the only way for me to communicate options I see clearly in my head. Made that breakthru years back at the MLA with the help of Bunsen and Cory. Hence, AI playtime, but this suffices I think?

It's a riff on my collection of NewerTech BookEndz Docks. REAR of Dock is much the same as this panel. Front side of BookEndz has a set of fixed male connectors for the 'Book. In this case you're lopping off cables plugged into your logic board so their stripped wires can be soldered into thruholes on the "Compact Mac I/O Connector Panel PCB."


Note that a Red and White RCA plug to stereo headset jack cable is lopped off to fit S-Video, Yellow Composite and Stereo Input jacks within the Floppy connector opening (fits, I tried it with an ADB cable) and I've repurposed the SCSI port using the CF Card adapter above.

PCB or Panel Mount connectors would be use for mounting the MacEndz plate horizontally or vertically, whichever is easiest in terms of parts availability. CF adapter bolts up in either config.

Should anyone wish to go PCI as I did in my very different Classic project, that redundant ADB Port is just begging for a USB plug. If anyone wants SCSI to anything but SD (total waste in and IDE Mac***) there's your programming port a spot for an Ethernet cable to snake out into the real world, or both +Firewire? Crimping connectors is a given, RJ-45's a fattie.


*** To be clear, you'll find a topic over yonder where 630 IDE was benched against its SCSI bus. Dunno how long ago, but it might be interesting to test the same SD Card on both interfaces. SD to IDE has been a thing for a long time and now the different SCSI/SD configurations could all be tested against in a winner takes all 630 solid state fixed disk replacement tournament! 🤪
 
Last edited:

-SE40-

Tinkerer
Apr 30, 2022
416
161
43
The Netherlands
pin.it
My bad….🙈 sorry!

“I suggested designing a ports panel for the rear of the case”…..

Yes, of course👍
But, the various compact mac models have different ports layout.

I am still working on the best base (frame) layout to make any ports shield possible. From there it can individually adapted as there are just too many options.
Shields can then be created by hand, CNC routed, or 3D printed by their builders wishes.

Personally I dont like too many connectors behind each other, as that can cause another wormhole of problems too.

Speedtest:
As for a ide-scsi -new media- speedtest, that would be interresting,

To me not a priority at this moment.
I will be glad if just this built works out well in the end🍀

Maybe something for you to research that?

Greetings, Chris.
 

Trash80toG4

Tinkerer
Apr 1, 2022
807
244
43
Bermuda Triangle, NC USA
I've been dumping my (thank heavens above) backup of 72 pages of attachments lost a/o their links redirected randomly at the MLA and just ran across this one that I'd mentioned upthread:

MinerAl-Adapter_01.jpg


It's more complicated, including A/B switching Video output (inputs and output?) from or to the Mac for whatever purpose and stereo output implemented from internal speakers. ISTR it being LC? to Compact Mac recasing related, but I'd have to hunt down the thread to be sure. But "L" shaped port breakout to Compact of some sort looks right. That'd be what I was suggesting. It's all customized length cables or cut and stripped cable lengths soldered to the I/O panel, very simple, very reliable, very reversible.

I thought you were only interested in the SE compact variants. The others are easily derived from the same basic ports breakout board layout, only the availability of ports will have changed and so they'd be simplified for Plus and earlier. DE-9 serial connectors make great locations for HD-15 connectors. ;)


edit: I don't much believe in benchmarking, but for curiosity's sake, so someone else would need to do the SD runoff testing.
 
Last edited:

-SE40-

Tinkerer
Apr 30, 2022
416
161
43
The Netherlands
pin.it
That would be a real nice looking and practical solution!
Collecting the needed cables and connectors new would be hard (here in Europe - I guess)
But may be newly available somewhere🙏

Or need to be salvaged from boards and other peripherals.
I am no real fan of old connectors😢

Alternative I….
slide out the frame….run the cables through the backside, connect these to the board and slide the frame assy back in….

Alternative II….
As with my initial ITX build,
cut a hole in the bottom 🙈

B21A48A0-6E1D-4965-B595-41E4E4B52FB3.jpeg
And run the cables to their positions.
This did prove me to work real well and is conveniant.

Too many option🍀
 

Trash80toG4

Tinkerer
Apr 1, 2022
807
244
43
Bermuda Triangle, NC USA
Like your ITX build solution! Very cool. Was doing something similar, but cut the chassis "roof" out and was mounting the ITX board to a DOA Plus board and its nekkidized Mini ATX PSU to the denuded center section of DOA A/B. Case is a damaged, vent melted Plus now has a removable driver side door, Targa top and an internalized desktop Zip Drive conversion. Board wound up elsewhere, but the "Visible Plus has been quite handy.

Here's the inverted Classic/6500 solution for the ProjectorMac. I'll share just one pic so as not to sidetrack your topic.

ChernobylClassic6500ProjectorDVD-00.JPG


Sub-Basement for the second PCI Slot is my very first, 1MB HDD case from APS. The Classic I hold dear as it was my very first curbside pickup, found on a rainy day in the Big Apple. Both have huge sentimental value, but keeping the like in original condition not required. Combining two treasures for into useful purpose/shelf candy seems appropriate. Besides I hate the 6500 case, I have several drawers/harnesses I've harvested from eBay over the year. But the one 6500 case I got was the donor for the nicely fitted drawer and cover for this currently nekkid tuschie Classic.

Dunno it this gives you any ideas for this particular hack, but . . .

Obviously I'm a big fan of the Ports Breakout Board approach. I plan (hope) to one day need to fab one for my second string, experimental victim Portable. I also move my Macs between KVM setups, the AppleDisplayUnit has a braided cord umbilical (Medusa mess) for running a PC Laptop and any one four Macs at a time or switching between between all five of them at will.

Carrying a computer from room to room trailing full length, multiple cable tail sounds like a trip hazard. ;)
 
Last edited:

-SE40-

Tinkerer
Apr 30, 2022
416
161
43
The Netherlands
pin.it
Thanks for the compliment!
Itx is an easy size to built with.

The 6500 is similar sized board as a 630?
Vertical mount offers a lot of space.
No big holes to cut needed👍
Really something to considder….

greetings Chris.
 

Trash80toG4

Tinkerer
Apr 1, 2022
807
244
43
Bermuda Triangle, NC USA
The 6500 is similar sized board as a 630?
Same same, pretty much interchangeable through the entire 630-6500/5200-5500 mobo drawer series.

Vertical mount offers a lot of space.
No big holes to cut needed👍
No way to do the three way projection implementation that way. Rear screen projection COLOR Compact sans LCD, rear for movie projection and scaling/blowing up artwork and best of all, vertical for laid back gaming on the ceiling projection screen. ;)
 

Trash80toG4

Tinkerer
Apr 1, 2022
807
244
43
Bermuda Triangle, NC USA
Much as I believe my Quadra 630 with full 68040 is the best, you can upgrade its lesser offspring with same. I guess I'd have to give the nod to the LC/DOS version that has a second (16MB limited?) SIMM Slot.

In the PPC versions I'd have to say the 6400, as the faster bus speed and marginally better graphics of the 6500, 5500 (and TAM) generation's Gazelle architecture intro'd some serious compatibility issues. But I don't think that's the mainstream view. A 20% kick in the bus makes a system faster overall, more so than the same increase in processor clock I think. Speed and Cache specs of the L2/G3 upgrade installed makes the most obvious difference in a performance build I think, which is pretty much independent of Alchemy/Gazelle architectural concerns?
 
Last edited:

-SE40-

Tinkerer
Apr 30, 2022
416
161
43
The Netherlands
pin.it
Ok, thanks a lot for the input.
Much appreciated!

Then I have to find me Full68040 processor + memory extension lateron.

First see to get this setup going…..😇
 

-SE40-

Tinkerer
Apr 30, 2022
416
161
43
The Netherlands
pin.it
Well, a trial with the cables showed that 10-15 mm underneath on extra space is no problem on the topside and makes it a bit easier on the longer connectors.
It all seems to fit pretty neat…👍

34E0D882-8947-4231-B882-B4D6B8F6C431.jpeg
427E9B3C-5C2A-470F-8D04-F2BCDA9773BF.jpeg
1EC93EDA-234B-4BAB-8F90-83307A186D43.jpeg
Sofar….
Greeting Chris
 

Attachments

  • BA2BCD73-480F-47C8-B11F-44900D11225C.jpeg
    BA2BCD73-480F-47C8-B11F-44900D11225C.jpeg
    818.7 KB · Views: 90