A takky Mac…..
- Thread starter -SE40-
- Start date
You are using an out of date browser. It may not display this or other websites correctly.
You should upgrade or use an alternative browser.
You should upgrade or use an alternative browser.
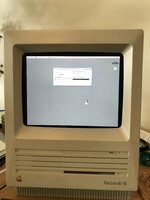
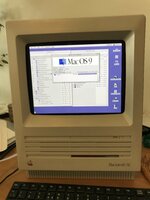
Yeah. I've been exchanging PMs with @-SE40- throughout the day... pretty cool that his panel plays nice with 832x624. Given how small the disk icon is at that reg... imagine what it'd be like at 1024x768!it does support/scale 16" input? I need one!
Sadly, though, that panel he has seems to be unobtanium... I've not been able to locate one so far...
 I've found some others, but who knows if they too will play nice with 16" rez...
Panel shouldn't matter, we need that MultiSync Controller Board! ")
I'd have been happy had it only supported VGA and SVGA, 16" probably looks a bit nasty by comparison I'd think?
I'd have been happy had it only supported VGA and SVGA, 16" probably looks a bit nasty by comparison I'd think?
Hello @fred1212,
Just wondering, would you care sharing some more info/ source about the ipad 3 display & controller?
Next to that how did you set the display scaling?
Is this done via the LCD controller or trough the Pi settings?
Any pics from your built to post?
Would be appreciated!
Cheers, Chris.
Just wondering, would you care sharing some more info/ source about the ipad 3 display & controller?
Next to that how did you set the display scaling?
Is this done via the LCD controller or trough the Pi settings?
Any pics from your built to post?
Would be appreciated!
Cheers, Chris.
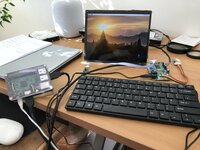
Don't want to highjack this post. So I'll give a brief rundown.
Had a spare pi 3B+ and a damaged ipad 3. Dissembled the ipad and the screen was OK. Purchased driver board from Aliexpress (https://www.aliexpress.com/item/32765195617.html?spm=a2g0o.order_list.0.0.77fb1802OwmMKr)
description -
You can adjust the screen area using overscan in the config files for each install of Sheepshaver or Basillisk.
Still havn't permanently homed the pi and screen in a case yet. Pics of test setup
Had a spare pi 3B+ and a damaged ipad 3. Dissembled the ipad and the screen was OK. Purchased driver board from Aliexpress (https://www.aliexpress.com/item/32765195617.html?spm=a2g0o.order_list.0.0.77fb1802OwmMKr)
description -
4K HDMI LVDS Controller Board for iPad 3 4 9.7' LP097QX1 SPA1 SPAV SPC1 2048x1536 EDP Signal 4 Lanes 51 Pins LCD Display Panel
Followed this - https://github.com/jaromaz/MacintoshPiYou can adjust the screen area using overscan in the config files for each install of Sheepshaver or Basillisk.
Still havn't permanently homed the pi and screen in a case yet. Pics of test setup
Attachments


No Hijack, good to see!
I think I have a similar board-display in my ITX ClassicII. Works well.

I think I have a similar board-display in my ITX ClassicII. Works well.
Cable update….

Not much too mention….
Bandcables are ready and connected,
PSU cables extended,
the external powerconnector left todo.
Next display assembly, and trying to get the new psu going.

Not much too mention….
Bandcables are ready and connected,
PSU cables extended,
the external powerconnector left todo.
Next display assembly, and trying to get the new psu going.
Lookin' good! Have you tried fitting the front panel, IR-remote control sensor box oriented to the HDD LED port yet?
Hi,…..no, in this case I will be using the flatpanel previously shown.
The front/bezel needs machining to make use of the full 9,7“ view.
As soon as ive got the electronics in good working order, I shall finish the enclosure & details.
Aiming to be ready on this project by Christmas,
to start work on the next, the Quadra 800 project.

The front/bezel needs machining to make use of the full 9,7“ view.
As soon as ive got the electronics in good working order, I shall finish the enclosure & details.
Aiming to be ready on this project by Christmas,
to start work on the next, the Quadra 800 project.
Last edited:
You don't have enough thickness a/o height in the void for the cables below the display on the lower right side to mount the box parallel to the vertical frame? It looks like plenty of cubic is available even, worst case you'd need to notch out the vertical member:

All you'd need to do is desolder the IR sensor and use extension wires (legs of a radial resistor type) to line it up with the HDD activity LED opening. given a bit of clear plexi magic, the opening could do double duty achieving function of both applications.
All you'd need to do is desolder the IR sensor and use extension wires (legs of a radial resistor type) to line it up with the HDD activity LED opening. given a bit of clear plexi magic, the opening could do double duty achieving function of both applications.
Thanks again for your suggestions.
There is still sufficiënt space behind de front panel, below the display, above the cooling vent ridge.
If proven a usefull feature I will place that remote box there. The controls switches can then positioned downward and so manual/remote control that (almost invisible) from the frontside.
No soldering needed.

For evaluation its now mounted in the backside, until I feel its a usefull control feature, worth adapting the frontpanel.
(For ir remote, just place a mirror tile behind the unit btw)
There is still sufficiënt space behind de front panel, below the display, above the cooling vent ridge.
If proven a usefull feature I will place that remote box there. The controls switches can then positioned downward and so manual/remote control that (almost invisible) from the frontside.
No soldering needed.
For evaluation its now mounted in the backside, until I feel its a usefull control feature, worth adapting the frontpanel.
(For ir remote, just place a mirror tile behind the unit btw)
Oh, no, that will invert all the 1's and 0's !!!(For ir remote, just place a mirror tile behind the unit btw)

Beautiful! IR works through the vents as is in that orientation? Love the vertical placement, keeps the FDD slot clear, hadn't thought that far ahead, still dopey from the cold/Theraflu nignttime.
You're welcome, cannot resist making suggestions.
You're welcome, cannot resist making suggestions.
Hi there @Trash80toG4 , dont know if it works through the vents. But when in this position there is also need for these switches and headphone jack to poke through.
First thing is now to get this setup under power.
Now fiddling to get my homebrew powerswitch pcb working with the ATX.
First thing is now to get this setup under power.
Now fiddling to get my homebrew powerswitch pcb working with the ATX.
IIRC the momentary switches are for power on and volume controls, both of which are handled via the IR remote control.
Don't need the headphone jack at all. That's what the one on the backplane is for, front mounted jack's only a matter of convenience, break the former out to the rear with everything else.
Don't need the headphone jack at all. That's what the one on the backplane is for, front mounted jack's only a matter of convenience, break the former out to the rear with everything else.
Found a front panel, there's no power button, just the two volume control buttons and front headphone jack. Power is a remote control function along with volume, CD track +- play/pause, eject, etc. so have at it!