retr01

Senior Tinkerer
Jun 6, 2022
2,469
1
782
113
Utah, USA
retr01.com
other gizmos that have an issue like this and nobody seems to really care.
Yep! I second that! :sneaky:✌️

The misalignment issue is like waiting in traffic watching another car's turn signal. Your car is flashing the turn signal and so is the car in front of you. They get aligned for a little bit and they're blinking together, then the inevitable frequency difference causes phase differences to accumulate and they start blinking at opposite times before it spins back around and they're going together again. This is the behavior we don't want. The other car's turn signal is like the pixels coming out of the Mac, blinking at the rate of 15.6672 MHz. Your car's turn signal is like the pixel acquisition rate of the video converter. So we set the PIO to be slightly too fast. That's like making your turn signal blink slightly faster than the other car. Then as you see the two turn signals get misaligned, you press a button that makes the next blink take a little bit longer than usual. This brings the alignment back in sync for a while. In the video converter gizmo, we know that we need to wait for 1/8 longer per 64 pixels captured.
Yeah, annoying isn't it about the turn signals on cars? :rolleyes: When I see that, sometimes I feel like that isn't appropriate and should be fixed. :oops::cautious: Superb analogy!(y):geek:
 

retr01

Senior Tinkerer
Jun 6, 2022
2,469
1
782
113
Utah, USA
retr01.com
I wonder about seeing the videos of the LCD screens "good enough" at 130 MHz and the "much better" at 130 MHz plus .2336 MHz with the algorithm implemented? :sneaky: 📹📺

That may help to convince people not to settle for those cheap so-called video converters that do not really render the correct video output. :geek:
 

Zane Kaminski

Administrator
Staff member
Founder
Sep 5, 2021
266
462
63
Columbus, Ohio, USA
Here's my thought about the PIO program to implement what I described. The limitations of the PIO make it difficult to load a constant greater than 31. These values have to be sent from the ARM to the PIO via the FIFO lol. Clumsy but it does have some benefits.

Code:
; acquireline gets HSYNC low -> active video time constant from ARM
; If time constant is 0, skip this line and repeat on next line.
; Otherwise acquireline waits for time constant after HSYNC falling edge.
; Acquireline also preloads Y register with value 8.
acquireline:
  wait 1 gpio hsync_gpio ; wait for HSYNC high
  pull block; load wait constant from ARM
  mov X OSR ; move constant into X
  wait 0 gpio hsync_gpio ; wait for HSYNC low
  jmp !x acquireline ; if wait time from ARM is 0, that means skip this line
acquireline_wait:
  jmp !x-- acquireline_wait
  set y 8

; pixloop_512 makes eight 64-bit acquisitions for a total of 512 pixels.
pixloop_512:
  pull ; load loop constant (64) from ARM
  mov X OSR ; move constant into X
  jmp !y acquireline
  nop
  nop
  jmp !y-- pixloopend

pixloop:
  jmp !x pixloop_512 ; if x==0, skip this iteration and go back to pixloop_512
  nop ; pad loop out to 8 instructions using nops
  nop
  nop
  nop
  nop
pixloop_end:
  in pins, 1 ; get pixel from Mac
  jmp !x-- pixloop ; decrement x and go back to top
; jump is always taken because we handle x==0 case at beginning of loop

The key thing here is that we iterate through pixloop 64 times with x decreasing from 64 to 1, then when x==0, we exit the loop early and go back to pixloop_512 and set x=64 before jumping into the end of the pixloop where the acquisition is made via the IN instruction. The purpose of the nops in pixloop should be obvious (because we are at 8x pixel clock) but the key here is the two nops in pixloop_512. These pad out pixloop_512 so it takes six cycles before jumping to pixloop_end. This compares to five nops in the pixloop loop. Consequently every 64th iteration, we end up waiting an extra cycle. This implements the extra 1/512 clock division.

The other odd thing here is that the ARM has to feed the PIO constants at a rate of 9 constants per active video line. The ARM or DMA controller has to send the PIO the number of cycles to wait after HSYNC before the active video period. This is a number around 1500. Then the ARM has to send the PIO the number 64 eight times. This is important because we can only load a constant from 0-31 using the PIO only. Strange...

Anyway this does have some benefits. The ARM has direct control of the X position adjust by sending different delay numbers. And the PIO program is written such that a delay of 0 means to skip this line. So the ARM will be responsible for bringing the PIO into vertical synchronization by telling it to skip lines. Therefore the ARM also controls the Y position adjust.
 
Last edited:

KennyPowers

Active Tinkerer
Jun 27, 2022
248
295
63
So I found this external video adapter in a Mac Classic I got awhile back (sorry for linking to another forum...easier than reposting):


Anyone seen one like that before?
 

retr01

Senior Tinkerer
Jun 6, 2022
2,469
1
782
113
Utah, USA
retr01.com
So I found this external video adapter in a Mac Classic I got awhile back (sorry for linking to another forum...easier than reposting):


Anyone seen one like that before?

Hi @KennyPowers! 👋

I have not personally seen this. However, reading through, it is very similar as it taps in the video signal and outputs the video as a 1-bit B/W via TTL. You will need to match up wires correctly to the right video connector and hook up to a modern solution such as RGB2HDMI. If you look through this thread, you will see a lot more information. :) (y)

Currently, a few awesome folks on here are working on a simpler solution as discussed earlier in this thread.
 
Nov 4, 2021
126
98
28
Tucson, AZ
I tweaked the full speed PIO program a little to make it assemble in circuitpython's assembler and to use delay cycles instead of repeated nops. It seems to be working. I also fired up a second State Machine to generate an HSYNC signal for it to respond to. I have python feeding this 177, for the delay between HSYNC falling and video data starting, then 63 8 times forever. I wish I had some hardware I could test this on, it feels like it's getting somewhere.

The downside of feeding delays in from the Arm core is that we lose the ability to double-up the input FIFO to give the Arm DMA more time to do reads.

It looks like we'll have to switch to the C SDK to fiddle with PLL values or potentially tap the pixel clock off of the motherboard somewhere to really be in lock-step, but circuitpython is still good enough to test PIO code.

Code:
.program vidcap
.side_set 1
; acquireline gets HSYNC low -> active video time constant from ARM
; If time constant is 0, skip this line and repeat on next line.
; Otherwise acquireline waits for time constant after HSYNC falling edge.
; Acquireline also preloads Y register with value 8.
acquireline:
wait 1 pin 1 ; wait for HSYNC high
pull ; load wait constant from ARM
mov x osr ; move constant into X
wait 0 pin 1 ; wait for HSYNC low
jmp !x acquireline ; if wait time from ARM is 0, that means skip this line
acquireline_wait:
  jmp x-- acquireline_wait [7] ; 8 cycle wait
; pixloop_512 makes eight 64-bit acquisitions for a total of 512 pixels.
set y 7 side 1
pixloop_512:
pull side 1 ; load loop constant (64) from ARM
mov x osr side 1 ; move constant into X
nop side 1 [2]
; skip past the nops because the loop setup took those cycles
jmp pixloop_end side 1 
pixloop: ; 8 clocks
  nop side 1 [5]
pixloop_end:
  in pins, 1 side 1
  jmp x-- pixloop side 1
jmp y-- pixloop_512 side 1
[/code}

This screenshot is missing 3 nops in between 64-bit captures that bring the normal capture time to 32.83us.
[ATTACH type="full"]5998[/ATTACH]
 

Attachments

  • pio-capture.png
    pio-capture.png
    27.3 KB · Views: 50

Zane Kaminski

Administrator
Staff member
Founder
Sep 5, 2021
266
462
63
Columbus, Ohio, USA
Sounds like it's time to do a board! I can modify my SE ATX+VGA adapter for the purpose.

As for feeding the constants, let's try to have one loop on the second core that services all of the real-time stuff: feeding the constants, retrieving the video data, and constructing the output framebuffer. We can of course use DMA too but some CPU work will be required at least to get it going and to do the frame-switch logic. That will basically be a loop that repeatedly services all the buffers or whatever.

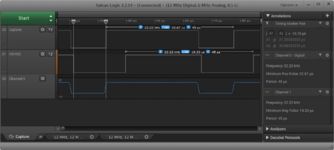
And on the subject of the frame-switch logic... We must keep two separate framebuffers in order to avoid VSYNC tearing. The algorithm for which framebuffer to read into/out of is as follows:

When storing a new frame, check the current output framebuffer and line number. If the output line is at the beginning of the frame, say at line 62 (out of 768) or less, store the frame in the other framebuffer. Otherwise if the output line is further into the framebuffer, store into the framebuffer currently being used for output.

The idea for picking which framebuffer to output from is very similar to choosing which framebuffer to store to. Check the current input framebuffer and line number. If the current line being input is at the beginning of the frame, at line 10 (out of 342) or less, start output this frame from the other framebuffer. Otherwise if the input line is further into the framebuffer, start output from the current framebuffer being written to.

This basically minimizes input->output latency while repeating frames to ensure that there is no VSYNC tearing effect where the current input/output points cross over. Tweaking the line constants (62 and 10) accomplishes adjusting the latency and allowable framerate drift between the Mac and 1024x768 VGA. Lower line constants mean lower average latency but too low (or too high) and there will VSYNC tearing.
 
  • Wow
Reactions: -SE40-
Nov 4, 2021
126
98
28
Tucson, AZ
I finally got the code up on GitHub (https://github.com/crackmonkey/macvid). Fine tuning the timing was giving me a headache for a while, I think because the "Classic II Developer Note" timing diagram said that a scanline should be 49.93us but the blog post with oscilloscope screenshots I was also using as a reference said 44.93us.
The code is split into two parts, a generator I have running on one Pico outputting the signals with a simple video test pattern, and the capture code on a second Pico that captures the data to a framebuffer in RAM. The captured frames aren't used for anything yet because there doesn't seem to be a handy VGA library for CircuitPython, only C, nor SPI slave device support for pulling the frames to another microcontroller with a screen or a full on Pi with HDMI. Probably gotta redo the capture to the C SDK to be able to do VGA output.
I'm sure both PIO programs can be simplified greatly, but functionality first. I'm imagining move the sync handling in capture to other state machines that output IRQs for the full HBLANK and VBLANK intervals that the primary output loop WAIT's on
 
  • Like
Reactions: Zane Kaminski

Zane Kaminski

Administrator
Staff member
Founder
Sep 5, 2021
266
462
63
Columbus, Ohio, USA
I'm working on some hardware with the RP2040 and supporting equipment. The design is in the same form factor as my previoius Mac SE video/power adapter:
1657137692299.png

Of course that gizmo doesn't do line rate conversion, hence the motivation for the Pi Pico/RP2040-based design.

Major parts in the new design include:
  • RP2040 microcontroller ($1)
  • SPI flash memory (< $1)
  • 12 MHz crystal (< $0.25)
  • 74LVC245APW buffer (< $0.50)
  • 2x7 connector for Mac (< $1)
  • 2x12 connector for ATX PSU ($1)
  • HD-15 VGA connector (< $1)
  • microUSB connector (< $0.25)
  • big ol 7905 -5V regulator ($1)
  • Board ($1?)
Should be cheap to make!

This probably isn't gonna be the (only) final form factor for this design. This current board requires an ATX PSU and can't drive the Mac's internal CRT in parallel. The aim with this is to easily try out the Mac + adapter on the bench. Once it's working we can redo the layout and make something with a passthrough and which fits in the case but which breaks out the VGA connector to the back panel.


Edit:
Here's my draft schematic:
Screen Shot 2022-07-06 at 4.41.34 PM.png
 
Last edited:

Zane Kaminski

Administrator
Staff member
Founder
Sep 5, 2021
266
462
63
Columbus, Ohio, USA
@Zane Kaminski, is this similar to the Power R 2703 adapter for B/W video out for the SE and SE/30?
Not exactly. My older gizmo, pictured above and discussed in the accelerator thread, is basically the same thing as the PowerR adapter. This new schematic has a smart microcontroller in it with 264 kB of RAM. It’s supposed to use the RAM to store whole frames from the Mac, synchronizing each frame to the 60 Hz 1024 x 768 VGA output. So this is a lot more sophisticated than what could’ve fit in the size of the PowerR gizmo back in the day. And this is better than the PowerR adapter because it lets you use a regular non-multisync VGA monitor. Without this complex rate conversion done by the microcontroller, a special monitor is be required to view the image. I am not aware of any LCD monitor which is officially specified to work at the Mac’s very low line rate. Nevertheless there are a few multisync monitors which are known to work. This new adapter aims to solve the problem of LCD monitor compatibility, producing output which any monitor with a 1024 x 768 resolution or greater can display.
 
Last edited:

-SE40-

Tinkerer
Apr 30, 2022
416
161
43
The Netherlands
pin.it
I love this solution here to apply
lateron on my classic II „book“project ✅

Maybe less advanced….
Here I found another solution
that looks interresting!
It shows his approach to this matter.

(also mentioned here I discovered🙈)

🍀
 
Last edited:
Nov 4, 2021
126
98
28
Tucson, AZ
For the next iteration with pass-through support, do you think you can put in a switch or jumper to be able to use it as an analog board & CRT tester with the rp2040 generating test patterns?
 
Nov 4, 2021
126
98
28
Tucson, AZ
Progress! The C SDK is naturally much fiddlier than python so it took me a while to get the Arm code working. Also, I'm out of practice thinking about pointers for feeding the DMA engine. I now have it generating a 1024x768 signal from an in-RAM frame buffer. I need to wire up the capture part to fill the frame buffer with something other than a static test pattern and also rework the DMA to send each scanline twice. Right now I think it's generating a double-wide image, but two frames in one top & bottom of the output.


PXL_20220723_224816399.jpg


The test bars are 8 Mac pixels (16 XGA) on the sides and 16 Mac (32 XGA) in the middle. I wanted the edges to be high so I could see them in my logic analyzer. I'm only hooking up to the red pin.
 
  • Like
  • Wow
Reactions: Stephen and -SE40-

-SE40-

Tinkerer
Apr 30, 2022
416
161
43
The Netherlands
pin.it
Anyone here familiair with this work?

C5DA4D9F-9E43-425B-999F-86D7774723B5.jpeg
May provide some additional info on their approach?

🍀
Edit: Interesting, but beside it has another purpose, it seems they got stuck at 640x480 in color….guess it does not apply here.
 
Last edited:

madcow

New Tinkerer
Aug 9, 2022
9
1
3
I too had one of these CA data displays for my Mac Plus to connect to a projector. The external display itself stopped working at some point and to my knowledge it is lost...or at least I haven't found the box with it yet.

I do have the board as it has been installed in my Plus this whole time and I just got it working with an RGB2HDMI!
 
  • Wow
Reactions: lilliputian

theducks

New Tinkerer
Apr 3, 2023
1
6
3
Here's a video by someone very recently showing this working -

I started working on a board based on the waveguide.se design mid last year to use with an OSSC, but that was before he updated to mention the different config required for a Mac Plus/512/128k, and I think on reflection and after watching the video I've linked, that this RP2040 based one is a better idea. Sigh :) My board went to a back burner after I designed and had a few fabbed, and also a kid.. just getting back to it now and I see things have moved on..
1680530114078.jpeg