Is the graphic from the manual? I have a a lot of the original documents for the mac portable if anyone needs pages from them as well as well as a lot of the Larry Pina books which include a bit of help on error codes and such. They are probably all uploaded already somewhere.I did a similar intervention on a HP712 top lid. It’s not for the faint of heart, but doable. With the help of a bench drill, surely doable.
Or maybe even some thin and long screws could do the job.
As for disassembling the actual hinges, it’s super simple. Remove the cylindrical aesthetic cover, by just slightly rotating it for disengaging the retention pin and pulling it out sideways. That’s it on the panel side. On the chassis side, remove the plastic wedge-like pin that prevents the hinge from sliding out sideways. At that point you can remove the hinge/clutch.
View attachment 24835
Cracked Hinge on Mac Portable
- Thread starter JDW
- Start date
-
Please can you read through and vote on the following proposition for changes to the board structure by clicking here.
You are using an out of date browser. It may not display this or other websites correctly.
You should upgrade or use an alternative browser.
You should upgrade or use an alternative browser.
As for disassembling the actual hinges, it’s super simple.
View attachment 24835
Well, “removing” the cylindrical hinges from the left and right sides is truly easy, just as you kindly showed us. But how to OPEN/DISASSEMBLE each of those two hinges after they are removed, in order to lubricate or check lubrication, is still the mystery. (Question #1 in my opening post.)
No one has yet chimed in about that, which indicates nobody other than @techknight knows.
The last great mystery of the Macintosh Portable!
I think @techknight covered lubricating the clutches in an earlier portable video, linked below (start 1:05:01).Well, “removing” the cylindrical hinges from the left and right sides is truly easy, just as you kindly showed us. But how to OPEN/DISASSEMBLE each of those two hinges after they are removed, in order to lubricate or check lubrication, is still the mystery. (Question #1 in my opening post.)
No one has yet chimed in about that, which indicates nobody other than @techknight knows.
The last great mystery of the Macintosh Portable!
It would be preferable to be able to have tension go all the way from the top of the rib to the other side so that new cracks can't happen anywhere in-between.Underneath the 5 ribs is more plastic, almost as high as the ribs.
...
Basically no clearance ABOVE or BELOW. And because the ribs are ANGLED, the clearance to the back (until you hit the metal HDD drive bracket) changes per the angle. But if I measure the clearance from the back of the ribs, at the base of the crack, I get 3.0mm until I hit the metal drive bracket.
I like the part atThe ribs belong to the fixed and unmovable polycarbonate plastic main frame of the computer, which can be removed. But the moveable cylindrical hinges that fit into the ribbed part can be removed from the sides of the LCD. Watch this video at 7:59 to see how the cylindrical caps are removed from both sides. Then watch from 23:29 to see the cylindrical inner pieces removed, and soon after that he somehow breaks them apart to lube them.
No. They must be firm. The ribs exist to strengthen the fixed piece of plastic so it won't easily break. But in my case, it did break, right through the ribs.
Using bolts might require removing some plastic to inset the head on one end and the bolt on the other end if there's no clearance above the rib or the underside of the frame.The word "bolts" means "machine screws" and means you normally need nuts and washers, but now that I've answered your previous questions, you can see that bolts aren't usable here. If you content they are, sketch your concept, shoot a photo, then upload it.
Sewing pins seem strong to me (they'll bend but not break). They are smooth so won't hold much vertically (along their length). If they are inserted perpendicularly, through all the fins parallel to the bottom of the display, then their job would be to withstand shear forces. You would need pins above and bellow the crack and something that holds the two pins together such as a metal plate on each side of the fins.My experience with sub 1.0mm drill bits isn't good. They almost break when I look at them!Seriously, they aren't strong, and that's why I earlier said that even "titanium" at those diameters might not even be adequate.
There appears to be some clearance between the ribs and the hard drive for your idea (3 mm as you've said). Instead of wire, you can use a metal plate. Instead of a metal plate, maybe something that acts as a plate and also fills the negative space between the fins.Now what may work, and what I think is perhaps less scary than doing what @paolo suggested would be to drill very shallow holes for self-tapping stainless steel screws to be placed at the BACK of the ribs, one screw on each side of the break. Then the screw wouldn't screw down flush with the ribs, leaving just enough room for a thin metal wire to be wrap around each screw, thereby pulling the screws toward each other. I still don't like drilling out these old plastics because 1.58mm at the narrowest point toward the top of the rub worries me a bit. But perhaps if the hinge could be welded using WELD-ON 16 (which again, I don't know if it even works), then the screw and wire idea might act as a reinforcement that would better ensure the weld won't break over time. Pure speculation on my part though. Not sure what's best.
@RolandJuno
Thank you so much for answering my Question #1 !!! That's the GOLD MEDAL ANSWER!
More specifically, from the part of the video you kindly linked for us, large pliers are required to squeeze that protruding piece (see below), then push inward to pop that piece out the other side.
@techknight then adds lubrication, and then twists the ribbed end with the same set of pliers to ensure the new grease is working.
He skipped cleaning the insides of them, probably because IPA has a detrimental affect on polycarbonate plastic. And while hot soapy water with dish soap might do the cleaning job. It would take a few days of drying to ensure there's absolutely no water inside. And you'd really need to wait that long before adding any fresh lube.
I don't have TechKnight's grease, but I do have Super Lube 21030 Synthetic PTFE Grease which is kind to plastics. I also have Super Lube 51010 Oil, which can be mixed with the 21030 grease to obtain a thinner grease overall, which is very nice.
Using "bolts/machine-screws" is not practical based on my observations of the machine, and you can kind of see that in the photo I marked up with measurements in my earlier reply to you. Why? Because the 5 Ribs are just too thin, as you could see from my measurements. And if you read earlier posts by @Paolo B , you will see that his suggestion was to use 0.8mm drill bits, drilled into each rib from the top-down. So yeah, 0.8mm diameter pieces of metal here. Fine for a drill bit, but that diameter would be impractical for bolts. At least, I'm not visualizing how "bolts" would work here.Using bolts might require removing some plastic to inset the head on one end and the bolt on the other end if there's no clearance above the rib or the underside of the frame.
Not sure how that "metal plate" suggestion would work, but I agree that sewing pins (see photo below) or thick needles would probably be stronger than many of the 0.8mm drill bits I've seen and used before. But I could be wrong on that.Sewing pins seem strong to me (they'll bend but not break). They are smooth so won't hold much vertically (along their length). If they are inserted perpendicularly, through all the fins parallel to the bottom of the display, then their job would be to withstand shear forces. You would need pins above and bellow the crack and something that holds the two pins together such as a metal plate on each side of the fins.
Again, I'm not sure what serves as a "metal plate" or how practical that idea is for people like myself who aren't metal workers. I have the tools to cut (or break) very thin pieces of metal. But I don't have metal crafting tools. And it would be an impractical spend money to buy the required metal working tools, especially for someone not adept to working with metal in that way. I really wouldn't know what tools to buy anyway.Instead of wire, you can use a metal plate. Instead of a metal plate, maybe something that acts as a plate and also fills the negative space between the fins.
It's the same for the drill press that @Paolo B mention. Great idea, perhaps, for people who already have such a tool, but to go out and buy a drill press only for a single use seems rather wasteful. And when you live in Japan like me and have little storage space, what do you then do with the drill press when you're done?
So overall, what I am looking at are all the practical (for me) ways to solve this cracked hinge problem.
And so, because a drill press isn't really a practical idea for me, that is why I came up with the alternative idea of drilling out very tiny and shallow holes in the sides of the ribs (by hand, obviously), so as to insert self-tapping screws into those freshly-drilled holes so the screws will partially screw into the ribs. One screw above the crack, one screw below. Then wire that is strong enough not to elongate over time could possibly be wrapped around the top screw, then pulled down tightly to wrap around the lower screw. And to ensure that holds, JB Weld or similar 24-hour cure epoxy should cover all that to make sure the screws and wires stay in place over time. But that's only speculation on my part. I've not tried it. Because once you start drilling, any "oops!" moments could spell the end for the plastics in question. But I guess the worst that could happen is the crack doesn't get fixed, which means it remains as it is now.
Hmmm...
The question at this stage focuses on what cement I should buy. Because even if I drill or add sewing needles, etc., the plastics still need to be somehow glued or welded together. The metal parts we've spoken about would serve as "reinforcements."
If you've read the previous posts, you know I've been eyeing Weld-ON 16, pretty much ONLY because of what ChatGPT told me. So far, no one experienced with the stuff has chimed in. I even posted in the r/AskEngineers subreddit in hopes of getting experienced opinions, but nothing so far. So it's basically a shot in the dark for me to try it. But to try it means my wallet will be zapped, which I don't like.
You folks in the US can get Weld-On 16 for a mere $17 bucks...
But for me, Amazon Japan seems to be the only seller, and the parallel-import guy charges a whopping $45 USD equivalent. The impact to my Japanese Yen wallet is more like $65 though. So yeah, all that money for a tube of very toxic stuff that is also a far larger tube than I even need. Smaller (and cheaper) tubes of Weld-ON 16 exist, but the seller on Amazon Japan doesn't offer those. :-( And if that wasn't discouraging enough, I would be forced to wait until Dec. 6th to get it.
The only other contender, which again was recommended by ChatGT (not a fellow human being), is 3M Scotch-Weld Structural Plastic Adhesive DP8005. Yes, that's sold on Amazon Japan too, but that stuff is even more expensive because you must separately buy a special 3M tool to squirt it out properly, in the right ratio. And ChatGPT tells me it probably wouldn't be as good as Weld-ON 16.
If you've read the previous posts, you know I've been eyeing Weld-ON 16, pretty much ONLY because of what ChatGPT told me. So far, no one experienced with the stuff has chimed in. I even posted in the r/AskEngineers subreddit in hopes of getting experienced opinions, but nothing so far. So it's basically a shot in the dark for me to try it. But to try it means my wallet will be zapped, which I don't like.
You folks in the US can get Weld-On 16 for a mere $17 bucks...
Amazon.com: IPS Weld-On 16 Acrylic Plastic Cement, 5 oz Tube : Industrial & Scientific
Amazon.com: IPS Weld-On 16 Acrylic Plastic Cement, 5 oz Tube : Industrial & Scientific
www.amazon.com
But for me, Amazon Japan seems to be the only seller, and the parallel-import guy charges a whopping $45 USD equivalent. The impact to my Japanese Yen wallet is more like $65 though. So yeah, all that money for a tube of very toxic stuff that is also a far larger tube than I even need. Smaller (and cheaper) tubes of Weld-ON 16 exist, but the seller on Amazon Japan doesn't offer those. :-( And if that wasn't discouraging enough, I would be forced to wait until Dec. 6th to get it.
The only other contender, which again was recommended by ChatGT (not a fellow human being), is 3M Scotch-Weld Structural Plastic Adhesive DP8005. Yes, that's sold on Amazon Japan too, but that stuff is even more expensive because you must separately buy a special 3M tool to squirt it out properly, in the right ratio. And ChatGPT tells me it probably wouldn't be as good as Weld-ON 16.
You guys keep talking about drilling holes with impossibly thin and long drills, but may I ask why we aren't stitching the plastic by melting the structural wires into it with, say, a dedicated hot stapler or even just a meaty soldering iron pressing a wire in? I've had luck using my butane soldering iron to push chopped up paperclips into plastic.
After bonding the two parts, of course.
JDW, this might be one of those things where you may need to hunt down an industrial supply store. Though I don't know about that sort of thing in Japan.
Somebody, somewhere, has to know where to get some. Car people? Hobby people? Custom-terrarium people?
After bonding the two parts, of course.
JDW, this might be one of those things where you may need to hunt down an industrial supply store. Though I don't know about that sort of thing in Japan.
Somebody, somewhere, has to know where to get some. Car people? Hobby people? Custom-terrarium people?
@Oelmuvun
Ideas like that are the very reason I started this thread. Different people have different great ideas, and collectively, we can perhaps come to the best overall fix.
I honestly had not thought of using anything like that before. I must profess my complete and utter ignorance! But it seems like a wavy metal "staple" is melted into the plastic and then released, along you to snip off the metal legs, as shown here:
Have you experience using that to fix plastics?
Of course, to use the same thing on the plastic hinge we're talking about would mean to cut right through the ribs in order to get that hot staple fitted. The main issue with that is that you have those removable cylindrical hinges shown in the photo on my earlier post here. I don't see clearly how it would be possible to use a hot staple while also keeping those cylindrical hingers REMOVABLE. And if you leave them installed while melting that hot staple into the plastic, would the hinges even work anymore?
So while I love the basic CONCEPT, I'm not clear on the precise execution.
Okay, Guys. @Oelmuvun got my brain thinking about hot-welds. What if we just forget the crazy expensive (for me) and toxic Weld-On 16 and instead ponder alternative welds?
Let's start by considering the techniques shown in this short video (worth your time to watch):
With that video in mind, what do all of you think about the following procedure my feeble brain concocted?
Could that be a low-cost but effective means of repairing the Mac Portable hinge?
Let's start by considering the techniques shown in this short video (worth your time to watch):
With that video in mind, what do all of you think about the following procedure my feeble brain concocted?
- Remove cylindrical hinge.
- Press the broken parts together to make the crack close.
- Put tape on the INSIDE part of the crack (where the cylindrical hinges go) to prevent glue in Step-4 below from seeping into the place where the cylindrical hinge needs to go.
- Put super-glue on the crack from the outside (side with the 5 ribs). Then quickly put baking soda on that glue (which supposedly makes the super-glue 10x stronger).
- Make the bent-nail welder as shown in the above video.
- Weld/Melt thin metal pieces across the crack (sewing pins?, cut-off pieces of circular spring link shown in the above video?).
- Put super glue and baking soda atop all that.
- Remove Tape & Reassemble.
Could that be a low-cost but effective means of repairing the Mac Portable hinge?
I've never used the real tool, though I understand that different wire shapes are available. I've just been pushing bits of wire in with my Weller Portasol when I need to fix something.Have you experience using that to fix plastics?
...
So while I love the basic CONCEPT, I'm not clear on the precise execution.
Once I start tackling the cracks in my Firebird's factory body kit I intend to buy and try out a hot stapler.
My experience with super glue and baking soda has been pretty mixed, but I might also have been trying things that were not a good fit for it. I suggest you experiment with it on different types of plastic and in different situations.
Your first post says JB Weld Epoxy does not bound well to polycarbonate (poor chemical bond). But what about using JB Weld Putty for mechanical bonding? Maybe it can be used instead of metal plates/wires. You can drill into it to add screws or pins or other fasteners.
If you melt wires into the walls of the fins, then adding putty between the fins can make sure they stay in there.
ChatGPT contends that for use on polycarbonate, the original 24-hour cure JB Weld is better than the clay putty stick.what about using JB Weld Putty for mechanical bonding?
Separately from that, I was able to clean and lube the cylindrical hinges, thanks to my seeing how @techknight used pliers to squeeze the end and push to get the inner plastic piece out.
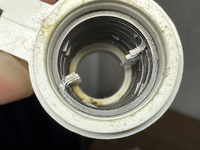
Once separated, they look like this...
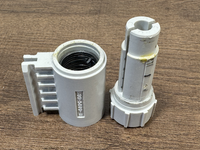
Very small amounts of yellow on the plastic piece is the old, stock grease, which was still soft to the touch...
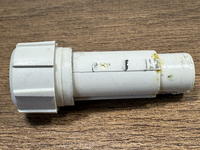
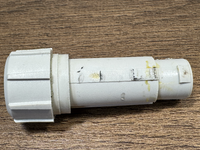
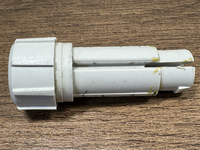
On the inside of the larger housing, you can see metal all around...
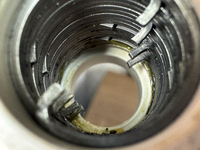
The yellow stuff is the stock grease...
I used a tissue and swaps to wipe out the old grease because IPA is bad for polycarbonate, and I didn't want to use soap and water and way days for it to fully dry...
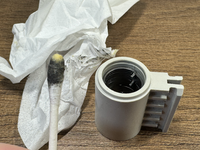
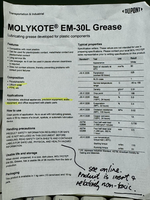
I told you before that I have SuperLube grease & Oil with PTFE, but I also have Molykote EM-30L, both of which I've used for my floppy drive lube jobs. I asked ChatGPT to tell me which of the two is best for this application, and it suggested the EM-30L, so I used that to lube. I dipped one end of my swap all around in the ME-30L and then lubed the inside, all over the metal. It's a very thin coat so you really can't see it after applying it. I then dipped the other end of my swab the same way and gave the outside of the inner plastic piece a very thin coating. Then I reassembled and used pliers like TechKnight did to rotate the hinge to ensure the grease would coat every nicely, then I put the hinges back on the Mac Portable.
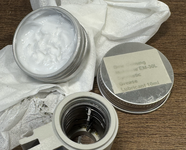
Details of EM-30L...
Does this help much with the smoothness of the hinge? Or is it not test-able yet due to the crack in the assembly? I'm considering doing it if it's worth the pain.ChatGPT contends that for use on polycarbonate, the original 24-hour cure JB Weld is better than the clay putty stick.
Separately from that, I was able to clean and lube the cylindrical hinges, thanks to my seeing how @techknight used pliers to squeeze the end and push to get the inner plastic piece out.
Once separated, they look like this...
View attachment 24851
Very small amounts of yellow on the plastic piece is the old, stock grease, which was still soft to the touch...
View attachment 24845 View attachment 24853 View attachment 24854
On the inside of the larger housing, you can see metal all around...
View attachment 24849
The yellow stuff is the stock grease...
View attachment 24850
I used a tissue and swaps to wipe out the old grease because IPA is bad for polycarbonate, and I didn't want to use soap and water and way days for it to fully dry...
View attachment 24848
I told you before that I have SuperLube grease & Oil with PTFE, but I also have Molykote EM-30L, both of which I've used for my floppy drive lube jobs. I asked ChatGPT to tell me which of the two is best for this application, and it suggested the EM-30L, so I used that to lube. I dipped one end of my swap all around in the ME-30L and then lubed the inside, all over the metal. It's a very thin coat so you really can't see it after applying it. I then dipped the other end of my swab the same way and gave the outside of the inner plastic piece a very thin coating. Then I reassembled and used pliers like TechKnight did to rotate the hinge to ensure the grease would coat every nicely, then I put the hinges back on the Mac Portable.
View attachment 24847
Details of EM-30L...
View attachment 24846
Does this help much with the smoothness of the hinge? Or is it not test-able yet due to the crack in the assembly? I'm considering doing it if it's worth the pain.
You quoted the part of my earlier post where I was talking about JB Weld, so I assume you must be asking if JB Weld will stick onto the smooth parts of the hinge in the vicinity of the crack, on the backside where those five ribs are. And the answer is NO because the plastic in that area would need to be roughened up. All that silvery metallic paint would need to be removed on any areas where JB Weld or similar epoxies would be used, and even then it may not make a great bond that will last over time because this is a hinge that will flex a bit. And, any such Epoxies used would NOT be the main fix, but rather just reinforcement, assuming they even would stick it all.
The main fix is what I’ve been talking about mostly in this thread. ChatGPT tells me that a “solvent“ bonding agent like “Weld-ON 16” would be needed to melt the two sides of the crack together and form a stronger bond than any glue or epoxy could provide in that area.
I’ve been continuing to do a lot of research outside this discussion because I’m not finding anybody who has any first-hand experience using solvents chime in. It’s therefore all a shot in the dark. But I did find an alternative to that super expense (for me) Weld-ON 16, also sold conveniently for me on Amazon Japan:
Amazon.co.jp: Acrysunday 14-3201 Acrylic Glue with Injector, 1.0 fl oz (30 ml) : Industrial & Scientific
Amazon.co.jp: Acrysunday 14-3201 Acrylic Glue with Injector, 1.0 fl oz (30 ml) : Industrial & Scientific
www.amazon.co.jp
Active ingredient: Dichloromethane (DCM), aka "Methylene Chloride" aka "Methylene dichloride" (二塩化メチレン), CH₂Cl₂
It’s cheap, which is nice. It claims to work on “polycarbonate resin,“ which I assume is the general way to speak about even the polycarbonate used in the Macintosh Portable’s case, although I’m not really sure about that.
It is also about as liquidy and fluid as water, which is why it needs to be applied with a syringe, apparently when the crack is CLOSED, so that it seeps into the crack and then you hold it in place and it does it work. At least, that’s what I’ve read and learned based on my asking ChatGPT about it.
In contrast, the more expensive Weld-ON 16 is more of a syrup like thickness, with the following ingredients:
- Methylene chloride (dichloromethane, DCM) — 30–60% by weight. 
- Methyl acetate — 10–15% by weight. 
- Methyl ethyl ketone (MEK) — 10–30%. 
- Methyl methacrylate (MMA) monomer (stabilized) — a small percentage (0–2%). 
- Plus some acrylic resin.
Oops quoted wrong . My bad!!! Thanks for the in-depth answer anyway, dont worry about it. ThxYou quoted the part of my earlier post where I was talking about JB Weld, so I assume you must be asking if JB Weld will stick onto the smooth parts of the hinge in the vicinity of the crack, on the backside where those five ribs are. And the answer is NO because the plastic in that area would need to be roughened up. All that silvery metallic paint would need to be removed on any areas where JB Weld or similar epoxies would be used, and even then it may not make a great bond that will last over time because this is a hinge that will flex a bit. And, any such Epoxies used would NOT be the main fix, but rather just reinforcement, assuming they even would stick it all.
The main fix is what I’ve been talking about mostly in this thread. ChatGPT tells me that a “solvent“ bonding agent like “Weld-ON 16” would be needed to melt the two sides of the crack together and form a stronger bond than any glue or epoxy could provide in that area.
I’ve been continuing to do a lot of research outside this discussion because I’m not finding anybody who has any first-hand experience using solvents chime in. It’s therefore all a shot in the dark. But I did find an alternative to that super expense (for me) Weld-ON 16, also sold conveniently for me on Amazon Japan:
Amazon.co.jp: Acrysunday 14-3201 Acrylic Glue with Injector, 1.0 fl oz (30 ml) : Industrial & Scientific
Amazon.co.jp: Acrysunday 14-3201 Acrylic Glue with Injector, 1.0 fl oz (30 ml) : Industrial & Scientificwww.amazon.co.jp
Active ingredient: methylene chloride (二塩化メチレン).
It’s cheap, which is nice. It claims to work on “polycarbonate resin,“ which I assume is the general way to speak about even the polycarbonate used in the Macintosh Portable’s case, although I’m not really sure about that.
It is also about as liquidy and fluid as water, which is why it needs to be applied with a syringe, apparently when the crack is CLOSED, so that it seeps into the crack and then you hold it in place and it does it work. At least, that’s what I’ve read and learned based on my asking ChatGPT about it.
In contrast, the more expensive Weld-ON 16 is more of a syrup like thickness, with the following ingredients:
- Methylene chloride (dichloromethane, DCM) — 30–60% by weight. 
- Methyl acetate — 10–15% by weight. 
- Methyl ethyl ketone (MEK) — 10–30%. 
- Methyl methacrylate (MMA) monomer (stabilized) — a small percentage (0–2%). 
- Plus some acrylic resin.
Last edited:
Okay, folks. After many hours of talking to ChatGPT and searching on my own, I've changed my mind about using screws or drilling holes, because ChatGPT thinks that would weaken the aging plastics of the Mac Portable.
Here's my tentative plan now...
I questioned ChatGPT multiple times about the soundness of its warning against using even tiny M1 screw to better ensure JB Weld wouldn't come off, but it was adamant about me not using the screws.
Even so, I will add a small screw kit to my order, and a small 2mm thick transparent polycarbonate sheet I can use for testing the DCM liquid solvent. My Amazon Cart now looks like this:

If anyone has thoughts to share before I place the order, let me know.
Here's my tentative plan now...
- Buy Acrysunday (Dichloromethane: DCM) in order to "weld" the crack, by applying it to the rib-side, with the crack closed. And ChatGPT says I shouldn't open and close the crack when using it because that could create problems. Not sure about that, and the crack is very tightly closed when closed, so I wonder if the liquid would truly seep in along the crack, but it is what it is.
- Buy Fiberglass mesh tape with adhesive on the back. For me, ChatGPT recommends Tesa Tape 60100, sold on Amazon Japan. Mesh means it has holes in it. The adhesive side is to make sure it sits flat on the ribbed side of the hinge holder. I would need to cut thin strips and place them in between the ribs AFTER my solvent weld is done, then apply a thin layer of the original JB Weld 24-hour cure atop that.
- I would need to scrape off the metallic chrome paint on the rib side of the plastic to ensure that JB Weld can take hold of the PC underneath. Sanding it might be hard in those tight spaces between the ribs. But scratching it or mildly gashing it with an Xacto knife may be needed for the JB Weld to better take hold and make it less likely it will come off.
- I should also buy some Nitrile gloves for protection against the solvent. My hand circumference measures about 19.8cm, so that means these gloves in size M should be right.
I questioned ChatGPT multiple times about the soundness of its warning against using even tiny M1 screw to better ensure JB Weld wouldn't come off, but it was adamant about me not using the screws.
Even so, I will add a small screw kit to my order, and a small 2mm thick transparent polycarbonate sheet I can use for testing the DCM liquid solvent. My Amazon Cart now looks like this:
If anyone has thoughts to share before I place the order, let me know.
Last edited:
LOL. I guess the lack of comments are basically telling me: "Go for it, James. We're waiting with bated breath to see if it works out for you."
Funny.
Well, I found a video from the manufacturer of the Dichloromethane (DCM) liquid, and it's curious to see their female demonstrator pour it into the included plastic dispenser with bare hands:
Funny.
Well, I found a video from the manufacturer of the Dichloromethane (DCM) liquid, and it's curious to see their female demonstrator pour it into the included plastic dispenser with bare hands:
Just had a new idea to supplement what my current plan.
You can see on my Amazon order that I have a 2.0mm thick transparent Polycarbonate sheet. I intended that to be used only for testing of the DCM liquid, but maybe it can serve a more practical purpose too.
What if I remove as much of that chrome paint as possible on the BACK of the 5 RIBS, then put the DCM liquid the backs of the ribs quickly and then very quickly put a small section of that polycarbonate sheet over everything like shown below? Not sure what the working time for DCM is, but I could probably apply the DCM and lay the rectangular piece on it within 5 seconds.

The red part shown above is the rectangular piece I would need to cut out of my 2.0mm thick transparent polycarbonate sheet. As you can see, it would span the crack and reinforce the ribs. That would need to be done after the main gluing of the crack with DCM is finished, of course. But that may be all the reinforcement required.
You can see on my Amazon order that I have a 2.0mm thick transparent Polycarbonate sheet. I intended that to be used only for testing of the DCM liquid, but maybe it can serve a more practical purpose too.
What if I remove as much of that chrome paint as possible on the BACK of the 5 RIBS, then put the DCM liquid the backs of the ribs quickly and then very quickly put a small section of that polycarbonate sheet over everything like shown below? Not sure what the working time for DCM is, but I could probably apply the DCM and lay the rectangular piece on it within 5 seconds.
The red part shown above is the rectangular piece I would need to cut out of my 2.0mm thick transparent polycarbonate sheet. As you can see, it would span the crack and reinforce the ribs. That would need to be done after the main gluing of the crack with DCM is finished, of course. But that may be all the reinforcement required.
I wonder if the mentioned dental scaler would work for removing this metallic covering?I would need to scrape off the metallic chrome paint on the rib side of the plastic to ensure that JB Weld can take hold of the PC underneath. Sanding it might be hard in those tight spaces between the ribs. But scratching it or mildly gashing it with an Xacto knife may be needed for the JB Weld to better take hold and make it less likely it will come off.
