Macintosh IIci - no life even after recap

Glitch

New Tinkerer
Apr 29, 2025
7
0
1
Hey all!
I have been collecting some old Macs the last couple of years, a Macintosh Plus, a Powerbook 170, a Macintosh IIvx, and a Quadra 700. All of them came to me working but needing either maintenance work like recapping, or in the case of the Powerbook, plastic repair. So I'd say I'm fairly confident in general repair work and soldering, without really knowing too much about electronics. Recently I picked up a Macintosh IIci that came to me not working. The power supply was dead and there was signs of minor capacitor leakage on the logic board. Having had success with my other Macs I was confident I could get this one working, so I set about cleaning up any corrosion I could see and recapping the board. Since I have a Quadra 700 I decided to use its PSU for the time being, beofre spending time recapping the one in the IIci.

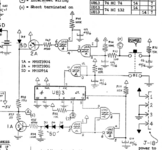
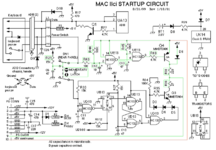
Having done all the work, I plugged the IIci in and...nothing. No errors, no beeps, no nothing. The fan on the PSU doesn't in try to spin up. At this point I'm pretty lost. From what I've read it seems my first go to should be the power circuit on the logic board, but I'm still not sure what the entails. Long story short, I'm hoping someone can give some pointers or guide me to what I should be trying and in what order to see if the board is indeed repairable with my limited skill set.

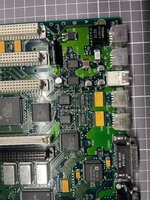
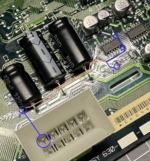
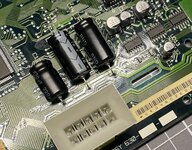
I'd upload a picture of the whole board but honestly the damage is almost imperpectible to the naked eye, but I can definetely try and take some macro photos if anyone wants to see a specific part of the board.

Any help appreciated, thanks!
 

phunguss

Active Tinkerer
Dec 24, 2023
377
330
63
Stillwater, MN
I am no electronics expert, either. But, many here are more skilled and their visual inspection could provide clues. Please upload the image of the whole board. That is a starting point. And you will likely get guidance for things to focus on, or requests for closer photos of specific areas.
 

scj312

Tinkerer
Oct 29, 2021
64
81
18
It's possible for cap leakage to result in damaged traces within the startup circuit, given how many caps are there. The place on the logic board to look at is in the area underneath the power supply. Magnification may be required to see any breaks in the traces. It's also possible there is a broken trace beneath one of the replaced caps or beneath UD13 or UE13.
 

speakers

Tinkerer
Nov 5, 2021
124
90
28
San Jose, CA
peak-weber.net
The IIci startup logic is notoriously susceptible to damage. One testing trick is connect PSU pin 9 (signal) directly to pin 10 (+5v standby) to bypass the logic and force power-on.
 
  • Like
Reactions: djc6

Hugotronics

New Tinkerer
Apr 11, 2025
3
0
1
France

Attachments

  • 1746259019532.png
    1746259019532.png
    51.5 KB · Views: 28

Glitch

New Tinkerer
Apr 29, 2025
7
0
1
Hey all! Thanks for the suggestions, and sorry for the late reply! I've attached a few images of the board, in case that helps. Unfortunately, I don't have access to a microscope or the like so I'm trying to get by with only my eyes, and while I can clearly see damage between the expansion slots (C & D) next to C16 and some between the chips above the three axial capacitors, but that's about it. I've done some continuity checks and there seems to be a bad trace next to C16), but could that stop it from booting? I've tried to test other traces, but honestly I find it mostly impossible to follow them, so I guess I'd need to know where they end up, which is doable if I know what traces to check...since there's a lot of them. As for underneath the PSU and around UE13 and UD13 I can't really see any damage, not that that means there isn't any.

@speakers That sounds like a good place to start. How would I do that though? I've done similar bypasses on atx power supplies to but here I'm not sure how to jump those pins when the PSU in in situ.
 

Attachments

  • IMG_3367.jpg
    IMG_3367.jpg
    2.1 MB · Views: 14
  • IMG_3370.jpg
    IMG_3370.jpg
    2.2 MB · Views: 15
  • IMG_3372.jpg
    IMG_3372.jpg
    2.3 MB · Views: 14
  • IMG_3374.jpg
    IMG_3374.jpg
    2.1 MB · Views: 13

phunguss

Active Tinkerer
Dec 24, 2023
377
330
63
Stillwater, MN
Did you clean this board? Did you do the recap?

The traces near caps by the 3 big coaxials, I can't tell if that is flux residue or a scratch from the soldering iron.
Screen Shot 2025-06-01 at 4.02.15 PM.jpg


Near Cap C16, you can see most of the endpoints, so I assume you continuity tested most of those traces. Look at UH2 and see if you can clean up those solder points on that chip. I can't tell if that is dust/residue/corrosion, or maybe cold solder joints.
Screen Shot 2025-06-01 at 4.03.20 PM.jpg
 

Glitch

New Tinkerer
Apr 29, 2025
7
0
1
Thanks, I'll check those spots and see what I can find

Yes, I cleaned the board. Not sure if the previous owner tried doing any repairs, but I'm pretty sure no one had tried recapping it at least.

First I removed all the old caps, cleaned the board as best I could with IPA and white vinegar, I then soaked the board in IPA for a few hours, brushing it a few times while soaked. Afterwards I used white vinegar and IPA to clean up the remaining corrosion I could see. There were quite a few bluegreen corrosive spots spread around the old caps on the board, not particular big ones but quite a few and spread out, but I did get rid of all that I could see. After that I put the new caps in.
 

Hugotronics

New Tinkerer
Apr 11, 2025
3
0
1
France
This part of the board drives the soft power circuit. Any broken trace is a problem. To test a trace you suspect is cut without following it to the end, you can simply scrape it slightly to expose the copper.
 

speakers

Tinkerer
Nov 5, 2021
124
90
28
San Jose, CA
peak-weber.net
@speakers That sounds like a good place to start. How would I do that though? I've done similar bypasses on atx power supplies to but here I'm not sure how to jump those pins when the PSU in in situ.
I think it should possible to put a shorting link in the base of the terminal block between pins 9 and 10 and still be able to put the PSU in place. But I haven't ever tried this .. I have an extender cable (made by cutting down an ATX extender).
 

Glitch

New Tinkerer
Apr 29, 2025
7
0
1
Ok, so I reflowed Q3 and a few other chips (UA4, UA5, and UH2). Some were a bit stubborn but they all came out looking shiny and tested ok. I also touched up some of my capacitor work and I tested all the traces @phunguss mentioned and they all checked out fine. Lastly, I checked the power switch to make sure it's not broken and it checked out fine too.

So I plugged it in and...nada, still nothing. I left it plugged in for a while...just in case, and no still completely dead.
 
Last edited:

Glitch

New Tinkerer
Apr 29, 2025
7
0
1
I decided to check the voltage ratings on the 2 PSUs, the one from my Quadra 700 (Delta) that works and the one from the IIci (Astec) that the seller said didn't work (and that I have yet to recap). Turns out they are very similar but not exactly the same.

My understanding is that a slightly higher amperage is not going to be an issue, as can be seen on the +5 and +12 rails, but how about a lower amperage?? The -12 on the Delta is slightly lower than the Astec (0.6A vs 1.0A). Could that be a problem?

EDIT: Read up on it and it doesn't seem like the difference should be a problem, sooo back to the logic board I guess
 

Attachments

  • IMG_3377.jpg
    IMG_3377.jpg
    1.4 MB · Views: 3
Last edited:

Glitch

New Tinkerer
Apr 29, 2025
7
0
1
Having done a bit more amateur sleuthing and making use of the schematic @Hugotronics shared I think I might have found the break. There seems to be a break between pin 10 on the PSU socket and the rest of the circuit. Seeing as how, as far as I understand, pin 10 is the one providing the trickle power, it feels somewhat important. So, having potentially identified the culprit I needed to actually find the break, which I kind of did although I can't actually see it. As you can see in the image, I think all the purple parts should be connected but they are not. Q4 and UE13 are connected but they are themselves not connected to pin 10...which I think they should be...

Long story short, can anyone "confirm" my work before I add a bodge wire between 1 and 2 and accidently fry something?
 

Attachments

  • Continuity.png
    Continuity.png
    21.6 KB · Views: 9
  • Break?.png
    Break?.png
    1.4 MB · Views: 10
  • IMG_3378.jpg
    IMG_3378.jpg
    757.7 KB · Views: 8