MacSD - Multi-device SCSI adapter with audio

retr01

Senior Tinkerer
Jun 6, 2022
2,473
1
796
113
Utah, USA
retr01.com
The handle on the C-clamp provides the leverage, but that's one of many variables.

The torque will be much higher than turning a nut by hand.

Do you mean with fingers? Turn the handle on C shaped clamp with the fingers and stop when it stops. Or a tad tighter, like a 1/4 turn after the stop?
 

YMK

Active Tinkerer
Nov 8, 2021
358
285
63
Do you mean with fingers? Turn the handle on C shaped clamp with the fingers and stop when it stops. Or a tad tighter, like a 1/4 turn after the stop?

Yes, finger tighten the rotating handle on the clamp.

It stops when the force you apply isn't enough to turn further.

Again, too many variables to give repeatable instructions.
 
  • Like
Reactions: retr01

JDW

Administrator
Staff member
Founder
Sep 2, 2021
1,577
1,376
113
53
Japan
youtube.com
30mm is about the limit for an 040. Any bigger and you'll have to make a spacer of some kind to clear the pins. Better to choose a smaller clamp.

One way is a flat surface like glass or marble and wet sandpaper of increasing grit (400, 1000, 2000).
1. Thank you very much for the suggestion of going with a clamp's "circle pad" diameter of less than 30mm.

2. As to C-clamp twisting pressure required, I will use "paste squirting out the sides" as my best guide (because that is easy to see), with the pressure on my fingertips being the second best guide (because a precise determination of needed pressure on fingers is hard to assess with any decent level of accuracy).

3. As to sanding or "lapping" (a term Google taught me today), I've been watching YouTube videos on the subject this morning and finding it to be a controversial issue. Here's one video that explains...


This guy watched a lot of videos, then tried it, then wondered if it was worth it...


Watch until you hear how long he lapped! Two or three hours!? Man alive! He then suggests it could be done in as "little" as 90 minutes! Yikes!

Not sure if I should do any sanding/lapping at all at light of that.

🤔


YMK

Active Tinkerer
Nov 8, 2021
358
285
63
2. As to C-clamp twisting pressure required, I will use "paste squirting out the sides" as my best guide (because that is easy to see), with the pressure on my fingertips being the second best guide (because a precise determination of needed pressure on fingers is hard to assess with any decent level of accuracy).

If you can move the CPU against the heatsink, it's not enough pressure, as there's still excess compound between the two. When enough of the copper is making contact with the CPU, you won't be able to move it.

Not sure if I should do any sanding/lapping at all at light of that.

If you want the fastest possible 040, it may be worth it. I'm just going for lower noise at rated speed, so I didn't bother.
 
  • Love
Reactions: JDW

YMK

Active Tinkerer
Nov 8, 2021
358
285
63
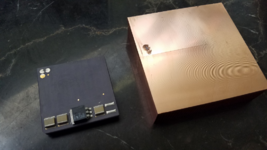
The adhesive on the Pentium 83 didn't hold as well as the 040s, maybe because it's smoother or got hotter or had to carry a larger heat sink with less area. In any case, the paste and glue coverage wasn't bad at all:

1666757432456.png

No worries of permanent damage; It cleaned up easily with acetone:

1666757611647.png

Removing material from the heat sink avoids contact with the three corner pads, which are used to power and detect the presence of the stock fan. I soldered an 0603 resistor there to fake out the fan detection, without which it becomes a Pentium 33. I attached them again, this time with 100% adhesive and they're holding fine so far.
 

JDW

Administrator
Staff member
Founder
Sep 2, 2021
1,577
1,376
113
53
Japan
youtube.com
Removing material from the heat sink ...
You mean these holes?
1666758616161.png


The Before, After and Combined images below seem to indicate what I suspected might happen -- overshoot of the thermal paste across the glue, thereby compromising the glue in places.

1666758978967.png


I've bought all the materials though, and in my case it is a square 040 with no components on top like that, so if I do a pea drop in the middle of thermal paste, with glue at all 4 corners, in theory (so long as my pea isn't too big), the heatsink will flatten the thermal paste into a circle and largely miss the corners where the glue is, thereby securing the heatsink with issue. But again, that is in theory. You had success with your 040, but I tend to make a blunder of things. I should probably make a video about it because, quite honestly, if a guy like me can do it, anybody can.

BTW, I decided to go with MX-4 because MX-5 is still too new, thicker than MX-4 and therefore spreads a bit worse, and because even MX-4 costs a heck of a lot for a 4g tube. It cools a bit worse than my old standby Kryonaut, but after reading numerous recent reports, the 8 year life of the MX-4 won me over. When gluing a heatsink, I don't want to change it out again for a very long time!
 
  • Like
Reactions: retr01 and YMK

YMK

Active Tinkerer
Nov 8, 2021
358
285
63
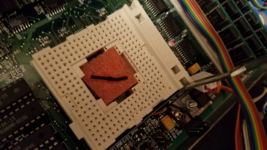
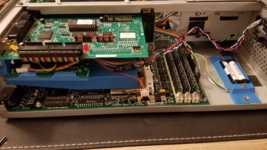
Here's some more on the Gateway 4SX-33 setup. MacSD uses this thermistor to measure CPU temperature. The pink foam keeps it pressed against the Pentium 83. Fine wires pass between the board and socket through the CPU pins to a 4-pin header. That header is anchored to the motherboard with a ring terminal by the two middle pins.

1667794218895.png

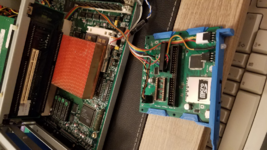
Here's the Pentium installed with the 80x80x20 copper heatsink. A ribbon cable passes from MacSD through the case, making stops at the rear RGB LED, CPU, HDD LED, reset switch (used as CD eject), SoundBlaster 16, power supply and firmware update switch. The CD audio headers have been flipped around.

1667794498617.png

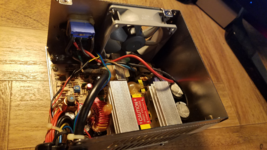
The 80mm power supply fan is the only fan in this system. The CPU is cooled by air entering through a card slot, guided by a 3D printed duct over the heatsink, driven by negative pressure in the case. This is much quieter than the tiny stock fan on the P83 Overdrive. As CPU temperature increases, MacSD modifies the PWM signal to the PSU fan, speeding it up and increasing airflow to the CPU. The CPU will overheat if the cover is removed for long, so if I'm working on it live, I'll usually point a blower at the heatsink to keep it cool.

1667795071763.png

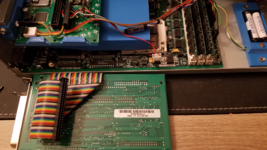
An Adaptec AHA-1520A sits right above MacSD. The onboard ROM allows booting from SCSI.

1667795210779.png
 
  • Love
Reactions: JDW

YMK

Active Tinkerer
Nov 8, 2021
358
285
63
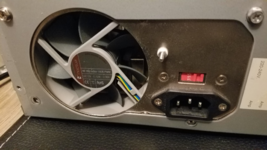
Newly recapped PSU. The fan is swapped with a Noctua NF-R8 Redux.

1667795928570.png

The protruding screw on the rear of the PSU carries the fan's RPM signal. This makes it easy to hook up a scope and watch fan speed.

1667796268319.png
 

YMK

Active Tinkerer
Nov 8, 2021
358
285
63
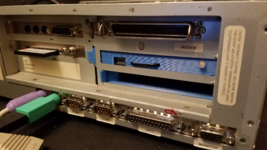
Here's a shot of the rear. The switch next to the CF slot triggers MacSD firmware updates. The RGB LED indicates:

Red - Error codes
Green - Fragmentation
Blue - PCM (CD audio / synthesizer) active

1667796705584.png

I'll have to remove that modem label.
 

YMK

Active Tinkerer
Nov 8, 2021
358
285
63
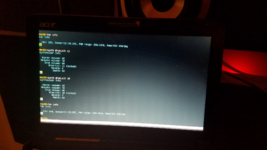
This is a USB terminal connection on a Linux netbook running minicom. The first "fan info" command was shortly after a cold start.

25% PWM had the fan running at 411 RPM.

I then started up a game and changed the MIDI drum kit twice.

Fan speed is set to begin increasing at 50°C.

A second "fan info" command after an hour of game play shows the PWM settling at 64%, 1218 RPM with the CPU at 53.89°C.

1667800242535.png
 

JDW

Administrator
Staff member
Founder
Sep 2, 2021
1,577
1,376
113
53
Japan
youtube.com
My new video below is dedicated with humble appreciation to @YMK for having kindly and patiently taught me the better way to heatsink a hot 68040 processor, as described earlier in this thread. If any of you want to better cool a hot 68040 CPU, especially when overclocking, this video is for you!


I'd also like to give a big shout out of thanks to @Kay K.M.Mods who got me started on this Color Classic modding adventure. Kay, you're an amazing person. You do shockingly good repairs (so good they bring tears to my eyes), and your online store is filled with endless delights.

Friends, this will be my final video for a while, due to my wife's cancer surgery on the 25th of this month. Please see the closing segment of my Apple IIe Card Part II video for details. I will of course try to stay active here on TD, and by PM & email. It's just that I won't have spare time for video work until my wife is back at home and on her path to recovery. Humble thanks to all of you for your kind words of support. It means a lot to me.
 

Kay K.M.Mods

Active Tinkerer
Sep 23, 2021
296
653
93
Tokyo
www.kerosmm.com
My new video below is dedicated with humble appreciation to @YMK for having kindly and patiently taught me the better way to heatsink a hot 68040 processor, as described earlier in this thread. If any of you want to better cool a hot 68040 CPU, especially when overclocking, this video is for you!


I'd also like to give a big shout out of thanks to @Kay K.M.Mods who got me started on this Color Classic modding adventure. Kay, you're an amazing person. You do shockingly good repairs (so good they bring tears to my eyes), and your online store is filled with endless delights.

Friends, this will be my final video for a while, due to my wife's cancer surgery on the 25th of this month. Please see the closing segment of my Apple IIe Card Part II video for details. I will of course try to stay active here on TD, and by PM & email. It's just that I won't have spare time for video work until my wife is back at home and on her path to recovery. Humble thanks to all of you for your kind words of support. It means a lot to me.
James, there are many people who care about your health.
Don't get too hung up on one thing, take it easy and calm your mind by thinking about when your kids were little.

It looks like the Color Classic adventure is about to end. Where to go next, but slow down for now.
 

YMK

Active Tinkerer
Nov 8, 2021
358
285
63
Great video @JDW! Looks like it went smoothly for your Color Classic.

Thanks for the MacSD mention, much appreciated.

Agreed with @Kay K.M.Mods and hoping for the best outcome for your family.
 
  • Love
Reactions: JDW

JDW

Administrator
Staff member
Founder
Sep 2, 2021
1,577
1,376
113
53
Japan
youtube.com
@YMK
On Youtube you wrote the following (see blue highlighted part)...

1668682316657.png


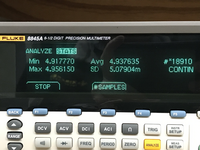
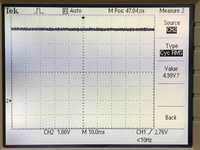
I made time this evening to do 2 hours worth of measurements on the 5V line. I tapped 5V and GND on Spicy O'Clock because (1) it was most convenient, and (2) it taps those connections very close to the CPU. I used my Fluke bench top meter and oscilloscope. I used 20cm long wires to tap the 5V Rail and Ground because the wires need to lead outside the back of the case. Those rather long wires contribute to greater than actual noise riding on the voltage waveforms.

Lowest voltage measured was 4.918V on the Fluke:
tempImaget24gpp.png

The scope measured a pretty solid 5V:
tempImageIVSbaH.png

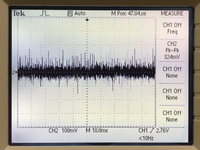
However, the noise riding on the 5V increased over the two hours of use, starting off at between 250mV pk-pk to 360mV pk-pk:
tempImageS1MFYq.png

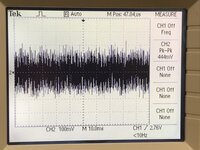
But after an hour or so of running Norton System Info and games like Doom, Marathon and Duke Nukem, the noise increased to almost 500mV pk-pk:
IMG_3695.JPG

The Color Classic was still stable, with no crashing. And the oddball pixels that appear when I move the black arrow pointer across the title bars in the Finder showed minimal pixelation at that point.

Keep in mind I have the dual speaker stereo mod with volume maxed out during game play. And I have a spinning platter hard drive in there too.

I quite all apps and let it idle in the Finder for 15 minutes, and the voltages remained the same, but the noise went down to an average of about 360mV pk-pk.

After I shutdown and wait a while, the scope shows the 5V rail to rest at 100mV, with about 110mV, with 60mV pk-pk riding on it. Subsequently flipping the main power switch on the back to off brings that to zero.

tempImageADn97a.png
 

YMK

Active Tinkerer
Nov 8, 2021
358
285
63
@JDW that seems like quite a bit of noise. The board might benefit from a large axial or radial cap, possibly where the unpopulated SIMM slot is.

With 4.94V average, you could probably bump that up safely to 5.05-5.10V. I don't know how to do that with the CC analog board though.

The CPU will run hotter, but with this new heatsink, you certainly have the thermal headroom.
 
  • Like
Reactions: JDW

JDW

Administrator
Staff member
Founder
Sep 2, 2021
1,577
1,376
113
53
Japan
youtube.com
I don't have a lot of time after work tonight, but I will try my best to fit my Scope probe nearer to the source, rather than use those 20cm leads. I know from experience that the longer the scope probe ground, the more pronounced the noise is on switching power supplies, especially the ESL spikes which make up most of the noise (as opposed to ripple). I will also connect a BlueSCSI, FloppyEMU and Joystick to see if that added current draw makes a difference.

From what I understand, there's a single POT on the CC Analog Board that boosts or reduces all voltages. So if I adjust the 5V rail, the 12V rail will also be affected. I've never touched that POT before. It needs to be changed with the power ON to see the change in real time. So long as a tiny turn doesn't suddenly bump the voltage up to 5.5V or higher, then all should be well. But with these old POTs you never know. Maybe @Kay K.M.Mods might have some thoughts about that since he's a true master of the Color Classic and its Analog Board.
 

JDW

Administrator
Staff member
Founder
Sep 2, 2021
1,577
1,376
113
53
Japan
youtube.com
@YMK
It's difficult to get my scope probe to fit with the motherboard inside the case. The best I could do was use one 20cm wire between Spicy O'Clock's 5V pin to the outside of the case, connecting to my Scope Probe. I then used the GND on the external SCSI port to my Probe's GND, thinking that might shorten the GND wire distance and therefore reduce the noise spikes, but in fact it increased them as shown in this short video (just after cold boot to the Desktop, with no FloppyEMU or Joystick or BlueSCSI connected at all -- only keyboard and mouse).


@Kay K.M.Mods
Have you adjusted the 5V rail on any of your Color Classics? If so, did you use PP1 or PP7?

@Mu0n
I found your 68kMLA post about voltage adjustments. You seem to indicate that PP1 changes the 5V rail, but that seems to conflict with what POWERCC says here, claiming that PP1 only affects "+60V, +24V & +8.4V". Which POT really affected the 5V rail, and did you turn it clockwise or counter-clockwise, and about how much did you turn it? (I'm trying to figure out what PP7 does versus PP1, before I touch anything.)

Thanks!

1668761845679.png
 

Kay K.M.Mods

Active Tinkerer
Sep 23, 2021
296
653
93
Tokyo
www.kerosmm.com
@YMK
It's difficult to get my scope probe to fit with the motherboard inside the case. The best I could do was use one 20cm wire between Spicy O'Clock's 5V pin to the outside of the case, connecting to my Scope Probe. I then used the GND on the external SCSI port to my Probe's GND, thinking that might shorten the GND wire distance and therefore reduce the noise spikes, but in fact it increased them as shown in this short video (just after cold boot to the Desktop, with no FloppyEMU or Joystick or BlueSCSI connected at all -- only keyboard and mouse).

View attachment 9866

@Kay K.M.Mods
Have you adjusted the 5V rail on any of your Color Classics? If so, did you use PP1 or PP7?

@Mu0n
I found your 68kMLA post about voltage adjustments. You seem to indicate that PP1 changes the 5V rail, but that seems to conflict with what POWERCC says here, claiming that PP1 only affects "+60V, +24V & +8.4V". Which POT really affected the 5V rail, and did you turn it clockwise or counter-clockwise, and about how much did you turn it? (I'm trying to figure out what PP7 does versus PP1, before I touch anything.)

Thanks!

View attachment 9865
PP7 is correct
 
  • Like
Reactions: DrJosh9000 and JDW