Restoration: Macintosh SE with Water Damage

PotatoFi

Active Tinkerer
Oct 18, 2021
171
352
63
Last year, a friend of mine messaged me saying that he had "a bunch of old Apple stuff" for me. Apparently, it had all come out of his parent's basement (a factor that will come into play later). In the pile was a little Macintosh SE.

More specifically, a Macintosh SE FDHD! The FDHD stands for "Floppy Drive, High Density" (or something like that), and can read 1.44 mb floppy disks. Not only does it have a high-capacity floppy drive - it also has a ROM that can take advantage of it, which makes it more special and usable than a typical Macintosh SE. Later versions of this were labeled "Macintosh SuperDrive", which I think is super cool.

IMG_0310.jpg


Here's what we have to work with. It is extremely dirty, and the front is obviously very, very scratched. At this point, I couldn't tell the condition of the CRT because of all of the dirt. This is by far the worst-looking compact Mac I've ever seen.

IMG_0311.jpg


Notice the rust stains around the bottom. Not a good sign.

IMG_0312.jpg


It gets worse. Check out the connectors on the back. At this point, it was becoming very clear to me that there was serious water damage. There's the remains of a "Property of the State of Idaho" asset tag, which is interesting. I've seen 3 or 4 machines with this exact tag.

IMG_0314.jpg


Expecting the worst, I grabbed my impact driver and broke the screws loose. I was pretty anxious to get it apart.

IMG_0315.jpg


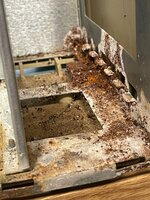
I wiggled the back bucket off, and this is what I was greeted with. Yikes. I seems that this machine sat in some water for awhile. I know it was in a 1940's basement for a couple of decades before coming to me - it seems that there must have been a flood at some point!

IMG_0316.jpg


At this point, I was thinking, "Well... maybe the CRT could be useful in another machine." Or maybe, "I guess I can salvage the flyback."

IMG_0317.jpg


I decided to keep going, and tear it completely down to see what I had to work with. Just to be safe, I followed the CRT discharge procedure of clipping a wire to the chassis and a screwdriver, and sliding the screwdriver under the anode cap. I'm sure this machine hasn't been powered on in ages, but better safe than sorry. I've done this on many compact black-and-white Macs, and I've never heard so much as a "click" from a small arc, but I always do it anyway.

IMG_0318.jpg


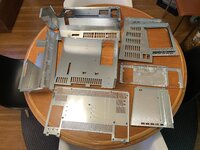
With the CRT discharge out of the way, I could starting tearing it down. But... where to start? The logic board was so rusted in that it wouldn't budge. I decided to unplug the floppy and hard drives first, but those were a struggle. Next, I removed the analog board. Check out the literal "water line". You can see exactly how far up the water came.

IMG_0319.jpg


With the analog board removed, let's show another photo, just to drive home how totally trashed this machine is. My impact driver was key to getting a lot of the rusted screws loose.

IMG_0320.jpg
 
Last edited:

PotatoFi

Active Tinkerer
Oct 18, 2021
171
352
63
Next, I took the machine out to the garage to try to figure out how to get the logic board out. I don't have any photos of this, but I managed to get a screwdriver down to the battery and pop it out of the holder. Amazingly, it hadn't blown up.

I soaked the logic board rails in some WD-40 to try to loosen things up, and let it sit for a few hours.

IMG_0321.jpg


While that sat, my daughters helped me clean up the back bucket a bit. We used Dawn dish soap and toothbrushes, as usual. I think they were hoping for a dedicated Sim City machine for their bedroom!

IMG_0323.jpg


With a bit of persuasion, I was able to get the logic board out. I ended up jamming a screwdriver in between the logic board and blending the rails out slightly to remove the board. They didn't permanently deform, but they did move just enough to sneak out the board. Sliding the board out was a complete impossibility.

IMG_0325.jpg


Here's the logic board up close. I think this is the point where any sane person would stop. But me? No. I decided to keep going.

IMG_0326.jpg


I hit the logic board with a garden hose, and then stuck it into a tray of vinegar to try and neutralize some of the rust.

IMG_0330.jpg


I stuck the chassis screws in as well. It's fun to watch the vinegar work on them!

IMG_0332.jpg


The amount of rust around the I/O ports caused me a great heck'n concern! I decided to wait and let the vinegar do it's thing. Maybe, just maybe...

IMG_0331.jpg


I scrubbed the board with a toothbrush after a couple of hours, and was surprised at how much it cleaned up. But there was still a ton of rust around the I/O ports, so my wife helped me find a creative solution to submerge the I/O ports with the limited amount of vinegar that we had on hand at the time (shortage due to coronavirus).

IMG_0333.jpg
 
Last edited:

PotatoFi

Active Tinkerer
Oct 18, 2021
171
352
63
With that marinating, I removed the chassis from the front of the case. Wow, this thing looks horrible!

IMG_0327.jpg


Hrm... I'll need to find a replacement Apple badge for it. You know, if it ever runs again, and obviously, it won't. This is just going to be a parts machine, right? And I'm just cleaning up the parts. Right?

IMG_0328.jpg


Using a pair of flush cutters, I removed the plastic parts that hold the speaker down.

IMG_0329.jpg
 
Last edited:

PotatoFi

Active Tinkerer
Oct 18, 2021
171
352
63
That’s gonna be fun to watch!

I’ll be waiting for the Apple // thread 😀

I'm glad you're here for the journey! And don't worry... the Apple II+ will get more attention soon, and eventually, the two Apple IIe's that you see above are slated for attempted resuscitation too.
 

PotatoFi

Active Tinkerer
Oct 18, 2021
171
352
63
After sitting in the vinegar all Sunday afternoon, I pulled the logic board out and took it back to the sink for a soap and water scrub. It's funny, a few years ago I would have never dreamed of putting a circuit board in the kitchen sink, much less hitting them with the garden hose like I did this with this one. Now... I scrub them down with soap and water all of the time.

IMG_0335.jpg


As soon as I was done scrubbing, I took it out to the garage and hit it with the air compressor. Not bad... I think there's signs of life here, but the shield near the ports on the back is proving to be especially rusty and offensive. I decided to try removing it.

IMG_0338.jpg


Looking at the underside of the board, I located the solder joints that hold the shield in place. I set my soldering iron almost as hot as it will go: 990°F. Next, I coated one of the joints in flux paste.

IMG_0341.jpg


I heated up the joint with the iron. At a certain temperature, the flux, solder, corrosion, and rust started to pop, bubble and fizz! When the solder turned molten, I sucked it all away with the solder sucker. It worked great!

IMG_0342.jpg


Same story on the rest of the joints. I think the secret is lots of heat, and lots of flux.

IMG_0344.jpg


There are some tabs that are twisted about 22° before soldering, so I straightened them back out so I could pull the board through.

IMG_0345.jpg


With all of the solder removed, and the tabs straightened, it was time to remove the shield. I had my wife heat a couple of joints for me while I worked the shield loose. I knew that teaching her to solder would come in handy!

IMG_0347.jpg
 
Last edited:
  • Like
Reactions: fehervaria

PotatoFi

Active Tinkerer
Oct 18, 2021
171
352
63
Next, I took a small wire wheel on a cordless drill to both the shield and chassis. Big improvement, but there were a lot of small corners that I can't get into. I think sandblasting will be the ultimate solution here, but I need to find someone with a sandblasting cabinet.

IMG_0348.jpg


I would have liked to submerge it in vinegar for a few hours, but at the time, we were super low on vinegar. So, I decided to try something different: hot sauce, which is full of vinegar! Don't worry, we like our hot sauce around here. but while this bottle of Mule Sauce from Sticker Mule is fun, we aren't into the flavor. We're more of a Tabasco, Sriracha, and buffalo sauce family.

Anyway, onto the chassis it goes!

My 7-year-old daughter said, "Dad, don't you feel a little weird painting hot sauce onto your Macintosh?"

"Yes. Yes I do."

IMG_0350.jpg


I wrapped it in plastic and put it in the garage overnight.

So, did it help? Maybe a bit. I washed it all off in the sink and left it to dry, which was a mistake. When I came back, it had all surface rusted, so I didn't get a great comparison. I hit it with the wire wheel on the drill one last time for now.

IMG_0354.jpg
 
Last edited:
  • Wow
  • Like
Reactions: JDW and Mu0n

PotatoFi

Active Tinkerer
Oct 18, 2021
171
352
63
Okay, now that the chassis isn't going to give us Tetanus just by looking at it, let's talk about what I did with the front shell! Sadly I didn't get any photos of this part, but I took it outside with my daughters, some toothbrushes, and Dawn dishwasher detergent, and we scrubbed the front like crazy. For the stubborn stuff (and there was a lot of stubborn stuff), I brought it inside and used wet paper towels and baking soda. This acts as a mild abrasive and removes stubborn scuffs and marks. It does also remove a bit of texture, but the scratches were so deep on this Mac that I was okay with that, especially on the chin. Where possible, I like to smooth out scuffs and scratches, even if that means losing some of the plastic texture.

To remind you, here's before:

IMG_0311.jpg


IMG_0327.jpg


And here's after, with the chassis and CRT re-attached.

IMG_0362.jpg


The scratches on the front are pretty unfortunate, but after retrobrite, these will hide a bit more. You know, assuming that I need to retrobrite this machine for some reason. Because it'll never run again.

Or will it?

IMG_0364.jpg


Normally, I tend to tear the Mac down and do retrobrite before doing any kind of reassembly and testing, but for this one, I decided to start move towards testing sooner rather than later.

Also, my livingroom looked like this:

61223698679__98CEC1A0-971B-43FB-8C8F-E400C1C6A878.jpg


In an effort to make my livingroom look a lot less like that, I moved towards reassembling the machine.

IMG_0358.jpg


...and in the spirit of reassembly, I decided to tackle the RAM. I hit the contacts with an eraser. You can clearly see that the stick on the right has been cleaned in this photo.

IMG_0356.jpg


Here's the board again, mostly cleaned up with the RAM reinstalled.

IMG_0361.jpg
 
Last edited:

PotatoFi

Active Tinkerer
Oct 18, 2021
171
352
63
Let's take a quick look at the rest of the parts. Here's a closeup of the rust on the power supply. Next, I'll be taking this apart to see how bad the damage is. I don't think it's as bad as the exterior suggests.

IMG_0359.jpg


I won't bother to fix this until we've verified that the machine will power on and read an external floppy, but I'll have to clean up the floppy drive as well. Remember that this is a Macintosh SE FDHD, so this is a SuperDrive that can read 1.44mb disks! Worth saving for sure. The good news is that at this stage, I found that everything seemed to move okay, including the spindle and motor.

IMG_0360.jpg


Let's tackle the analog board and power supply! First, I cracked the lid on the power supply, which is a Sony model. Inside, it wasn't nearly as bad as it looked. The enclosure was rusted, but the board and components looked okay.

IMG_0366.jpg


I removed the plastic shield on the back of the analog board, and found that it looked okay. A bit of corrosion but nothing serious, I've seen worse from capacitor damage. I used my impact driver to remove the four Phillips screws holding the power supply to the analog board.

IMG_0367.jpg


With the power supply removed, I could see that the front of the analog board had some rust stuck to it.

IMG_0368.jpg


I took it to the kitchen sink to work on it. I started with soap and water and a toothbrush, and then I used baking soda on a wet paper towel to remove the last of it.

IMG_0371.jpg


Since the analog board is out of the machine, I decided to clean up the brightness knob. In the past, my own SE FDHD had a faulty brightness knob that was erratic, and would only turn up to a certain brightness. I spent ages replacing parts on the board before finally just desoldering the knob, and rinsing the potentiometer with alcohol.

This one was literally under water, so I decided to do that here. Besides, it's super gross on the outside and needs external cleaning anyway. Here it is with the original solder joints.

IMG_0375.jpg


I heated my iron to 750°F, and attempted to heat one of the joints. No luck, so I tinned the tip with a bit of fresh solder, and instantly things started flowing. I used a cheap desoldering pump to remove the majority of the solder, then I followed up with a bit of desoldering braid to get the last bit. The knob popped right out.

IMG_0376.jpg


I didn't get photos of this part, but I went to the sink and scrubbed it with... you guessed it! Soap, water, and a toothbrush. When I was done cleaning the outside, I filled it up with alcohol, twisted it around a few times, and repeated once more. Then I took it back upstairs and reinstalled it.

IMG_0377.jpg


After that, the back of the logic board got a nice scrub with alcohol, and then a bunch of cleaning with the air compressor. I also used paper towels and alcohol to clean up the anode wire and cap. You'll see them in a bit, they look brand new!
 
Last edited:

PotatoFi

Active Tinkerer
Oct 18, 2021
171
352
63
Next, I popped the power supply board out of it's case. I somehow didn't get an "after" photo, but here's what the back of the power supply board looked like at first. It's pretty easy to remove, just three Phillips screws, unclip the low voltage wire bundle, and sneak it out of the case. I've never recapped one of these because I was kinda afraid to get into it, but now I know that they're pretty simple inside. An LC power supply is a lot more complicated to take apart and put back together.

IMG_0369.jpg


All of the gunk that you see on the back of the power supply doesn't seem to be rust or corrosion, it's all flux! I scrubbed at it with alcohol and a toothbrush, and in no time, my hands were super sticky! I ended up scrubbing it several times with alcohol, scrubbing it with soap and water to remove the last bit, and blowing all of the moisture with the air compressor. Then, I put both the power supply board and analog board out in the evening sun to dry.

Also, check out that shiny anode cap!

IMG_0378.jpg


Next, I decided to work on removing the corrosion from the power supply case.

IMG_0379.jpg


I took it out to the work bench, and used a couple of clamps to keep it still while I wire brushed it. It came out looking great.

IMG_0380.jpg


I might need to paint the part of it that is bare metal later, but for now, I decided to put it back together to get closer to testing. I know that looks like a glass of whiskey in the background, but it's just vinegar with some rusty screws in it.

IMG_0382.jpg


At this point, the power supply and logic board were reassembled!

IMG_0384.jpg


Tsk tsk tsk. This won't do.

IMG_0372.jpg


Windex fixes everything!

IMG_0373.jpg


I reassembled the Mac, and I gotta say... it looks pretty insanely different then when I took it apart.

IMG_0387.jpg


At this point, it was ready to test. I'm decided to wait until the next day to give all of the components to dry out; I wanted to give this Mac every opportunity to start up on the first try. Here's a closer look at the internals:

IMG_0388.jpg


At this point, here's what was left:
  • See if this thing even works! I'll just use an external floppy drive for now.
  • Functionality test including all I/O ports
  • Clean, lubricate, install and test floppy drive
  • Install and test hard drive
  • Fix any analog board issues such as capacitors and screen adjustment
  • Tear down
  • Sandblast and paint chassis and brackets
  • Finish cleaning up case bucket
  • Retrobrite entire case
  • Final reassembly
...you know. Assuming it ever works again.
 
Last edited:

polpo

New Tinkerer
Oct 30, 2021
14
17
3
Amazing restoration so far!
Next, I took a small wire wheel on a cordless drill to both the shield and chassis. Big improvement, but there were a lot of small corners that I can't get into. I think sandblasting will be the ultimate solution here, but I need to find someone with a sandblasting cabinet.
I'd try dunking the chassis in Evapo-rust (or a similar chelation-based product like WD-40 Rust Remover Soak or Blaster Rust Remover Bath). I've had excellent results with removing the rust on battery bombed compact Macs with it. Here's the results of soaking an SE chassis in Evapo-rust overnight:

evaporust.jpg
 

Patrick

Tinkerer
Oct 26, 2021
433
1
222
43
I've heard vinegar can be bad for electronics if left for too long? I've only used it for minor cases of rust that I can use a qtip for.

is this a case where the logic board was already pretty far gone, might as well try to save it by soaking it in vinegar?

Or is vinegar not as damaging as I was led to believe ?
 

Elemenoh

Active Tinkerer
Oct 18, 2021
355
351
63
Bay Area
  • Sandblast and paint chassis and brackets
awesome work so far! the chassis is used for grounding. So if you paint it be sure to mask where necessary to maintain ground. I had a bunch of my frames replated at a local shop. It wasn’t much money and they came out great. The shop took care of chemically and mechanically removing the rust before plating too. Photos below of a rusted out Lisa frame I restored this way.

Good luck!
 

Attachments

  • 154ABDD2-33EA-46EE-9338-8AE229B1DB12.jpeg
    154ABDD2-33EA-46EE-9338-8AE229B1DB12.jpeg
    522.6 KB · Views: 87
  • E779E271-D687-49B7-B7D9-2C93B983DB41.jpeg
    E779E271-D687-49B7-B7D9-2C93B983DB41.jpeg
    505.5 KB · Views: 91

Mac84

Administrator
Staff member
Founder
Sep 4, 2021
175
237
43
New Jersey, USA
www.mac84.net
Wow, a thrilling saga! I can't wait for the epic conclusion. :love: I say it'll turn on!

awesome work so far! the chassis is used for grounding. So if you paint it be sure to mask where necessary to maintain ground. I had a bunch of my frames replated at a local shop. It wasn’t much money and they came out great. The shop took care of chemically and mechanically removing the rust before plating too. Photos below of a rusted out Lisa frame I restored this way.

Good luck!
Wow, those look great! I wanted to do the same to the metal support for my SE/30 before installing it in a MacEffects case, but I couldn't find a place (yet) local that would do parts this small.
 
  • Like
Reactions: JDW and Stephen

alxlab

Active Tinkerer
Sep 23, 2021
287
305
63
www.alxlab.com
The Evapo-rust really did a good job! Think it's probably the best results I've seen.

The new plating looks great too. Don't really know any local places that would do it at reasonable price but I haven't look hard.
 

PotatoFi

Active Tinkerer
Oct 18, 2021
171
352
63
Amazing restoration so far!

Thanks!

I'd try dunking the chassis in Evapo-rust (or a similar chelation-based product like WD-40 Rust Remover Soak or Blaster Rust Remover Bath).

I've been meaning to pick up some Evapo-rust or similar! Unfortunately, I'm not documenting this restoration as it happens (not yet, anyway - I'll be caught up to current events shortly). This portion of the restoration happened in May 2020 - the height of the pandemic, when we weren't shopping for anything but essentials.

I've heard vinegar can be bad for electronics if left for too long? I've only used it for minor cases of rust that I can use a qtip for.

Hmm, I can't say I've ever heard that. Stay tuned for the results of the extended bath in vinegar!
 
  • Like
Reactions: polpo

PotatoFi

Active Tinkerer
Oct 18, 2021
171
352
63
After the partial reassembly, I let the machine sit all night and all day while I worked. When work was done, it was finally time for the moment of truth! I plugged it in all by itself with no peripherals, and then flipped the power switch...

IMG_0390.jpg


Nothing.

Total silence. No activity whatsoever. Well, I guess expecting this to power on after it had been through was probably a bit too much to ask, huh?

But then I got to thinking.

Maybe, just maybe.

I removed the two screws near the back of the analog board that connect it to the chassis, and then the four screws holding in the power supply. Using a long screwdriver, is pushed in the locking tab on the power supply to analog board connector and popped it out. Then, I was able to twist the PSU sideways and sneak it out of the chassis, since the analog board wasn't connected by those two screws, allowing the chassis to flex a bit. I put a bit of pressure on the CRT when I did this... probably not something I would do all of the time, but I needed to know.

IMG_0393.jpg


Yep, there's the problem!

IMG_0394.jpg


That probably needs to be plugged in for anything to work! I plugged it back in, and hastily reassembled the machine.

The moment of truth.

I flipped the power switch, and...

IMG_0395.jpg


What?!

IMG_0396.jpg


YES! It works! I could hardly believe it!

Next, I grabbed my external drive (which has a 1.44mb SuperDrive installed) and a System 7.0.1 Install 1 disk. I couldn't find my Disk Tools disk, but whatever, I just wanted to see if the floppy controller worked.

IMG_0397.jpg


Floppy controller works!

Next, I texted my friend, who gave me the machine.

Screen Shot 2020-05-30 at 10.26.43 AM.png


Neither can I!

At this point, I've verified that the external floppy port works, and both of the ADB ports work.

IMG_0399.jpg


The screen was pretty dim (this picture was taken at night, in the daytime it's a bit hard to see), so I adjusted the max brightness cutoff up as much as I could before lines appear. As you can see, there's pretty severe burn-in; this CRT has a lot of hours on it, and is probably pretty tired.

But I don't care. It works! Still, there's a LOT more work to do on it. Stay tuned.

IMG_0400.jpg
 
Last edited:

Mu0n

Active Tinkerer
Oct 29, 2021
570
530
93
Quebec
www.youtube.com
Well done! In retrospect, the 512k I got with water damage (but very strong moldy smell) was less far gone than this, and I didn't keep it. I was at the start of building my career in education though, so I didn't have the necessary skillset required at the time.

This would be a prime candidate to get some RGB2HDMI going, no?
 
  • Like
Reactions: PotatoFi