
Today that happened to me exactly.Hello, any help much appreciated. The motor in my reels has suddenly stopped working. This is not due to any software upgrade, it was working one day and the next day was totally silent - no capture, no rewind, no start-up sound. Everything else seems to be as normal. Has anyone else experienced this and, assuming it's the motor which has failed, are generic replacement parts available? I'm going to dismantle the unit and check for voltage on the motor terminals when it should be active, other than that I'm a bit stumped...
Update: I dismantled the unit, unplugged the motor cable from the PCB and then re-attached it and all is well, full functionality again, I've no idea why, but unless it fails again I'm going to leave well alone
Update 2: I put the unit back in its normal position and the fault came back immediately. After a lot of head scratching the penny dropped. The power outlet which the Reels was plugged into had accidentally been switched off. So how was it starting up at all? From the USB connection! Obviously enough power coming in to boot the software but not enough to start the motor (5V not 12V). I don't think there's any mention, either in the instructions manual or in these posts, which describes the until being able to boot up from the USB and I assume it's just an unintentional quirk in the circuit design.
Hacking the Kodak Reels 8mm Film Digitizer (New Thread)
- Thread starter Mac84
- Start date
You are using an out of date browser. It may not display this or other websites correctly.
You should upgrade or use an alternative browser.
You should upgrade or use an alternative browser.
Oh no!
You're probably already tried all these, but sharing few ideas just in case:
- Re-format SD card, max. 32GB as FAT32, then copy and try flashing firmware (either stock firmware or modded)
- Long power off (>5 minutes), press power button +30 seconds while power cable is not plugged
- UART on boot, if available - watch for bootloader. If there's output, potentially recoverable with software/flashing - if complete silence, hardware issue
Meanwhile once it started again, after resting for multiple days. This is awesome, and makes me way less concerned.
My type D is unable to quickly drain it's capacitors it seems. Being not connected to power for a few hours and pressing in the power button for 30 s doesn't seem to drain it on mine. But I do have time, it's no issue waiting another week.
Right now it does not run. It's black again, after I walked away on it. Maybe it has to do with "sleep mode"? It's the first times I don't power it off, but waddle of. If I ever fix it, I will always manually power off.
I have now a wiped SD card with the most current of your Firmwares. My plan is to wait a week and then start the unit, causing it to be re-flashed.

I feel all will be fine soon =)

I vent and ordered the parts for the lens swap. But im a little afraid to go further because what you said about the 7mm Extension ring. I cant get it to screw all the way inn without force.Installing new lens (https://www.rmaelectronics.com/azure-photonics-azure-1228mac/), 7mm extension ring (https://www.m12lenses.com/7mm-Metal-Extension-Ring-for-M12-Mount-p/pt-erm12-700m.htm), and lock ring (https://www.m12lenses.com/M12x0-5-Lock-Ring-CNC-Machined-Aluminum-p/pt-lrm12-2.0m.htm) onto the image board-
I don't have specific photos showing the installation of these components onto the image board, but it's relatively simple. First screw the 7mm extension ring onto the existing plastic lens mount. Be carful screwing it in. the metal threads of the extension ring can easily strip the plastic threads of the lens mount. Next screw the lock ring onto the lens, then screw that assembly onto the installed extension ring.
Re-attach ribbon cable to the image board
View attachment 25985
Has anyone else also tried this method with the original lens mount? And did you have to use force?
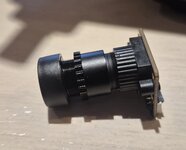
Pic is how far I can go before I need to use force
Attachments
Mine is in more. One image out of focus, sorry.I vent and ordered the parts for the lens swap. But im a little afraid to go further because what you said about the 7mm Extension ring. I cant get it to screw all the way inn without force.
Has anyone else also tried this method with the original lens mount? And did you have to use force?
Pic is how far I can go before I need to use force
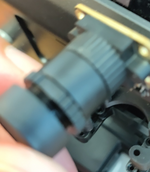
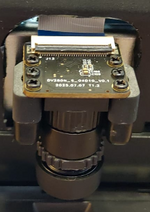
What I did: remove the new lens and lock ring. Take the prolongation and the original female socket. Take grip gloves. I really don't know the English word. They would translate to Farmer's Gloves if I apply my mother tongue here. And then force it.
For me it caused plastic shavings. But I was able to blow them off the sensor surface just fine with a bellows.
After that, you can re-attache the lens and lock ring.
Attachments
Thanks alot, I got it workingMine is in more. One image out of focus, sorry.
What I did: remove the new lens and lock ring. Take the prolongation and the original female socket. Take grip gloves. I really don't know the English word. They would translate to Farmer's Gloves if I apply my mother tongue here. And then force it.
For me it caused plastic shavings. But I was able to blow them off the sensor surface just fine with a bellows.
After that, you can re-attache the lens and lock ring.

I had to use alot of force and there was some shavings I had to remove after. It was also really tricky to get the extension ring to enter the threads correctly. It was very easy to get it crooked, but I managed to get it straight after alot of fiddling.
I've got the machine back together again. But I can't get the full frame in the picture. I can move the frame from side to side and up and down. But not more out. Not sure if this is a D-version quirk?
@melw is there some way to hack the camera to zoom all the way out? Or should I look for a bigger riser? I used the 7mm version in post #199 by Deano.
Attachments
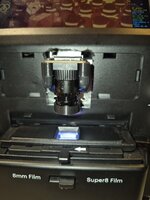
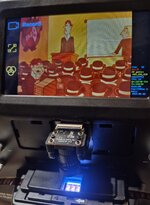
But I can't get the full frame in the picture. I can move the frame from side to side and up and down. But not more out. Not sure if this is a D-version quirk?
[...] Or should I look for a bigger riser? I used the 7mm version in post #199 by Deano.
I have that issue too, but I accepted it, because it's part of the secret sauce. Being zoomed out fully makes it such that you use the full sensor surface for the scanner and such that you have the best possible resolution for the setup. But yes, depending on what you scan, it's sad that the frame is a bit cropped, especially towards the top and bottom.
@Deano in post #199 you mention 8 and 9 mm versions of your riser. Would you mind sharing the step files of those by any chance?


Thank you for letting me join. I have a 2 month old Reels serial J2925..... and am worried before I flash it that the J may have the D version. When I run the whole serial through the checker, it says that my serial was not found and Use Firmware B. The reason I wondered is if the serials are moving alphabetically, J is after H. Then I wondered why the 25 is bold in the Firmware D warning H2825148BKxxxxx. Possibly I am reading into the bold number and the starting letter?
Thanks again, I hope I can contribute.
Thanks again, I hope I can contribute.
But if we can move the image up, down and side to side. Dosen't that mean we're not using the whole sensor?I have that issue too, but I accepted it, because it's part of the secret sauce. Being zoomed out fully makes it such that you use the full sensor surface for the scanner and such that you have the best possible resolution for the setup. But yes, depending on what you scan, it's sad that the frame is a bit cropped, especially towards the top and bottom.
@Deano in post #199 you mention 8 and 9 mm versions of your riser. Would you mind sharing the step files of those by any chance?
Sorry if this has been discussed before.
But if we can move the image up, down and side to side. Dosen't that mean we're not using the whole sensor?
That's a very good point. Let rephrase it to "maximum usable resolution, given the current boundaries"

Hi all - new member here. I just picked up a non-working Reels from ebay cheap with the stated defect "it needs a new SD card reader". Well, it was cheap so I bought it and it just arrived this afternoon. What happened is that the SD card socket seems to have been pushed off the board judging by the board damage. In its place is a micro SD to SD adapter badly soldered on to the board with short leads and floating in mid-air. The opening on the micro SD adapter where the micro card enters was melted and distorted either by a soldering iron or a hot air station, so I don't think a micro card will fit the opening (I didn't try it). Unfortunately, the original card socket was not included.
The unit powers up and asks for an SD card when I push the scan button All menus and adjustments work, so I assume if I can get it to recognize an SD card the machine will be fine.
What I need is a good closeup photo of what the socket should look like so I can try a new socket in place of the hacked in micro adapter and go from there.
Also, the serial number is H2825148BK01650. I entered that number into Steve's Kodak lookup tool and it says the number was not found but also to use Firmware B. Any other info appreciated.
Thanks so much.
John
The unit powers up and asks for an SD card when I push the scan button All menus and adjustments work, so I assume if I can get it to recognize an SD card the machine will be fine.
What I need is a good closeup photo of what the socket should look like so I can try a new socket in place of the hacked in micro adapter and go from there.
Also, the serial number is H2825148BK01650. I entered that number into Steve's Kodak lookup tool and it says the number was not found but also to use Firmware B. Any other info appreciated.
Thanks so much.
John
If you don't get such a photo, I recommend scrolling to the photos here. I know one user moved the socket from the back to the front and that post might include the needed infos.Hi all - new member here. I just picked up a non-working Reels from ebay cheap with the stated defect "it needs a new SD card reader". Well, it was cheap so I bought it and it just arrived this afternoon. What happened is that the SD card socket seems to have been pushed off the board judging by the board damage. In its place is a micro SD to SD adapter badly soldered on to the board with short leads and floating in mid-air. The opening on the micro SD adapter where the micro card enters was melted and distorted either by a soldering iron or a hot air station, so I don't think a micro card will fit the opening (I didn't try it). Unfortunately, the original card socket was not included.
The unit powers up and asks for an SD card when I push the scan button All menus and adjustments work, so I assume if I can get it to recognize an SD card the machine will be fine.
What I need is a good closeup photo of what the socket should look like so I can try a new socket in place of the hacked in micro adapter and go from there.
Also, the serial number is H2825148BK01650. I entered that number into Steve's Kodak lookup tool and it says the number was not found but also to use Firmware B. Any other info appreciated.
Thanks so much.
John
Thanks! I went through both threads about a month ago before I decided to take a shot at this machine, but didn't remember that part (I probably skipped it!).If you don't get such a photo, I recommend scrolling to the photos here. I know one user moved the socket from the back to the front and that post might include the needed infos.
John
Use "D" firmware for H2825:Thanks! I went through both threads about a month ago before I decided to take a shot at this machine, but didn't remember that part (I probably skipped it!).
John
Post #468 (this thread)
https://tinkerdifferent.com/threads...8mm-film-digitizer-new-thread.4885/post-45585
SD Card Reader Pics:
*** These are from the original thread -"Modding the Kodak Reels 8mm Film Digitizer (Firmware Hack)" ***
(Post #282 - Original Thread)
(Post #375 - Original Thread)
Last edited:
Use "D" firmware for H2825: https://tinkerdifferent.com/threads...8mm-film-digitizer-new-thread.4885/post-45585
SD Card Reader Pics:
Thank you so much! That pic is EXACTLY what I needed. I ordered a socket from digikey - hopefully it will fit - it should. Hopefully the board isn't too badly mangled. Time will tell. I'll post pics when I get the socket in.
Regarding the D firmware - is that now proven safe and does it indicate that this machine is more of a recent manufacture?
John
Glad it helped and hope your unit works when you get the socket in.Thank you so much! That pic is EXACTLY what I needed. I ordered a socket from digikey - hopefully it will fit - it should. Hopefully the board isn't too badly mangled. Time will tell. I'll post pics when I get the socket in.
Regarding the D firmware - is that now proven safe and does it indicate that this machine is more of a recent manufacture?
John
"proven safe" --- Read the disclaimer in the first post and decide if you want to take the risk. Many have, including myself, and are happy with the results. If you're uncomfortable updating the firmware, some have gone ahead and archived their collection with stock firmware before experimenting with the modifications. You took the risk on the damaged unit, why not go ahead and try the enhanced firmware?
I think the 4th and 5th digit of the serial number seems to loosely follow the year of manufacture so I would say yours is a more recent unit.
Looking forward to hearing about your results and if you run into trouble, someone here will probably be able to help.
After having to step away from my scanning project for nearly a year, I am back on it. I have a B model, and was using 0dan0 's v6.9 with no issues. After getting everything setup, I updated to v7.7.1 for B's and updated with no issues. Right after the update, the splash screen came up and a I could move around the menus. I did not change any settings, but did look through the various menus. I went to capture and it stopped right after the first frame and shut completely off. It was right after there was a signal to the drive stepper on the front reel, it turned a bit, and then shut off. After unplugging and turning back on again, the splash screen comes up, it goes to the menu, sends a signal to the stepper motor and then shuts off. I tried going back one to V7.7.0 and then all the way back to V6.6 and the same thing continues to happen.
I am thinking this is not a function of the FW, but maybe my hardware went bad sitting for a year? Has anyone else seen this?
Update - I found a post elsewhere where this was being discussed. Turns out I needed to use the USB plug for power. Plugged in the USB and it no longer turned off, but would not start capture when I selected capture. Plugged in both the 12v and the USB and it now captures, but stops advancing the film several frames in, but still continues to capture. Very odd, but will keep troubleshooting. Did this after going back to 7.7.1
Update - turned it off and went swimming for a couple of hours. Got cleaned up, sat down to try it again and it is working great! No idea....
I am thinking this is not a function of the FW, but maybe my hardware went bad sitting for a year? Has anyone else seen this?
Update - I found a post elsewhere where this was being discussed. Turns out I needed to use the USB plug for power. Plugged in the USB and it no longer turned off, but would not start capture when I selected capture. Plugged in both the 12v and the USB and it now captures, but stops advancing the film several frames in, but still continues to capture. Very odd, but will keep troubleshooting. Did this after going back to 7.7.1
Update - turned it off and went swimming for a couple of hours. Got cleaned up, sat down to try it again and it is working great! No idea....
Last edited:
Glad to hear you got it working but I don't think you're out of the woods yet. You shouldn't need USB power to supplement the 12V.After having to step away from my scanning project for nearly a year, I am back on it. I have a B model, and was using 0dan0 's v6.9 with no issues. After getting everything setup, I updated to v7.7.1 for B's and updated with no issues. Right after the update, the splash screen came up and a I could move around the menus. I did not change any settings, but did look through the various menus. I went to capture and it stopped right after the first frame and shut completely off. It was right after there was a signal to the drive stepper on the front reel, it turned a bit, and then shut off. After unplugging and turning back on again, the splash screen comes up, it goes to the menu, sends a signal to the stepper motor and then shuts off. I tried going back one to V7.7.0 and then all the way back to V6.6 and the same thing continues to happen.
I am thinking this is not a function of the FW, but maybe my hardware went bad sitting for a year? Has anyone else seen this?
Update - I found a post elsewhere where this was being discussed. Turns out I needed to use the USB plug for power. Plugged in the USB and it no longer turned off, but would not start capture when I selected capture. Plugged in both the 12v and the USB and it now captures, but stops advancing the film several frames in, but still continues to capture. Very odd, but will keep troubleshooting. Did this after going back to 7.7.1
Update - turned it off and went swimming for a couple of hours. Got cleaned up, sat down to try it again and it is working great! No idea....
Sounds like you have a voltage or current issue with the 12V. Is the connector fully seated? On mine you can feel and hear a distinct click when the connector is inserted. Is there any corrosion on the connector? Any visible fraying, pinches, or sharp bends in the cable? Is the power adapter rated for 12V and 1500 mA?

Hi all! My serial starts with H2825, which [...] looks like Type D. Before I flash this baby, can someone confirm:
For a few years I've been bringing filmmaking workshops to schools across our province in eastern Canada, and we transitioned to using super-8 and having the kids edit in camera. Paying others for processing and scanning adds up, so we're keen to squeeze some better scans out of this thing.
- melw's build in post #695 is the one to use?
- Is it the same install process as the others? ie. FAT32 card under 32GB, FWDV280.BIN in the root, empty NVTDELFW folder,, etc
- Is there a stock Type D dump anywhere, or am i stepping into the void once I flash?
For a few years I've been bringing filmmaking workshops to schools across our province in eastern Canada, and we transitioned to using super-8 and having the kids edit in camera. Paying others for processing and scanning adds up, so we're keen to squeeze some better scans out of this thing.
Last edited:
1. I haven't tried melw's #695 but yes, that is the latest and the one I'd go withHi all! My serial starts with H2825, which from post #45585 looks like Type D. Before I flash this baby, can someone confirm:
Happy to report results back. Thanks for all the work on this!
- melw's build in post #695 is the one to use?
- Is it the same install process as the others? ie. FAT32 card under 32GB, FWDV280.BIN in the root, empty NVTDELFW folder,, etc
- Is there a stock Type D dump anywhere, or am i stepping into the void once I flash?
For a few years I've been bringing filmmaking workshops to schools across our province in eastern Canada, and we transitioned to using super-8 and having the kids edit in camera. Paying others for processing and scanning adds up, so we're keen to squeeze some better scans out of this thing.
2. Yes
3. Stock firmware can be found in post #143:
I've edited my post #713 to try to avoid confusion. It seems that when a hyperlink to another post is copied, the post number for the entire site is referenced in the link; the post you're referring to as #45585 is post #468 in this thread.