How can I tell if the firmware update was successfully installed? After performing the Firmware B update, my startup screen still shows the regular Kodak logo. My serial number is D2825148BK00952. I used a SanDisk Ultra 16 GB card, formatted it to FAT32, and placed only the FWDV280.bin file on the SD card. The boot process took approximately 10–20 seconds. I’ve also tried all three options. Also, I just bought this new off of Amazon.
Modding the Kodak Reels 8mm Film Digitizer (Firmware Hack)
- Thread starter Mac84
- Start date
You are using an out of date browser. It may not display this or other websites correctly.
You should upgrade or use an alternative browser.
You should upgrade or use an alternative browser.
- Status
- Not open for further replies.
I was out this week and tested last saturday with V6.9. I found sufficent color settings for Kodachrome from the 70 s. 448, 256, 256 ev 2 ( White bal 2,0 -1,5 -0,5 ). Only the issue after 16384 frames existed. Now we have the new V7.1.1 with the possibility to choose also 24fps ( over 95 % of my films are in 24fps ) what makes it getting rid of cutting and reframing. I love this, many thanks. Today I did 2 short scans with the new version. I believe I have to test with additional settings for the Kodachrome tomorrow. 528, 256, 256 ( White bal 1 -1.5 -0.5 ) was my last test. It was too green. But this was the setting which showes a good histogram with an empty Kodakfilm, but not within the film.
Tomorrow I will also check, if the 16384 Problem has gone away ...
Tomorrow I will also check, if the 16384 Problem has gone away ...
It is unlikely to work, as it has no data on it use as a macro lens, nothing to suggest good focus at ~30mm. So few lens vendors have near focus data and sample images like Scorpion does. I've purchase nearly a dozen random lenses, that seemed okay on paper, but would not focus at the range needed.Not identical to Scorpion's, but close enough? https://commonlands.com/products/16mm-m12-lens?variant=40507626651766
The boot screen, if updated, will show:How can I tell if the firmware update was successfully installed? After performing the Firmware B update, my startup screen still shows the regular Kodak logo. My serial number is D2825148BK00952. I used a SanDisk Ultra 16 GB card, formatted it to FAT32, and placed only the FWDV280.bin file on the SD card. The boot process took approximately 10–20 seconds. I’ve also tried all three options. Also, I just bought this new off of Amazon.
I've only used 32GB cards with stand formatting (defaults to FAT32.) If is very new, it likely Type C.
I tried type C and I get the inverted screen issueThe boot screen, if updated, will show:
View attachment 24310
I've only used 32GB cards with stand formatting (defaults to FAT32.) If is very new, it likely Type C.
Well now you know you are installing firmware.I tried type C and I get the inverted screen issue
") So Type B it is.
So Type B it is.Thanks, I’ll go back to Type B then.Well now you know you are installing firmware.
I’m trying to convert my grandfather’s films for the family and want to make sure I can give them the best quality possible. I have 15 reels from the early 1960s, and I’m guessing they haven’t been used in decades. I’ve ordered some PEC-12 to clean the film is there anything else I should do?
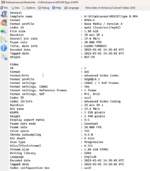
Here’s the MediaInfo for Type B:
Attachments
I found success with using Pec Pads and Film Guard solution to gently clean dust/dirt from the film before scanning, while also lubricating it. Some film didn’t need it as much as others (those that had been screened more often).Thanks, I’ll go back to Type B then.
I’m trying to convert my grandfather’s films for the family and want to make sure I can give them the best quality possible. I have 15 reels from the early 1960s, and I’m guessing they haven’t been used in decades. I’ve ordered some PEC-12 to clean the film is there anything else I should do?
Here’s the MediaInfo for Type B:
I did use Pec 12, but for cleaning the film path on the scanner.
Compressed air was occasionally helpful to blow dirt out of the gate while scanning as needed.
Also, decide on a system to organize and label the footage and files. A spreadsheet with any data you can assemble would be wise.
On my next round of scanning (with the awesomeness that is 7.1.1 or later) I may borrow from someone up thread who put cotton or spec pads on the scanners’s grey film guide posts to keep those from scratching the film.
That looks like Mac84 firmware, not 0dan0 v7.1. The original firmware hack didn't modify the boot logo, that is way you didn't see any change on the firmware update.Thanks, I’ll go back to Type B then.
I’m trying to convert my grandfather’s films for the family and want to make sure I can give them the best quality possible. I have 15 reels from the early 1960s, and I’m guessing they haven’t been used in decades. I’ve ordered some PEC-12 to clean the film is there anything else I should do?
Here’s the MediaInfo for Type B:
Other big differences: resolution at 1920x1440 (not 1600x1200, remember the stock lens can only resolve ~640x480, more resolution is not always better), bitrate is lower (not 35Mb/s), and 20fps is the stock framerate (not an 8mm or Super8 fps.) The v7.1 firmware has a lot of additional fixes, more stable exposure and a manual white balance control. My firmware also updates the date to 2025-10-22.
Attached is the latest Type B firmware if you want the above and more.
Attachments
Last edited:
The previous contents of this post have been moved to the new thread on this topic
New User Guide Location: A User Guide and Reference to 0Dan0's Custom Firmware
New Version History Location: Firmware Version History
New User Guide Location: A User Guide and Reference to 0Dan0's Custom Firmware
New Version History Location: Firmware Version History
Last edited:
@ThePhage You reminded me how annoying the "Tint" is for saturation. So that can be changed (in English only), something for the next release.

No more issues ( histogram disappears, black lines in the stored frames ) with reels having over 16384 frames ( reels bigger than 5 inch - ca 67 meters S8 ).
Thank you @0dan0 so much. Now I can start my second round of scanning all my material and have much less work to do in postprocessing which I stopped in August.
Thank you @0dan0 so much. Now I can start my second round of scanning all my material and have much less work to do in postprocessing which I stopped in August.
It seems, that I'm recognising something mysterious. I'm scanning one film after an other. After some films I switch off the scanner, take out the SD card, copy the files from the card, erase them on the card, put the card back in the scanner and turn on the scanner again. There is no film in, the color settings are changing, I can see that in the little histogram. OK. He adjusts. I hadn't changed the White bal and green yet. I recognised, that the first value stays always like it was at switch off time. I believe, same to the last value, but the middle value often changes. I hat 256, after switching on it goes to 324 or so.
Second mysteria : I recognized, that in dark shots there was a shine on the capture from the sprocket hole. So I had an inserted film, went back the frame adjust with down arrow five times, checked the scanning window, putted it 2 times more left, went back with up arrow five times. I repeated the back-forth-left adjustment a second time and went back to the recording setting. I also recognised, that the middle value in the histogram was changed, from 256 to 224.
That means be careful if you have many films of the same historic time and vendor and want to scan them all with the same adjustment ( because you figured out that it fits best ) and check if the settings have not changed for every new scan.
Last edited:
Yes, as the firmware is re-using the left and right buttons for green tint, any longish presses while framing may also alter the tint. I should probably make the green tint presses longer.It seems, that I'm recognising something mysterious. I'm scanning one film after an other. After some films I switch off the scanner, take out the SD card, copy the files from the card, erase them on the card, put the card back in the scanner and turn on the scanner again. There is no film in, the color settings are changing, I can see that in the little histogram. OK. He adjusts. I hadn't changed the White bal and green yet. I recognised, that the first value stays always like it was at switch off time. I believe, same to the last value, but the middle value often changes. I hat 256, after switching on it goes to 324 or so.
Second mysteria : I recognized, that in dark shots there was a shine on the capture from the sprocket hole. So I had an inserted film, went back the frame adjust with down arrow five times, checked the scanning window, putted it 2 times more left, went back with up arrow five times. I repeated the back-forth-left adjustment a second time and went back to the recording setting. I also recognised, that the middle value in the histogram was changed, from 256 to 224.
That means be careful if you have many films of the same historic time and vendor and want to scan them all with the same adjustment ( because you figured out that it fits best ) and check if the settings have not changed for every new scan.
Last edited:
That's definitely good news about the 12mm lens being a match, but bad news about the 16mm lens. @0dan0 Do you still have any hope of finding a lens that could get good focus, good coverage, and good resolution, given the short focal length of the Reels' design?My lenses order form RMA ELECTRONICS arrived. The AZURE-1228MAC is confirmed to be same lens as the one from Scorpion. The secondary experiment with at 16mm AZ-231622S-MAC hasn't worked, I couldn't get a focus at this short distance.
The 12mm is a really good fit, with some overscan. A 12mm macro like this one, should have been the original choice for this hardware. For the active picture is so near 1080p. It would be extremely unlikely that 16mm macro, with no overscan would work in this range, without being a custom lens design.That's definitely good news about the 12mm lens being a match, but bad news about the 16mm lens. @0dan0 Do you still have any hope of finding a lens that could get good focus, good coverage, and good resolution, given the short focal length of the Reels' design?
I've been collecting my thoughts for some comments and queries about the updated firmware and use of the Kodak Reels in general, but this discussion of alternative lenses prompts me to jump in now with a specific question that seems relevant. 0dan0 unhappily reports that "16mm AZ-231622S-MAC hasn't worked, I couldn't get a focus at this short distance". Might it not be possible to achieve focus at a closer distance by adding a supplementary lens? Back in the sixties I used a 1 dioptre "close-up" lens on my Sankyo 8mm camera when shooting animation. Similarly a 2 dioptre supplementary on my 35mm Voigtlander enabled me to copy prints etc. at a shorter distance than the standard (fixed) lens allowed. Granted that we're now considering a MUCH shorter distance than in those cases I suppose that in principle it might be possible to come up with a supplementary that would appropriately reduce the focusing range of the 16mm lens. Others with more knowledge of optics will be better able to calculate the required spec for such a lens, but it seems to me that it might be a feasible solution. Obviously any additional glassware potentially degrades the achievable quality by some margin, but maybe not enough to offset the advantage of an optimised field of view?My lenses order form RMA ELECTRONICS arrived. The AZURE-1228MAC is confirmed to be same lens as the one from Scorpion. The secondary experiment with at 16mm AZ-231622S-MAC hasn't worked, I couldn't get a focus at this short distance.
This thread has been an invaluable resource while I've been getting to grips with my "Kodak" Reels and I have to express my appreciation of all the contributors, particularly those responsible for the hugely impressive firmware and hardware enhancements. My scanner is as yet unmodified, until I have completed an initial digitisation of my family's 8mm archive (1958-82) but I hope that in due course I'll be able to take advantage of all that voluntary development work.
- Status
- Not open for further replies.