In this thread I'll be discussing my adventures in modifying the Kodak Reels 8mm film digitizer firmware. First I'll explain how I started, my goals, the the results, some tidbits I learned, and how-to do this yourself. This will be a lengthy post, but my process may be helpful to others and I want to refer to this in a future video.

1. THE JOURNEY
Over the past few years a few companies have been making devices that help you digitize your 8mm / Super 8 films. 8mm film was how people recorded home movies decades before VHS and digital cameras made it easier. Converting film to tape or digital has always been expensive and tricky.... frame rates, flicker... dirt... sound, etc.
Products from Wolverine and Kodak (or whoever has licensed their name), have decent-ish products that sell for around $200-400 USD. These products are made of plastic and aren't the best of course, but they cost thousands less than a professional set up. And for most people, this will successfully let them relive cherished moments.
The device moves the film slowly through the device frame by frame. Pausing it to capture an image, then proceeding to advance the film to take another image, and repeating until you stop it. It saves these images as part of an H264 video file, converting it from an image sequence to a video in the process.
The Problem
These devices often have zero adjustable video settings! This often leads to compressed video artifacts and other blemishes that you have no way of removing. Previously in 2017 some bright minds hacked the Wolverine firmware to allow for better video quality. So when I came across a Kodak Reels (aka Reelz in some territories) for sale on eBay for half the price, I wondered if the same could be done.
On paper the Kodak Reels digitizer offers better specs than the Wolverine Pro. It had a better camera sensor and offered a recording resolution higher than 1080p (1728x1296), much nicer than some of the original Wolverine models which were locked to 720p. The higher resolution is great, because you'll likely end up cropping the frame in a video editing program afterwards.
1) Figure out how to adjust the video settings of the device
2) Figure out how to re-flash the firmware to the device
Arrival
Upon arrival I immediately put on a Super 8 reel, left the default crop and image settings (crop, tint, exposure, sharpness are all you get to tinker with), and recorded the full reel. It took about 25-30 minutes to record this short Super 8 reel. If played with a projector, it would have been about 3 minutes in length (at 18 fps).
The default results weren't bad. In most scenes the image was decently clear, although artificially sharpened. The dynamic color balance or "HDR" that this device apparently employs didn't always have the best results, but it wasn't terrible. Much better than I expected from seeing re-compressed (via YouTube) samples online. However, I thought it could do better. After all, film is fragile (as I'd soon be reminded) and I wanted to archive these films once and never have to go back.
Finding the firmware
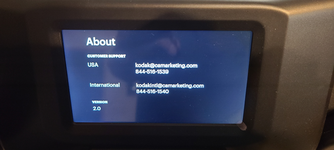
All the forum posts about getting the Wolverine firmware were long gone... how was I going to get the Kodak firmware? Their website doesn't provide a download and a version of 1.0 is listed in the device menu. To my knowledge, nobody had ripped open the device yet. So I did that first and took detailed photos.
Under the SD card board I found a Novatek NT96658MBG processor, a similar chip to the Wolverine unit. Right next to the processor was a small chip marked MXIC MX25L3236F, looking that up, it appears to be a flash memory chip. Interesting!
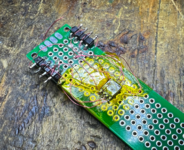
After consulting with the juicy brain of @Kai Robinson - he confirmed via data sheets that my EPROM programmer's profile for the MX25L3206EM2 should be compatible enough to dump the Kodak's MX25L3236 chip. I just needed a physical adapter to let the chip's 8 legs to plug into my programmer. One was available, the ADP-081, which appeared to be just a straight through piece to adapter the pins. Being impatient, I fashioned my own crude adapter.

With my fingers crossed I plugged it in... and the PC EPROM software crashed! Thankfully, on the second try and about 2 minutes later, the EPROM file was dumped, giving me a 4 MB file of the Kodak Reels ROM!

Now what?
Now that I had the ROM... what could I do with it? Looking back at my goals, I wanted to edit the settings and then figure out how to re-flash the firmware to the device... preferably without an EPROM programmer.
After hours of chasing archived forum posts and dead links I learned a lot. As of 2017 there was a thriving community of tinkerers trying to get more out of their dashcams that also used the Novatek CPU. One user, Tobais, had created a website of tools for hacking the Novatek firmware on dashcams. This included a tool for decompressing / recompressing the firmware (which I didn't know I needed to do) and some magic checksum adjustments (NikTool).
It also had a great tool to adjust the values for the video settings (NtkMPE) from the decompressed firmware. Someone before me used this knowledge to hack the Wolverine 8mm digitizer, but their website was gone and their email address dead. From what I pieced together, the tools from Tobais didn't work as-is, another user had stepped in to help, but I had no way of contacting them to discover further details.
Using the tools I found online, I decompressed the original firmware dump with NikTool. It had two partitions, one extracted to be about 19 KB and the other about 14 MB. I downloaded a hex editor, ImHex (Mac/PC), and opened the decompressed firmware file. There was a lot of references to things this device didn't have, like Wi-Fi, but I'm sure other dashcams did.
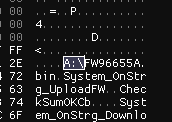
Eventually, I found repeated references to a firmware file "FWDV280.BIN", and "A:/NVTDELFW", so I was 99% sure I had found the firmware file name it needed.

Now to see if I could find the video codec / resolution values. Using NtkMPE I selected the dumped decompressed (2nd partition) firmware file and... ta-dah! The tool displayed a list of video resolutions, frame rates and bitrates successfully appeared!
I also want to tackle the FPS toggle, as Super 8mm should be set to 16 FPS, not 20... but that may be an oddball enough frame rate to confuse video programs. Either way, that's on my to-do list.

Repacking Firmware
I modified the bitrate to another value as a test and saved the changes. Now I had a decompressed file with the modifications I wanted, but I needed to find out how to recompress in a way to trick the device into accepting the Firmware update. NikTool had options to compress and merge firmware partitions, so I thought I had to repack the modified 2nd partition and the unmodified 1st partition into one file.
However, this didn't work. After compressing and merging the partitions, the file looked visibly different in the hex editor, which made me realize I wasn't doing something right... or the tools were modifying it too much.

Original Firmware Flashing Attempts
Knowing I had a backup of the firmware, I realized in a worst-case scenario I could desolder the chip again and reprogram the chip via my EPROM programmer. So I decided to try flashing a modified file to the device. I decided to try and flash the original unmodified firmware to eliminate issues.
I renamed the original programmer dumped firmware file to FWDV280.BIN and placed it into the root of the SD card and inserted it into the digitizer. This was the process for updating the Wolverine device, so I assumed it would be similar. When I turned on the device, the startup process now changed! The power light remained on, but the screen stayed black. However, this didn't change for 5 minutes, so I switched it off. It didn't seem to like the firmware file, but upon restarting the device it still worked. However, the presence of the firmware file on the SD card did something. So I was on the right track.
Hours later, on a whim, I realized that the 1st partition of the firmware file maybe wasn't needed. Looking at the hex data, it may have been leftovers from the way I dumped the entire memory chip. So I unpacked the original firmware again (only the 2nd partition this time), then recompressed it with with NikTool without making any changes. This resulted in a 4 MB firmware file. I renamed that to FWDV280.BIN, put it on an SD card and gave it a try. I switched on the device and the screen remained black... I felt defeated... until 30 seconds later, the device booted! Did I just successfully flash the firmware??
It either failed or it didn't, but it did something it didn't do before!! However, inspecting the SD card, it still had the firmware file present. I would assume it would remove the file when done, but perhaps not? Then I recall the "A:\NVTDELFW" string I saw in the code. A:\ seemed to refer to the SD card. So I put an empty directory on the SD card titled "NVTDELFW", as the name suggests, it perhaps tells the Novatek chip to delete the firmware, but from where?? And when??

I turned on the device again, this time with the firmware still on the SD card and the blank folder named NVTDELFW in the root. Now it seemed to flash the firmware for 30 seconds, and booted fine. I shut it off and saw the firmware file was deleted from the SD card! So the NVTDELFW command / folder removes the firmware after flashing. Without it, the firmware file would remain and flash the device on each startup. Neat!
Modified Firmware Tests
Now that I knew I could flash the firmware, I wanted to modify it and try flashing it. Modifying the firmware could also prove I was flashing the firmware, because with nothing on the screen, I was just assuming it was accepting a new firmware. And without any visible changes in the software, it was tough to confirm my assumpsions.
I used the NtkMPE tool to modify the uncompressed firmware file with a different video bitrate. The original value was "6400", I changed this to "9600" and saved the changes, recompressed it, and put it onto the SD card. And... SUCCESS, it flashed!
I did a quick capture test of a few seconds, then hastily removed the SD card and shoved it into my Mac. Comparing the details of the video file, it was clear that the bitrate had changed! Awesome! It worked! Now I wondered, how more could I push it?
The NtkMPE tool doesn't allow you to enter a value larger than 32700, but the gap between 6400 and 32700 is large. Over the next day I went through the tedious process of modifying the firmware, adjusting the bitrate, recompressing the file, and flashing it to the 8mm digitizer device. If I got too greedy, the device would seemingly capture the film. But the video file wouldn't save on the SD card and trying to use the on-device screen to view the file would make it lock up. Thankfully the device would still reboot and I could easily re-flash the firmware to try again.
After many, many attempts and failures, I found entering "15600" gave me a ~20.0 Mb/s bitrate (2.5 MB/s), a healthy improvement from the original "6400" ~8 Mb/s (1 MB/s). This improved the video quality significantly and removed all visible compression artifacts! (Also a value of 16420 seems to work too!)
Further tries with settings of 16000, 16500, 16800, 17222, 18000 and beyond didn't yield any successful results - the device just froze up. But 1200, 14800, 15420, 15600 and 16420 seemed to give me plenty of video file to work with. So I was happy to continue with that.
2. COMPARING THE RESULTS
Now let's see the difference these changes made. Let's start with some stills.
I'll add video examples later on, but stills tell a good story. After all, the device captures the film as images before creating a video file anyway. Without motion, you may think these image changes are minor, but in motion on a large TV, they really make a difference.
A video comparing the video bit rate and firmware changes
Please see the below PNG images for some other examples:
On the left is the enhanced / custom firmware with sharpening set to -2.0 and the higher bit rate.
On the right is the default firmware with the sharpen setting at -0.5

Notice on the original version how there are compression artifacts around the face, resulting in sharp blocks. Also notice in the comparison how the light on his cheeks differ. In motion this becomes quite distracting and stick out easily. Plus, some frames get superrrrr compressed and look terrible. Especially with the sharpening turned on.

This beach scene was captured with the original firmware. Again, it's not terrible... but the artificial sharpening (set to -0.5) combines with the compression to give you plenty of un-naturally sharp edges. Again, in motion this looks worse.

Again, the left is the enhanced / custom firmware with sharpening set to -2.0 and the higher bit rate.
On the right is the default firmware with the sharpen setting at -0.5
While the sharpening doesn't look too bad from far away, in other scenes it turns the round flames of the candle to odd rectangular blocks.

3. "Team Discovery Channel!" (Additional Learnings)
During this ordeal I've learned a lot about what this device likes and what it doesn't. Here is some helpful tidbits that may be handy.
4. HOW TO MODIFY AND FLASH THE FIRMWARE [For Archival Educational Purposes]
Skip to section 5 if you just want to use easier pre-made files!
WARNING! Follow these instructions at your own risk. Doing these steps may damage your device, your SD card, or void your warranty. You’ve been warned!!
Currently (12/2024) three models of this Kodak device exist. They are nearly identical except for the LCD used. Use the lookup tool to determine which firmware. Use the lookup tool to help determine which firmware works for your device.
You'll need the following:
- A Windows or Linux system to run the firmware tools software
- An SD card and SD card reader (or USB micro B cable)
- The firmware tools software, available here (NtkTool) and here (NtkMPE).
- The original unmodified firmware files, use the lookup tool to download them.
(Note: Only the decompressed version of the firmware file will be read by the NtkMPE tool)
Caution: Never power the device off while the firmware is being flashed. I'm using the cleaned up compressed ROM in this example to save you the step from deleting the extra data from the raw EPROM dump.
How to modify the firmware yourself:
(skip to Flashing firmware if you just want to use an already modified firmware)
(Using pre-modified or original firmware files)
I'd like to do more testing and see what settings produce the best results. I'd also like to digitize some reels I've had digitized via other methods and compare the quality.
I'll likely do a video about this subject. I'm curious if adjusting the resolution or FPS will work too. But I'm so satisfied with these results so far, I had to share them.
IMPORTANT UPDATE! - December 2024
Kodak has released an official firmware update tool here. This extends the max recording time to 40 minutes and gives you a safe "undo" option if you are playing around with modified firmware files.  WARNING: Kodak's OWN firmware MAY RESULT IN PERMANENT, UNFIX-ABLE SCREEN ISSUES ON the latest model!
  There is NO WAY to determine model types besides the serial number. Kodak's firmware is NOT compatible with units with a serial number starting with 'H2324148BK0....', see this post for a solution.
WARNING: Kodak's OWN firmware MAY RESULT IN PERMANENT, UNFIX-ABLE SCREEN ISSUES ON the latest model! There is NO WAY to determine model types besides the serial number. Kodak's firmware is NOT compatible with units with a serial number starting with 'H2324148BK0....', see this post for a solution.
Although there are multiple versions of this product (labeled Reels or Reelz, with versions 1.0 or 2.0), there are multiple silent hardware versions. We've identified 3 different firmware variants as of Dec. 2024.
I've made a new Digitizer Lookup & Firmware Helper Tool to get started. This uses your device's serial number to determine which firmware file (nicknamed A, B or C) will work for your unit. The modified firmware has also been updated to utilize the longer max 40 min. recording time, you can download those files here.
Again, see this post for recent models! PLEASE PROCEED WITH EXTREME CAUTION! There is a (now much, much smaller) risk that you can mess up the colors of your screen or otherwise PERMANENTLY alter your device.
PLEASE PROCEED WITH EXTREME CAUTION! There is a (now much, much smaller) risk that you can mess up the colors of your screen or otherwise PERMANENTLY alter your device.
1. THE JOURNEY
Over the past few years a few companies have been making devices that help you digitize your 8mm / Super 8 films. 8mm film was how people recorded home movies decades before VHS and digital cameras made it easier. Converting film to tape or digital has always been expensive and tricky.... frame rates, flicker... dirt... sound, etc.
Products from Wolverine and Kodak (or whoever has licensed their name), have decent-ish products that sell for around $200-400 USD. These products are made of plastic and aren't the best of course, but they cost thousands less than a professional set up. And for most people, this will successfully let them relive cherished moments.
The device moves the film slowly through the device frame by frame. Pausing it to capture an image, then proceeding to advance the film to take another image, and repeating until you stop it. It saves these images as part of an H264 video file, converting it from an image sequence to a video in the process.
The Problem
These devices often have zero adjustable video settings! This often leads to compressed video artifacts and other blemishes that you have no way of removing. Previously in 2017 some bright minds hacked the Wolverine firmware to allow for better video quality. So when I came across a Kodak Reels (aka Reelz in some territories) for sale on eBay for half the price, I wondered if the same could be done.
On paper the Kodak Reels digitizer offers better specs than the Wolverine Pro. It had a better camera sensor and offered a recording resolution higher than 1080p (1728x1296), much nicer than some of the original Wolverine models which were locked to 720p. The higher resolution is great, because you'll likely end up cropping the frame in a video editing program afterwards.
Interestingly enough, on the back of the device it says more info about the camera:
"8.08 Megapixels (3280 x2464) 1/3" CMOS sensor"
My project goals were the following:1) Figure out how to adjust the video settings of the device
2) Figure out how to re-flash the firmware to the device
Arrival
Upon arrival I immediately put on a Super 8 reel, left the default crop and image settings (crop, tint, exposure, sharpness are all you get to tinker with), and recorded the full reel. It took about 25-30 minutes to record this short Super 8 reel. If played with a projector, it would have been about 3 minutes in length (at 18 fps).
The default results weren't bad. In most scenes the image was decently clear, although artificially sharpened. The dynamic color balance or "HDR" that this device apparently employs didn't always have the best results, but it wasn't terrible. Much better than I expected from seeing re-compressed (via YouTube) samples online. However, I thought it could do better. After all, film is fragile (as I'd soon be reminded) and I wanted to archive these films once and never have to go back.
Note: While testing a standard 8mm reel it kept repeatedly tearing perfectly fine sprockets. On standard 8 there is an image in this area, sadly this permanently damaged some areas. I found that putting pressure on the take-up reel resolved this about 90% of the time. I'm going to stick to old cartoons until I figure out the quirks to reduce the risk of damaging one-of-a-kind home movies.
Finding the firmware
All the forum posts about getting the Wolverine firmware were long gone... how was I going to get the Kodak firmware? Their website doesn't provide a download and a version of 1.0 is listed in the device menu. To my knowledge, nobody had ripped open the device yet. So I did that first and took detailed photos.
Under the SD card board I found a Novatek NT96658MBG processor, a similar chip to the Wolverine unit. Right next to the processor was a small chip marked MXIC MX25L3236F, looking that up, it appears to be a flash memory chip. Interesting!
After consulting with the juicy brain of @Kai Robinson - he confirmed via data sheets that my EPROM programmer's profile for the MX25L3206EM2 should be compatible enough to dump the Kodak's MX25L3236 chip. I just needed a physical adapter to let the chip's 8 legs to plug into my programmer. One was available, the ADP-081, which appeared to be just a straight through piece to adapter the pins. Being impatient, I fashioned my own crude adapter.
With my fingers crossed I plugged it in... and the PC EPROM software crashed! Thankfully, on the second try and about 2 minutes later, the EPROM file was dumped, giving me a 4 MB file of the Kodak Reels ROM!
Now what?
Now that I had the ROM... what could I do with it? Looking back at my goals, I wanted to edit the settings and then figure out how to re-flash the firmware to the device... preferably without an EPROM programmer.
After hours of chasing archived forum posts and dead links I learned a lot. As of 2017 there was a thriving community of tinkerers trying to get more out of their dashcams that also used the Novatek CPU. One user, Tobais, had created a website of tools for hacking the Novatek firmware on dashcams. This included a tool for decompressing / recompressing the firmware (which I didn't know I needed to do) and some magic checksum adjustments (NikTool).
It also had a great tool to adjust the values for the video settings (NtkMPE) from the decompressed firmware. Someone before me used this knowledge to hack the Wolverine 8mm digitizer, but their website was gone and their email address dead. From what I pieced together, the tools from Tobais didn't work as-is, another user had stepped in to help, but I had no way of contacting them to discover further details.
Using the tools I found online, I decompressed the original firmware dump with NikTool. It had two partitions, one extracted to be about 19 KB and the other about 14 MB. I downloaded a hex editor, ImHex (Mac/PC), and opened the decompressed firmware file. There was a lot of references to things this device didn't have, like Wi-Fi, but I'm sure other dashcams did.
Eventually, I found repeated references to a firmware file "FWDV280.BIN", and "A:/NVTDELFW", so I was 99% sure I had found the firmware file name it needed.
Now to see if I could find the video codec / resolution values. Using NtkMPE I selected the dumped decompressed (2nd partition) firmware file and... ta-dah! The tool displayed a list of video resolutions, frame rates and bitrates successfully appeared!
I also want to tackle the FPS toggle, as Super 8mm should be set to 16 FPS, not 20... but that may be an oddball enough frame rate to confuse video programs. Either way, that's on my to-do list.
Note: When using the original compressed firmware file, the NtkMPE tool produced an error that it didn't find anything to modify.
Repacking Firmware
I modified the bitrate to another value as a test and saved the changes. Now I had a decompressed file with the modifications I wanted, but I needed to find out how to recompress in a way to trick the device into accepting the Firmware update. NikTool had options to compress and merge firmware partitions, so I thought I had to repack the modified 2nd partition and the unmodified 1st partition into one file.
However, this didn't work. After compressing and merging the partitions, the file looked visibly different in the hex editor, which made me realize I wasn't doing something right... or the tools were modifying it too much.
Original Firmware Flashing Attempts
Knowing I had a backup of the firmware, I realized in a worst-case scenario I could desolder the chip again and reprogram the chip via my EPROM programmer. So I decided to try flashing a modified file to the device. I decided to try and flash the original unmodified firmware to eliminate issues.
I renamed the original programmer dumped firmware file to FWDV280.BIN and placed it into the root of the SD card and inserted it into the digitizer. This was the process for updating the Wolverine device, so I assumed it would be similar. When I turned on the device, the startup process now changed! The power light remained on, but the screen stayed black. However, this didn't change for 5 minutes, so I switched it off. It didn't seem to like the firmware file, but upon restarting the device it still worked. However, the presence of the firmware file on the SD card did something. So I was on the right track.
Hours later, on a whim, I realized that the 1st partition of the firmware file maybe wasn't needed. Looking at the hex data, it may have been leftovers from the way I dumped the entire memory chip. So I unpacked the original firmware again (only the 2nd partition this time), then recompressed it with with NikTool without making any changes. This resulted in a 4 MB firmware file. I renamed that to FWDV280.BIN, put it on an SD card and gave it a try. I switched on the device and the screen remained black... I felt defeated... until 30 seconds later, the device booted! Did I just successfully flash the firmware??
It either failed or it didn't, but it did something it didn't do before!! However, inspecting the SD card, it still had the firmware file present. I would assume it would remove the file when done, but perhaps not? Then I recall the "A:\NVTDELFW" string I saw in the code. A:\ seemed to refer to the SD card. So I put an empty directory on the SD card titled "NVTDELFW", as the name suggests, it perhaps tells the Novatek chip to delete the firmware, but from where?? And when??
I turned on the device again, this time with the firmware still on the SD card and the blank folder named NVTDELFW in the root. Now it seemed to flash the firmware for 30 seconds, and booted fine. I shut it off and saw the firmware file was deleted from the SD card! So the NVTDELFW command / folder removes the firmware after flashing. Without it, the firmware file would remain and flash the device on each startup. Neat!
Modified Firmware Tests
Now that I knew I could flash the firmware, I wanted to modify it and try flashing it. Modifying the firmware could also prove I was flashing the firmware, because with nothing on the screen, I was just assuming it was accepting a new firmware. And without any visible changes in the software, it was tough to confirm my assumpsions.
I used the NtkMPE tool to modify the uncompressed firmware file with a different video bitrate. The original value was "6400", I changed this to "9600" and saved the changes, recompressed it, and put it onto the SD card. And... SUCCESS, it flashed!
I did a quick capture test of a few seconds, then hastily removed the SD card and shoved it into my Mac. Comparing the details of the video file, it was clear that the bitrate had changed! Awesome! It worked!
Now I wondered, how more could I push it?The NtkMPE tool doesn't allow you to enter a value larger than 32700, but the gap between 6400 and 32700 is large. Over the next day I went through the tedious process of modifying the firmware, adjusting the bitrate, recompressing the file, and flashing it to the 8mm digitizer device. If I got too greedy, the device would seemingly capture the film. But the video file wouldn't save on the SD card and trying to use the on-device screen to view the file would make it lock up. Thankfully the device would still reboot and I could easily re-flash the firmware to try again.
After many, many attempts and failures, I found entering "15600" gave me a ~20.0 Mb/s bitrate (2.5 MB/s), a healthy improvement from the original "6400" ~8 Mb/s (1 MB/s). This improved the video quality significantly and removed all visible compression artifacts!
(Also a value of 16420 seems to work too!)Further tries with settings of 16000, 16500, 16800, 17222, 18000 and beyond didn't yield any successful results - the device just froze up. But 1200, 14800, 15420, 15600 and 16420 seemed to give me plenty of video file to work with. So I was happy to continue with that.
2. COMPARING THE RESULTS
Now let's see the difference these changes made. Let's start with some stills.
I'll add video examples later on, but stills tell a good story. After all, the device captures the film as images before creating a video file anyway. Without motion, you may think these image changes are minor, but in motion on a large TV, they really make a difference.
A quick aside about evil artificial sharpening: This device by default has some pretty aggressive artificial sharpening. Thankfully, you can adjust it on the device's menu from a scale from +2.0 to -2.0. To an untrained eye, it would seem this sharpening produces decent results, but in motion it creates weird artifacts and over sharpens everything.
I've recorded the same film with the sharpening values of 0, -0.5, -1.0, -1.5, and -2.0 and examined the results closely. The setting of 0 results in weird heavy compression artifacts, -0.5 is better but not by a lot, and the -1.0 setting isn't too bad. However, when compared to -1.5 and -2.0, 99% of the major compression artifacts seem to disappear. I personally prefer the setting of -2.0, as I can always use Final Cut Pro to sharpen this stuff later if I wanted. But either -1.5 or -2.0 should be fine.
A video comparing the video bit rate and firmware changes
Please see the below PNG images for some other examples:
On the left is the enhanced / custom firmware with sharpening set to -2.0 and the higher bit rate.
On the right is the default firmware with the sharpen setting at -0.5
Notice on the original version how there are compression artifacts around the face, resulting in sharp blocks. Also notice in the comparison how the light on his cheeks differ. In motion this becomes quite distracting and stick out easily. Plus, some frames get superrrrr compressed and look terrible. Especially with the sharpening turned on.
This beach scene was captured with the original firmware. Again, it's not terrible... but the artificial sharpening (set to -0.5) combines with the compression to give you plenty of un-naturally sharp edges. Again, in motion this looks worse.
Again, the left is the enhanced / custom firmware with sharpening set to -2.0 and the higher bit rate.
On the right is the default firmware with the sharpen setting at -0.5
While the sharpening doesn't look too bad from far away, in other scenes it turns the round flames of the candle to odd rectangular blocks.
3. "Team Discovery Channel!" (Additional Learnings)
During this ordeal I've learned a lot about what this device likes and what it doesn't. Here is some helpful tidbits that may be handy.
- The tools from Tobais offer a handy GUI-wrapped version in the form of .jar files. However at least the NikTool (for compressing / decompressing files) requires the use of Windows executables. However their website mentions Linux binaries. I used Windows in my testing, but your mileage may vary on another OS.
- The SD card by default formats to FAT32. However, you can use ExFAT instead for larger file support. Although flashing the firmware only works on a FAT32 formatted card. Attempting this with an ExFAT card just has the device ignore the firmware file. ExFat cards seemingly work fine when saving / capturing and reviewing movies on the device. This may be good for much larger reels which may get close to the FAT32 file size limits. However, in my exmaple of a small Super 8mm reel, the file size was about 350 MB. So I haven't tested if the device can write files larger than 4 GB.
- When you flash the firmware all your image settings (exposure, tint, sharpness) are reset to the default values.
- The Frame Adjust option on the digitizer lets you pan the frame around and zoom in. This is not an optical zoom and purely a digital zoom. You can achieve the same results in post using a video editor program. However, zooming in on the image may make the auto color balance / HDR feature behave slightly better. But if the film reel you are capturing has some wobble to it, you won't want to zoom in too far.
- If you mod the firmware with a higher bit rate or video setting it doesn't like, the device will appear to be recording the file, but it won't save it. The quickest way to test if this is working, is to go to the "Capture" menu and record a clip, then press OK to stop the clip. When the menu asks if you want to playback the file, select Yes. If it plays the file, the video settings are good. If it freezes, the settings aren't compatible.
- The projector can be rough on film. It damaged many sprockets on an 8mm (standard) reel. So don't leave the machine unattended. I'm still investigating how to fix some of the hardware faults of this plastic thing.
- You can use the “USB Upload” feature of the Kodak device to mount the SD card on your system and drag and drop the firmware file to the SD card that way. This makes it easy to rapidly test new firmware files. Although I've noticed sometimes the USB connection can be slow or disconnect. After you copy the firmware over via USB, eject the volume on your Mac/PC and hold the power button for a moment to shut the Kodak device. Power it on again to flash the firmware.
- The NtkMPE tool lists the video resolution and codec settings of the firmware. A screenshot of this is below. When capturing both 8mm and Super 8mm media, the device saves files with a frame rate of 20 FPS. So I assume the remaining video options are unused. In my firmware mods, I've only adjusted address 00dda288. I haven't tried changing the resolution yet. A label on the back of the device conveniently displays the image sensor data as "8.08 Megapixels (3280 x2464) 1/3" CMOS sensor". It may be possible to push this higher. But even if you can't, I'm perfectly happy with the decreased compression.
4. HOW TO MODIFY AND FLASH THE FIRMWARE [For Archival Educational Purposes]
Skip to section 5 if you just want to use easier pre-made files!
WARNING! Follow these instructions at your own risk. Doing these steps may damage your device, your SD card, or void your warranty. You’ve been warned!!
Currently (12/2024) three models of this Kodak device exist. They are nearly identical except for the LCD used. Use the lookup tool to determine which firmware. Use the lookup tool to help determine which firmware works for your device.
You'll need the following:
- A Windows or Linux system to run the firmware tools software
- An SD card and SD card reader (or USB micro B cable)
- The firmware tools software, available here (NtkTool) and here (NtkMPE).
- The original unmodified firmware files, use the lookup tool to download them.
(Note: Only the decompressed version of the firmware file will be read by the NtkMPE tool)
Caution: Never power the device off while the firmware is being flashed. I'm using the cleaned up compressed ROM in this example to save you the step from deleting the extra data from the raw EPROM dump.
How to modify the firmware yourself:
(skip to Flashing firmware if you just want to use an already modified firmware)
- Open NikTool.jar software.
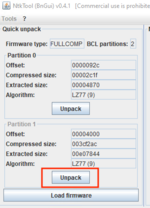
- Under the "Quick Unpack" section, select “Load Firmware” and load “Original-Kodak-ROM-Compressed.bin”.
- Locate “Partition 0” and choose “Unpack”.
This will save a decompressed version of the ROM as a .rbn file in the same directory as where you had the original .bin file
- Open NtkMPE.jar. Select File > Open Ntk Firmware, select the .rbn file you just saved.
- A list of video details will display.
Find Address 00dda288, this contains the default resolution of 1728x1296, 20 FPS, and 6400 bitrate.Here you can modify the video bitrate.
Click in the field to change the numbers, be sure to press Enter / Return when you are done to make the changes, or they won't enter.
Note: Please ignore the screenshot's 16222, that is an invalid entry, try 15420, 15600 or 16420 instead.
- Select “Apply modifications” from the top to save the changes. A confirmation dialog appears at the bottom. If the modified dialog says "0" you did not press Return / Enter, so make your changes and try again. if successful, this will save the changes to the .rbn file.
- Open NikTool.jar. We'll now be using the Manual operation section, specifically Pack firmware.
- Select the Open button (under Pack firmware). Select the .rbn file we just modified.
Leave the mode as “C” (for full compression) and the Baseval [hex] blank (it will read the hex # from the filename, so leave that alone).
- Select Run. This process may take up to 5 minutes, even on a fast PC.
During this process the Run button changes to a progress bar saying "BFC Compressing" and the log list below will slowly update.
When the Run button re-appears, the process should be nearly done.
- When done, rename the .bcl file to FWDV280.BIN. Ensure you change the filename extension in Windows/MacOS, as sometimes these will hide the filename by default.
- Place the FWDV280.BIN in the root of the SD card. The SD card must be formatted to FAT32.
- Create a folder titled “NVTDELFW” in the root of the SD card.
This deletes the firmware file after it is flashed, if you don’t do this, it’ll flash the firmware on each boot unless you manually remove the file.
- Insert the SD card into your Kodak device while it is off.
- Turn on your Kodak device, the power LED will remain on and the screen will stay black for about 30 seconds.
Afterwards, it will resume the startup process using your newly flashed firmware!
(Using pre-modified or original firmware files)
- Using your computer, download a desired firmware file and move it in the root of a FAT32 formatted SD card.
Use the lookup tool here to download the firmware. Both original and modified versions are available.
Check to ensure the file is named "FWDV280.BIN" (without quotes).
REMINDER: You MUST flash the correct version of the firmware to the correct version of the device. Use the lookup tool to help.
- Create a folder titled “NVTDELFW” (without quotes) in the root directory of your SD card.
This folder tells the device to delete the firmware file after it has finished flashing. If you don’t do this, it’ll flash the firmware on each boot unless you manually remove the file.
- Insert the SD card into your Kodak device while it is off.
- Turn on your device, the power LED will remain on and the screen will stay black for about 30 seconds.
Afterwards, it will resume the startup process using your newly flashed firmware!
- With the increased resolution and bitrate you may run into issues with larger film reels. Once the file on the SD card becomes over 4 gigabytes in size (or so), the machine may stop recording, so you'll need to pause and start another recording. Thankfully you can splice these files together in a video editor program.
This is a limitation of the FAT32 file system on the SD card. You can use an ExFAT formatted SD card to record movies, but I'm unsure if this resolves the size issue. Updating the firmware while using ExFAT formatted SD cards is not possible.
- My digitizer's camera was out of focus from the factory, I had to remove the plastic hood around the camera, carefully remove the glue, and re-focus the camera manually. Thankfully it has a plastic adjustment wheel.
- In my tests the picture "Sharpness" setting seems to perform best when you set it to -1.0 or -1.5. Anything higher introduces sharp blocky pixelization... yuck! The default value is 0.0 and introduces a lot of artifacts.
- I have not discovered a way to stop the "auto color" or "auto white balance" settings on this device. I usually leave the picture exposure setting to the default (0.0)
- Remember, the "zoom" function on the device is just digital zoom, it's not an optical zoom. Think of it as a crop.
I'd like to do more testing and see what settings produce the best results. I'd also like to digitize some reels I've had digitized via other methods and compare the quality.
I'll likely do a video about this subject. I'm curious if adjusting the resolution or FPS will work too. But I'm so satisfied with these results so far, I had to share them.
Attachments
Last edited: