OK. The jitter was my fault. I wasn't using all of the windings on the uptake reel. After threading the file properly, it is working very well. Thanks.I was able to capture using a 32GB card. Thanks! However, the frame jitter is very noticeable.
Hacking the Kodak Reels 8mm Film Digitizer (New Thread)
- Thread starter Mac84
- Start date
-
Board Nominations
Nominations have now closed and the results are available here. -
Hey Guest, MARCHintosh 2026 is upon us. Check out community projects, join GlobalTalk, and have fun!
You are using an out of date browser. It may not display this or other websites correctly.
You should upgrade or use an alternative browser.
You should upgrade or use an alternative browser.
1. I'm going to be busy at work for the next week and a half so my chances t play with this are slowing down again, right after I got it modded  Going to dump all my thoughts and posts at once.
2. FYI Davinci Resolve 20 is out now, if you started with the start of the mods you're probably still on v19. IDK how different it is, but at least v20 seems to install properly on Windows!
3. Bug? How does the film runout auto-stop sensing work? I scanned the same role of film three times, the first time it worked, the second and third times the film ended so there was just a white screen but it kept recording. My filmstrip has a few seconds of blank film at the end (dark brown). I noticed on the two times it failed I was zoomed out more so there was still a black strip of the Reels frame on the right side of the image.
4. Can someone sticky the User Guide to the top of the thread or pages so it's easier to find?
5. One thing I think those of us not rewriting the code can do to continue to improve things is working more on the user guide and workflow. It's good for someone with a bit of experience and patience but there's a lot of interpretation still left. Considering the target audience is probably not video processing minded I think more clarity and detail would be excellent. I've done tech writing in the past so I can do something as long as I know the right content.
5.a. Ideas for updating the mod:
How do you focus the lens? e.g. what are you using to focus it? The best piece of film you have? It's really hard to get a good focus with the screen the device has and using questionable film.
5.b (New Document) User Workflow:
Describe step by step what menu things to do before scanning (or during now) a reel of film to obtain the highest quality capture before refining it with editing tools.
Pre-Recording:
Exposure - how to set a good value
Sharpness -what is the recommended value/how to tell if it needs adjusting
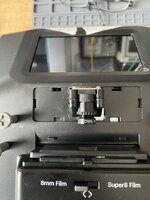
Framing - How this should be set, zoomed all the way out or in, partially, should you see the sprockets in the film, etc.
During Recording:
as mentioned in userguide, but possibly add more detail, how to adjust, button presses, what you're looking for.
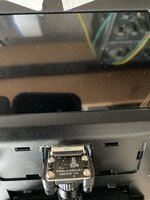
6. I'm out of time but I am still working on my plan to integrate the relocated SD card slot using the extension ribbon cable and the bare housing with ears. The idea is you will cut the existing SD external slot a little larger to enable looping the ribbon back inside the case then reroute the cable internally to where you want the new SD slot. There is a template you print and put on the rear to first guide you in cutting the larger hole and then in drilling the holes for the screws. The cover mounts to the outside to protect the exposed ribbon/card and screws from the inside with two #4 x 1/2" or similar sheet metal screws. Where the new SD card slot mounts is up to you, but there is also a drill template you put on the cover, drill two holes and cut a slot, then you will sandwich the case with a faceplate outside the case and the bracket/new card holder inside. This bracket uses two #4 x 1/2" or shorter sheet metal screws, pan head to mount to the body. The SD slot attaches to the bracket using the same M1.7 or similar screws used elsewhere for the lens mod. UPDATE 20260224 newer versions of the cover (deeper to accommodate 1/2" screws) and the SD board (better fit) have been added to this post and the originals removed. UPDATE 20260310 newer version of the new slot drill/cut template and faceplate. This version makes the new SD card slot easier to locate and more flush with the front of the unit. For the latest mod instructions see this post.
For the flex, drill template and slot cutter.

And cover installed. You'll have to install the cover, then put the extension in the SD slot before reassembling the unit.

To relocate the SD slot, find wherever you like then use the drill and slot cut template (look at front and back sides!):

Then assemble!


(This is the latest board mounting design)

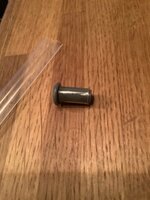
7. If anyone wants to do the nylon roller mod or similar I've attached a dimensioned drawing of the stock fixed posts. You have to open the case to unscrew them.
Going to dump all my thoughts and posts at once.2. FYI Davinci Resolve 20 is out now, if you started with the start of the mods you're probably still on v19. IDK how different it is, but at least v20 seems to install properly on Windows!
3. Bug? How does the film runout auto-stop sensing work? I scanned the same role of film three times, the first time it worked, the second and third times the film ended so there was just a white screen but it kept recording. My filmstrip has a few seconds of blank film at the end (dark brown). I noticed on the two times it failed I was zoomed out more so there was still a black strip of the Reels frame on the right side of the image.
4. Can someone sticky the User Guide to the top of the thread or pages so it's easier to find?
5. One thing I think those of us not rewriting the code can do to continue to improve things is working more on the user guide and workflow. It's good for someone with a bit of experience and patience but there's a lot of interpretation still left. Considering the target audience is probably not video processing minded I think more clarity and detail would be excellent. I've done tech writing in the past so I can do something as long as I know the right content.
5.a. Ideas for updating the mod:
How do you focus the lens? e.g. what are you using to focus it? The best piece of film you have? It's really hard to get a good focus with the screen the device has and using questionable film.
5.b (New Document) User Workflow:
Describe step by step what menu things to do before scanning (or during now) a reel of film to obtain the highest quality capture before refining it with editing tools.
Pre-Recording:
Exposure - how to set a good value
Sharpness -what is the recommended value/how to tell if it needs adjusting
Framing - How this should be set, zoomed all the way out or in, partially, should you see the sprockets in the film, etc.
During Recording:
as mentioned in userguide, but possibly add more detail, how to adjust, button presses, what you're looking for.
6. I'm out of time but I am still working on my plan to integrate the relocated SD card slot using the extension ribbon cable and the bare housing with ears. The idea is you will cut the existing SD external slot a little larger to enable looping the ribbon back inside the case then reroute the cable internally to where you want the new SD slot. There is a template you print and put on the rear to first guide you in cutting the larger hole and then in drilling the holes for the screws. The cover mounts to the outside to protect the exposed ribbon/card and screws from the inside with two #4 x 1/2" or similar sheet metal screws. Where the new SD card slot mounts is up to you, but there is also a drill template you put on the cover, drill two holes and cut a slot, then you will sandwich the case with a faceplate outside the case and the bracket/new card holder inside. This bracket uses two #4 x 1/2" or shorter sheet metal screws, pan head to mount to the body. The SD slot attaches to the bracket using the same M1.7 or similar screws used elsewhere for the lens mod. UPDATE 20260224 newer versions of the cover (deeper to accommodate 1/2" screws) and the SD board (better fit) have been added to this post and the originals removed. UPDATE 20260310 newer version of the new slot drill/cut template and faceplate. This version makes the new SD card slot easier to locate and more flush with the front of the unit. For the latest mod instructions see this post.
For the flex, drill template and slot cutter.
And cover installed. You'll have to install the cover, then put the extension in the SD slot before reassembling the unit.
To relocate the SD slot, find wherever you like then use the drill and slot cut template (look at front and back sides!):
Then assemble!
(This is the latest board mounting design)
7. If anyone wants to do the nylon roller mod or similar I've attached a dimensioned drawing of the stock fixed posts. You have to open the case to unscrew them.
Attachments
Last edited:
In case I run out, or am not able to send out screws to those who request it, here is the eBay listing I used to purchase: https://ebay.us/m/vcuELd@Deano, thanks again for sharing this! I was able to incorporate several components of this (including your spacer design, lens cover, and your recomendations for lens tube & locking ring) into my already-modified scanner. I am now able to get much better focus with my 12mm lens! Now I just need to get the dust removed off the sensor (with the product that 0dan0 recomended earlier). Then, the re-scanning shall commence!
Like you, I found some M1.7 x 12mm screws on eBay. They took a while to ship from China, but because they shipped so many of them, I'd be happy to mail out a set to those who are following this design. Just message me and we'll set something up.
Be sure to select the M1.7 x 12mm size option in whatever quantity suits your need: 100 or 500
Hi, first of all, thank you for all the great job and all the info you have provided.
I was looking around for a affordable way of digitizing my grandmothers old super 8 films and stumbled over this thread, so I decided to buy the Kodak Reels.
I have just received it in the mail and it is the D type (H2825148BKxxxxx).
At this time what are your recommendations of where to start.
I kind of want to start digitizing as soon as possible since my grandmother is 92 years old and I really want to watch these films with her.
I have bought the new lens and printed all the parts. Should I go with the stock firmware or should I try some of yours?
Best regards
Stellan
Hi Stellan. My 2 cents is to scan a reel or two with the stock lens & firmware so you can get comfortable with the basics of scanning (especially handling the film, and any gentle physical cleaning you may need to do). Some of that knowledge will carry over to an eventual modified hardware and firmware. You can even play with the footage a little bit in your editing software, but know that a modified scanner will have different results (color, exposure, resolution). Hopefully, that buys the team here some additional time to develop a D type firmware.Hi, first of all, thank you for all the great job and all the info you have provided.
I was looking around for a affordable way of digitizing my grandmothers old super 8 films and stumbled over this thread, so I decided to buy the Kodak Reels.
I have just received it in the mail and it is the D type (H2825148BKxxxxx).
At this time what are your recommendations of where to start.
I kind of want to start digitizing as soon as possible since my grandmother is 92 years old and I really want to watch these films with her.
I have bought the new lens and printed all the parts. Should I go with the stock firmware or should I try some of yours?
Best regards
Stellan
While you could do the lens replacement now, I'm not sure that the stock firmware will let you Zoom wide enough to capture the entire S8 frame that the 12mm lens (properly mounted) can image. So you wouldn't even be able to do no-frills stock firmware scanning. Others may chime in to correct my understanding.
Hi Larry,1. I'm going to be busy at work for the next week and a half so my chances t play with this are slowing down again, right after I got it modded
2. FYI Davinci Resolve 20 is out now, if you started with the start of the mods you're probably still on v19. IDK how different it is, but at least v20 seems to install properly on Windows!
3. Bug? How does the film runout auto-stop sensing work? I scanned the same role of film three times, the first time it worked, the second and third times the film ended so there was just a white screen but it kept recording. My filmstrip has a few seconds of blank film at the end (dark brown). I noticed on the two times it failed I was zoomed out more so there was still a black strip of the Reels frame on the right side of the image.
4. Can someone sticky the User Guide to the top of the thread or pages so it's easier to find?
5. One thing I think those of us not rewriting the code can do to continue to improve things is working more on the user guide and workflow. It's good for someone with a bit of experience and patience but there's a lot of interpretation still left. Considering the target audience is probably not video processing minded I think more clarity and detail would be excellent. I've done tech writing in the past so I can do something as long as I know the right content.
5.a. Ideas for updating the mod:
How do you focus the lens? e.g. what are you using to focus it? The best piece of film you have? It's really hard to get a good focus with the screen the device has and using questionable film.
5.b (New Document) User Workflow:
Describe step by step what menu things to do before scanning (or during now) a reel of film to obtain the highest quality capture before refining it with editing tools.
Pre-Recording:
Exposure - how to set a good value
Sharpness -what is the recommended value/how to tell if it needs adjusting
Framing - How this should be set, zoomed all the way out or in, partially, should you see the sprockets in the film, etc.
During Recording:
as mentioned in userguide, but possibly add more detail, how to adjust, button presses, what you're looking for.
6. I'm out of time but I am still working on my plan to integrate the relocated SD card slot using the extension ribbon cable and the bare housing with ears. The idea is you will cut the existing SD external slot a little larger to enable looping the ribbon back inside the case then reroute the cable internally to where you want the new SD slot. There is a template you print and put on the rear to first guide you in cutting the larger hole and then in drilling the holes for the screws. The cover mounts to the outside to protect the exposed ribbon/card and screws from the inside with two #4 x 1/2" or similar sheet metal screws. Where the new SD card slot mounts is up to you, but there is also a drill template you put on the cover, drill two holes and cut a slot, then you will sandwich the case with a faceplate outside the case and the bracket/new card holder inside. This bracket uses two #4 x 1/2" or shorter sheet metal screws, pan head to mount to the body. The SD slot attaches to the bracket using the same M1.7 or similar screws used elsewhere for the lens mod. WARNING I pushed these files out fast this morning so I have not done final fit checks with screws so I may need to tweak tolerances for them to fit.
For the flex, drill template and slot cutter.
Here are some of my thoughts regarding a few of your bullet points:
2. Davinci Resolve does bug me almost everytime I open it up that a new update is available. (20.3.2 as of this post). I keep old versions of the installer available just in case there's a significant flaw.
4. @Mac84, does this platform support sticky posts?
5. The Firmware User Guide could certainly be expanded with deeper explanation as to firmware features/operation and explain "why" and "when" to adjust settings, but I'm concerned it could get too wordy/dense. Fortunately, for video novices, leaving the new features/settings at their default values will typically yield really solid results.
That being said, I like your idea of providing a separate User Workflow document for the scanning process that is a little more geared toward novices. Now that developement of the custom firmware has slowed a bit, this could be a good time to build that out. But it would also need a degree of nuance: what I have found as best practices isn't a defacto standard that EVERYONE should feel beholden to. There is plenty of subjectivity in this process.
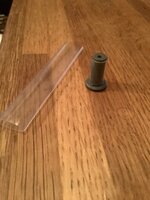
Do NOT try to eliminate the possibility that rollers give scratchmarks on the filmbase USING heat-shrinking tube. I did a test, se pictures, with transparent tube. The surface is unfortunately to soft and will give friction when the film is somewhat stretched. Maybe if one uses another heat-shrinking tube, like black.
All done to try finding an easy way to protect the filmbase
brg
Claus
All done to try finding an easy way to protect the filmbase
brg
Claus
Attachments
Hi Guys .
I just modded my scanner with a 12 mm macro lens and used all help that I have got here on this forum, both with advise from You and the Manual and also STL-files for making the distance (7mm). After plugin the scanner to 12 V, I had to zoom out and also move the frame, but then I made a recording. OK, I will have to adjust the white balans but when I compared the recording I made with the 8 mm lens, I see that it is a hugh differance. The original 8 mm lens gave a pixelated movie, but just by switching the lens to 12 mm macro, I got a great quality with much much less pixilation.
I have the version D, so I have not tried any firmware yet. Now I am ready if You want some testing. I have not connected any arduino to the board, so I will only be able to test functionality without any dumping of data.
I hope that there will come a firmware for version D, but until then, I will play with the scanner and just try the new 12 mm lens.
Brg
Claus
.I just modded my scanner with a 12 mm macro lens and used all help that I have got here on this forum, both with advise from You and the Manual and also STL-files for making the distance (7mm). After plugin the scanner to 12 V, I had to zoom out and also move the frame, but then I made a recording
. OK, I will have to adjust the white balans but when I compared the recording I made with the 8 mm lens, I see that it is a hugh differance. The original 8 mm lens gave a pixelated movie, but just by switching the lens to 12 mm macro, I got a great quality with much much less pixilation.I have the version D, so I have not tried any firmware yet. Now I am ready if You want some testing. I have not connected any arduino to the board, so I will only be able to test functionality without any dumping of data.
I hope that there will come a firmware for version D, but until then, I will play with the scanner and just try the new 12 mm lens.
Brg
Claus
Last edited:
Aperture-thoughts , and size of capture-files
Is it advisable to put on a ”hat” on the lens (12 mm) with a aperture-hole? Will I get a sharper picture? I mean the lens is focused on the filmplane and there should not be anything more to focus nearer or beyond the filmplane!
I think I read something here about making it easier to focus with a aperture i front of the lens?
It seems like the captured data is increased after that I zoomed out with the new 12 mm lens.
Any thoughts about this?
brg
Claus
, and size of capture-filesIs it advisable to put on a ”hat” on the lens (12 mm) with a aperture-hole? Will I get a sharper picture? I mean the lens is focused on the filmplane and there should not be anything more to focus nearer or beyond the filmplane!
I think I read something here about making it easier to focus with a aperture i front of the lens?
It seems like the captured data is increased after that I zoomed out with the new 12 mm lens.
Any thoughts about this?
brg
Claus
Last edited:
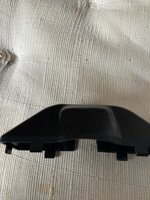
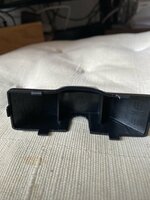
Modifying the covercap to the lens and sensor.
I have modified the thermoplastic cover, shown in the attached pictures. 160-170° Celsius with a hot air gun and then pressing with a wooden stick. It seems to work. And then a small strip of black electric tape to cover a small strip where the plastic cover has bend due to stress when working with hot air gun.
The plastic wall where the flat cabel goes, was enlarged with a soldergun.
brg
Claus
Attachments
Don't reduce the aperture, as it adds vignetting. If you got the focus correct it is not needed. Love the hood budge, like you have supped up the engine within (and you have in a way.)
Can you share any before and after scans?
Can you share any before and after scans?
As a counterpoint to this advice, I will probably explore aperture reduction to help improve focus when scanning film that is not perfectly flat. Some of my old footage (1940s) has unfortunately warped (cupping) so that the sides of the film bend upward. Through use of aperture caps to hopefully increase Depth of Field) I could have more of the film be in focus, and then work to artificially reverse the vignetting in post.Don't reduce the aperture, as it adds vignetting.
Otherwise, for flat film I would agree than the 12mm lens (with appropriate extension tube and 3d printed riser/spacer) should be able to get good focus without the caps.
Last edited:
Hi, here are two files, one with 8 mm lens and the other with 12 mm.Don't reduce the aperture, as it adds vignetting. If you got the focus correct it is not needed. Love the hood budge, like you have supped up the engine within (and you have in a way.)
Can you share any before and after scans?
The RAW 8 mm is pixilated and also change the light due to exposercontrol.
The RAW 12 mm is more detailed, less pixelated and therefor also better colors. And maybe the light is not changing beacuse I used the frame You supported in the Great Manual
Attachments
Last edited:
New member here! I've spent the last few hours scouring this thread looking for the answer to my question, but I could not find it for the life of me 
I have a Kodak Reels scanner with B Firmware. Just installed 0dan0's 7.7.1 firmware, and everything went great. HOWEVER I'm afraid that I'm missing a setting somewhere?
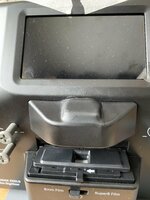
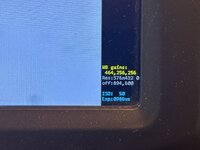
I figured out how to adjust the Qp value to minimize compression, but my "Res" setting during the preview window still shows 576x432. Looking at some of the screenshots from 0dan0 (and others), I see a much higher resolution (1440x1080).
Is there a setting somewhere that I haven't changed? This updated firmware is the only change I"ve made to my stock scanner so far.
I have a Kodak Reels scanner with B Firmware. Just installed 0dan0's 7.7.1 firmware, and everything went great. HOWEVER I'm afraid that I'm missing a setting somewhere?
I figured out how to adjust the Qp value to minimize compression, but my "Res" setting during the preview window still shows 576x432. Looking at some of the screenshots from 0dan0 (and others), I see a much higher resolution (1440x1080).
Is there a setting somewhere that I haven't changed? This updated firmware is the only change I"ve made to my stock scanner so far.
Attachments
New member here! I've spent the last few hours scouring this thread looking for the answer to my question, but I could not find it for the life of me
I have a Kodak Reels scanner with B Firmware. Just installed 0dan0's 7.7.1 firmware, and everything went great. HOWEVER I'm afraid that I'm missing a setting somewhere?
I figured out how to adjust the Qp value to minimize compression, but my "Res" setting during the preview window still shows 576x432. Looking at some of the screenshots from 0dan0 (and others), I see a much higher resolution (1440x1080).
Is there a setting somewhere that I haven't changed? This updated firmware is the only change I"ve made to my stock scanner so far.
Back in firmware update v7.6, 0dan0 added that resolution readout on the preview window to reference the "active" sensor resolution. The way I understand it is that when you use your in-menu frame controls to digitally zoom in or out, you are affectively using more or less of the sensor's pixels. Whatever the sensor uses then gets enlarged to 1600x1200 for encoding.
If you use the frame controls to Zoom all the way out, you should see a higher resolution readout on that preview window. If you don't, it would be helpful to document this (with a video showing the all-the-way zoomed out image, and whether you toggled to 8mm or Super 8) and see if you found a bug (earlier versions did need a power cycle after flashing the firmware to ensure the framing controls functioned properly).
I could be wrong, but I think 1440x1080 is the maximum active sensor resolution that is realistic to achieve when capturing a frame (probably S8).
Hi Claus, thanks for sharing these!Hi, here are two files, one with 8 mm lens and the other with 12 mm.
The RAW 8 mm is pixilated and also change the light due to exposercontrol.
The RAW 12 mm is more detailed, less pixelated and therefor also better colors. And maybe the light is not changing beacuse I used the frame You supported in the Great Manual
With the stock firmware and your 12mm lens, how far wide you are able to zoom out? Your samples don't show the edges of the frame or sprocket holes. Would you be willing to Zoom all the out as far as you can and post an image of the result (from a capture)? This could be beneficial for those considering lens replacement before a version D firmware is available.
New member here! I've spent the last few hours scouring this thread looking for the answer to my question, but I could not find it for the life of me
I have a Kodak Reels scanner with B Firmware. Just installed 0dan0's 7.7.1 firmware, and everything went great. HOWEVER I'm afraid that I'm missing a setting somewhere?
I figured out how to adjust the Qp value to minimize compression, but my "Res" setting during the preview window still shows 576x432. Looking at some of the screenshots from 0dan0 (and others), I see a much higher resolution (1440x1080).
Is there a setting somewhere that I haven't changed? This updated firmware is the only change I"ve made to my stock scanner so far.
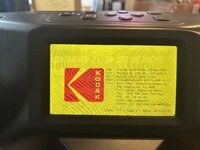
Unfortunately, the claims of the original product and the resolution written on the back, are misleading at best and a lie at worst. That low resolution number you're seeing is the actual pixels being used to produce the output. Any resolution you see in the MP4, is scaled up from this, no matter which firmware you use. The only solution to fix this is hardware, changing out the lens from the 8mm provided to a 12 mm (linked in other posts.). This gets you almost a 4X increase in pixels used to scan your film. A 12 mm lens has a narrower field of view, therefore more pixels of the sensor are used to describe details within your film.
Super 8 film is not known for being particularly high resolution. So while a new lens will get you more effective pixels, it mostly improves the definition the film grain. For me that's totally worth it.
@0dan0 and @ThePhage Thanks for the quick reply! I understand now what's going on with that number. I just tried zooming in and out in the preview mode, and the resolution number changed as you described.Unfortunately, the claims of the original product and the resolution written on the back, are misleading at best and a lie at worst. That low resolution number you're seeing is the actual pixels being used to produce the output. Any resolution you see in the MP4, is scaled up from this, no matter which firmware you use. The only solution to fix this is hardware, changing out the lens from the 8mm provided to a 12 mm (linked in other posts.). This gets you almost a 4X increase in pixels used to scan your film. A 12 mm lens has a narrower field of view, therefore more pixels of the sensor are used to describe details within your film.
Super 8 film is not known for being particularly high resolution. So while a new lens will get you more effective pixels, it mostly improves the definition the film grain. For me that's totally worth it.
I saw those posts today, about the hardware hack of installing a 12mm lens with all of the correct couplers. I'll be ordering those parts tonight. I'm very thankful that I found these improvements...but not thrilled that I need to go rescan a box of reels from my Dad's childhood
Hi, here are two files, one with 8 mm lens and the other with 12 mm.
The RAW 8 mm is pixilated and also change the light due to exposercontrol.
The RAW 12 mm is more detailed, less pixelated and therefor also better colors. And maybe the light is not changing beacuse I used the frame You supported in the Great Manual
We now have to get the bit-rate up on the Type D, as you have achieved more resolution, but too much is lost to compression.
Hi @ThePhage , I am zoomed all the way out. I have the sensor mounted 7 mm higher than original. If I move the frame some clicks(2-3)) up or down, the pictures edge will be visible.Hi Claus, thanks for sharing these!
With the stock firmware and your 12mm lens, how far wide you are able to zoom out? Your samples don't show the edges of the frame or sprocket holes. Would you be willing to Zoom all the out as far as you can and post an image of the result (from a capture)? This could be beneficial for those considering lens replacement before a version D firmware is available.
I have not tried to scan with the lens mounted in other distances due to what was written in the Great Manual for modding the scanner. So I thing is is fairly optimized, don’t You.