Device: Kodak Reels Type D (H-series, Serial: H2825148BK...)
Achievement: 1600x1200 output resolution working on D variant hardware!
Background
The Type D variant has been unsupported by existing firmware mods due to significant differences from A/B/C variants. After extensive reverse engineering, I've successfully ported core functionality to D hardware.
What's Working
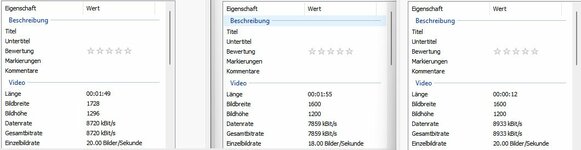
 1600x1200 output resolution
 (vs 1728x1296 stock)
Device boots normally
Menus fully functional
Stable recording
Currently recording at 20fps (stock)
Technical Details
Key Discovery: Type D firmware cannot use simple offset calculations from Type C. Each data location and function address must be individually mapped.
Process:
- Identified device-specific addresses (NVM: 0x80E0D600)
- Mapped 17 external function calls from Type C to Type D equivalents
- Updated 0dan0's ~29KB custom code block with D-specific addresses
- Inserted custom code at 0x0033a08c
- Found resolution values via pattern matching (not offset calculation)
Confirmed Mappings (Type C → Type D):
- Console Print: 0x80080160 → 0x80080c60
- Resolution Width: 0x00ddb754 → 0x00ddc718
- Resolution Height: 0x00ddb758 → 0x00ddc71c
- Input buffer setup: 0x802ea95c → 0x800160a0
- Plus 13 other function mappings
Critical Finding: Offsets vary wildly across the firmware:
- Console print: +0xb00
- Resolution: +0xfc4
- Some functions: negative offsets!
- Conclusion: Each address must be found individually
Current Limitations

Only basic resolution change implemented so far
OSD, histogram, RGB controls not yet functional
18fps not yet working (requires additional mapping)
Next Steps
Working on:
- 18fps frame rate (finding correct location)
- White balance controls
- Hooking custom code for OSD/histogram features
- Full feature parity with 0dan0's Type C firmware
For Other D Variant Owners
DO NOT flash Type A/B/C firmware on D hardware - it will not work.
If you want to help test D variant firmware development or have a D variant device, please reply. The systematic porting approach I've developed can be applied to add more features incrementally.
Files
Attaching:
- FWDV280.BIN - D variant firmware with 1600x1200 resolution
- Based on 0dan0's freed-space D base firmware
- Flash at your own risk (standard firmware update procedure)
To flash:
- Copy FWDV280.BIN to root of FAT32 SD card
- Create empty folder "NVTDELFW" on SD card
- Power on device with SD card inserted
- Wait ~30 seconds for flash to complete
Huge thanks to:
- @0dan0 for the original firmware work and ReelsChangeNotes.txt
- @Mac84 for the extensive documentation
- The TinkerDifferent community
This is just the beginning for D variant support. More features coming soon!