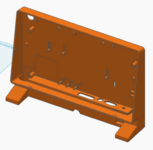
Apple Lisa 3d Case Project

nilobject

Tinkerer
Nov 21, 2023
61
38
18
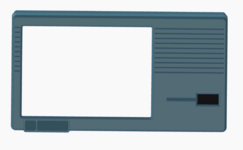
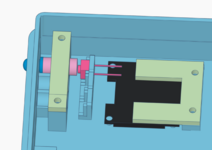
I devised a simple way to add a lighted power button to the front that I really like. It's just a clear keyboard switch with an LED attached, and a 3d printed button that allows the light to shine through.
Super clever! Well done, that's looks so awesome!
Do you have photos installing it or it was simple to do?
 

wottle

Active Tinkerer
Oct 30, 2021
949
708
93
49
Fort Mill, SC
^ I'd love to learn from your launcher code. Will you be making that public?

EDIT: Found your repository...
Yeah, spent some time tonight getting all the documentation squared away for the software side (setting up the Pi, installing my launcher and all the emulators) and the hardware side (the 3d printing and the assembly and wiring of everything).

It's live now, although it sounds like you already found it:


Technically you don't need to setup the hardware to use the software (it just looks cooler in the case!). But note that the launcher I created is optimized for a 1024x768 display. I will probably try to tackle letting it scale responsively, so keep an eye on the repo. Out of town this week for work, so probably won't have time to tackle anything for a bit.
 

wottle

Active Tinkerer
Oct 30, 2021
949
708
93
49
Fort Mill, SC
Super clever! Well done, that's looks so awesome!
Do you have photos installing it or it was simple to do?
I tried to make it somewhat simple, but it will involve some soldering to complete. The assembly instructions now include images of the various steps. The software is mostly automated with a provisioning script, but I don't want to get sued, so I didn't include ROMs and drive images with any OSes on them. I will look to better help users figure out where to acquire the ROMs and disk images.

 
  • Like
Reactions: nilobject

wottle

Active Tinkerer
Oct 30, 2021
949
708
93
49
Fort Mill, SC
Full kudos to you. I could never make something this complex, be implemented so simply. If you need any coding work done, hit me up.
Honestly, the emulator performance on the Pi 4 is pretty disappointing. I may focus some time trying to see if I can get the LisaEm and Previous emulators to perform better. I was hoping the Pi 3 would be sufficient, but the performance pretty unbearable. It's passable on the Pi 4, and I have a Pi 5 I have installed on and it works best, but requires a power board and a couple of fans to keep things cool, and I suspect I'll need to size up the cooling slots on the back for it to not overheat. I'll let you know. I'm also going to look at other emulators - I just heard about gssquared (https://gssquared.net/) that I might add to it, or replace the current standard Apple II emulator I am using. But I might start doing a deeper dive into performance tuning the emulators. I tried to use the Rust version of the Lisa emulator and I did eventually get it to run, but it still did not performa well on the Pi. I'll let you know if I start trying to tackle it.
 
  • Like
Reactions: nilobject

JDW

Administrator
Staff member
Founder
Sep 2, 2021
2,833
2,218
113
55
Japan
youtube.com
Excellent work, @wottle !

I have the LISA FPGA so I am eager to see when that edition of your amazing case is complete.

I don't have a 3D printer either, but I tend to use JLC3DP for most printers. However, the downside is they don't have vintage beige filaments. :-(
 
  • Like
Reactions: nilobject

wottle

Active Tinkerer
Oct 30, 2021
949
708
93
49
Fort Mill, SC
Excellent work, @wottle !

I have the LISA FPGA so I am eager to see when that edition of your amazing case is complete.

I don't have a 3D printer either, but I tend to use JLC3DP for most printers. However, the downside is they don't have vintage beige filaments. :-(
Yeah, there are going to be some compromises for adding support for the lighted power power key to the LisaFPGA version. The back is no longer symmetrical, which bothers me, but is probably acceptable.

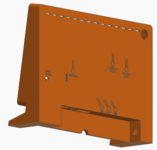
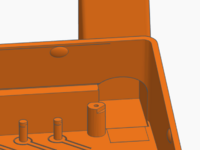
Also. the 12v power jack cannot stay where it is because that's where the enclosure for the switch will need to be. So I had temporarily moved it to the top back of the machine (not nearly as clean with all the cables going into the port cutout along the bottom of the back). Along with adding the rocker switch to the top of the back as well, allowing for easily powering off the LisaFPGA and LCD together. I'm going to see if it would be possible to squeeze the 12v DC jack in elsewhere in the port cut-out.

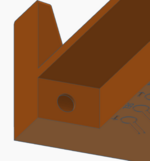
I actually just thought of a possibility for embedding it in the left leg, and hollowing out a chamber for securing it sideways into the leg. It looks like it would work and would be printable with minimal supports. seems like it would work and actually be better than my current location (except maybe trying to secure the nut on the inside of the barrel jack connector) .

Screenshot 2026-09-28 at 10.18.26 AM.png Screenshot 2026-09-28 at 10.18.48 AM.png


When I get back from my trip, I'll see about moving the Floppy screen and buttons, and re-doing the power inputs and testing the lighted power button.

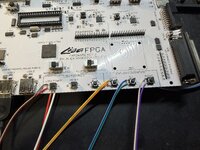
If anyone knows of a good solution for pre-made momentary switches that can be wired in easily, and secured in some mounts in a 3d printed enclosure, let me know. I was thinking about these? I would wire them to be remote buttons for the 3 ESFloppy buttons on the LisaFPGA. Then add little buttons underneath the chin for navigating, with the LCD now exposed on the front of the case. Then I would seal up the opening on the back, and remove those buttons.

1790605435794.png

https://www.adafruit.com/product/44...w7nygIZXNhkvKhReXbNd_P8QXpscUIFAi2n-GWhE_-o_Q

Now that I'm thinking about it. I might be able to put the 12v input where those ESFloppy buttons are today. IF that and the screen is moved, it opens up the space on that side for the power. I'll tinker with it when I return. This gives me a lot of respect for engineers building physical devices...
 
Last edited: