Installing Mac OS X Leopard on the Apple TV (1st generation)
- Thread starter scj312
- Start date
You are using an out of date browser. It may not display this or other websites correctly.
You should upgrade or use an alternative browser.
You should upgrade or use an alternative browser.
Some old articles/websites I had bookmarked regarding the original Apple TV:
https://arstechnica.com/gadgets/201...-xbmc-on-your-original-apple-tv/#comments-bar
Scott Davilla developed tools:
ATV USB Creator Tool
ATV Bootloader
Crystal HD for OSX
Not particularly related to running OSX on ATV, but figured it can't hurt to share teh old bookmarks.
https://arstechnica.com/gadgets/201...-xbmc-on-your-original-apple-tv/#comments-bar
Scott Davilla developed tools:
ATV USB Creator Tool
ATV Bootloader
Crystal HD for OSX
Not particularly related to running OSX on ATV, but figured it can't hurt to share teh old bookmarks.
Hey folks, surprised to see this getting attention over the past couple years. I created one of the OG 10.5.8 images linked in the hackint0sh thread. I still have my optimised version sitting on my NAS and would be happy to upload it if people are interested.

Could we modify the OSX tiger version to not start the menu, but rather show a gui?
I can't think of any benefits other than possible better driver support or salvaging drive space, though.
I found this video on adding RAM:
And this post suggests that snow leopard is installable:

 forums.macrumors.com
I'm wondering if the cpu can be upgraded.
I can't think of any benefits other than possible better driver support or salvaging drive space, though.
I found this video on adding RAM:
And this post suggests that snow leopard is installable:
Anyone interested in installing Snow Leopard on AppleTV 1?
I have successfully installed Snow Leopard 10.6.3 on my first gen AppleTV, if anyone's interested i can post the installation instructions here. Heres a pic for reference
forums.macrumors.com
I'm wondering if the cpu can be upgraded.
Yes @JonMS, that would be appreciated! I found one at a thrift store years ago for 10$ and it's been gathering dust ever since.Hey folks, surprised to see this getting attention over the past couple years. I created one of the OG 10.5.8 images linked in the hackint0sh thread. I still have my optimised version sitting on my NAS and would be happy to upload it if people are interested.
Last edited:
I picked up another gen 1, so I have a dual 2.5 drive cable on order, going to try the two drive option.
As you may know, the firmware for the 1st-generation Apple TV was a modified version of Mac OS X Tiger. Back in the day, many members of the Mac community were able to get full versions of Mac OS X running on the Apple TV. Unfortunately, patched disk images with the fruits of their labor have been lost to time, so I took it upon myself to dig up instructions on how to set up an installation from scratch, and have uploaded the resulting installation as a ready-to-use disk image!
In this guide, we will be using the disk image to create a bootable USB drive with Mac OS X Leopard 10.5.8 for the Apple TV.
What you will need:
Download the disk image from one of these fine places:
- Mac running Mac OS X Tiger or later
- 1st-generation Apple TV
- USB drive (16 GB or larger)
- Powered USB hub (for connecting the USB drive at the same time as a keyboard and mouse)
- Monitor or TV connected to the Apple TV via HDMI or component
- Audio connected to the Apple TV via the audio jacks (HDMI audio does not work)
- Internet Archive: https://archive.org/details/mac-os-x-leopard-apple-tv
- Macintosh Garden: https://macintoshgarden.org/apps/mac-os-x-apple-tv-1st-generation
Preparing the USB drive
In Disk Utility, select the drive, then select the Partition tab. Set the volume scheme to 1 partition, name it Apple TV HD, and set the format to Mac OS Extended (Journaled). Then, click Options, ensure GUID Partition Table is selected, and click OK. Apply the changes.
View attachment 2394View attachment 2395
Once formatting is complete, we can restore the disk image to the USB drive. First, scan the image for restore by choosing the Images menu > Scan Image for Restore, then select the downloaded image.
Once the scan is complete, select the Restore tab in the Disk Utility window. Drag the disk image to the source field, and drag Apple TV HD to the destination field. Select Erase destination, then Restore.
View attachment 2398
Once the restore is complete, select the USB drive in the source list, then click Info in the toolbar. Note the disk identifier listed in this window, as we will need it in the next section.
View attachment 2396In Disk Utility, select the drive, then click Erase in the toolbar. Enter the following options, then click Erase:
View attachment 2615
- Name: Apple TV HD
- Format: Mac OS Extended (Journaled)
- Scheme: GUID Partition Map
Once formatting is complete, we can restore the disk image to the USB drive. First, scan the image for restore by choosing the Images menu > Scan Image for Restore, then select the downloaded image.
Once the scan is complete, select the new Apple TV HD partition, then click the Restore button in the toolbar. Click Image..., select the disk image, then click Restore.
View attachment 2616
Once the restore is complete, select the USB drive in the source list, then click Info in the toolbar. Note the BSD device node listed in this window, as we will need it in the next section.
View attachment 2617First, we need to allow various OS utilities access to our drives. To do this, open System Preferences, then select Security & Privacy. Select the Privacy tab, and choose Full Disk Access from the left-hand list. Click the lock to authenticate, then click the + button and add the following items:
In order to see the last two items, press cmd-shift-period after clicking the + button.
- /Applications/Utilities/Disk Utility
- /Applications/Utilities/Terminal
- /usr/sbin/asr
- /usr/sbin/diskutil
You should see these four items now in the list:
View attachment 2618
Now, open Disk Utility. In Disk Utility, select the drive, then click Erase in the toolbar. Enter the following options, then click Erase:
View attachment 2615
- Name: Apple TV HD
- Format: Mac OS Extended (Journaled)
- Scheme: GUID Partition Map
Once formatting is complete, we can restore the disk image to the USB drive. First, scan the image for restore by choosing the Images menu > Scan Image for Restore, then select the downloaded image.
Once the scan is complete, select the new Apple TV HD partition, then click the Restore button in the toolbar. Click Image..., select the disk image, then click Restore.
View attachment 2616
Once the restore is complete, select the USB drive in the source list, then click Info in the toolbar. Note the BSD device node listed in this window, as we will need it in the next section.
View attachment 2617
Making the USB drive bootable
Now, we need to change the partition type so that the USB drive is bootable on the Apple TV. Once these steps are completed, the drive will no longer be readable by the Mac.
First, close Disk Utility, and open Terminal.
Runsudo gpt -r show /dev/diskXwhere diskX is the disk identifier or BSD device node noted from Disk Utility earlier.
In the output, find the line with index 2. Note the start and size values, as we will need them later.
View attachment 2397
Runsudo diskutil unmountDisk diskXto unmount the disk.
If it says the disk was not unmounted, wait a few moments and try again.
During the following steps, you may see a warning from Mac OS X that a disk is unreadable. Click Ignore if this alert opens.
Runsudo gpt remove -i 2 /dev/diskXto remove the existing partition entry, which we will re-add in the next step with the correct type.
Runsudo gpt add -b START -s SIZE -i 2 -t "5265636F-7665-11AA-AA11-00306543ECAC" /dev/diskXwhere START and SIZE are the respective values noted earlier.
Runsudo diskutil unmountDisk diskXto unmount the drive.
All done!
Booting Mac OS X on the Apple TV
Now comes the best part! The USB drive can be removed from the Mac and plugged into the Apple TV. Plug a USB hub into the Apple TV so that you can connect the USB drive, as well as a keyboard and mouse. Once you plug in the power cable, the Apple TV will boot into the Mac OS X Setup Assistant, where you can set up a user account and begin using Mac OS X! If you'd like to permanently install Mac OS X to the internal hard drive, you can follow the steps in the "Preparing the USB drive" section, but with the internal drive rather than a USB drive (and you can skip the section required to make USB drives bootable).
Things to keep in mind:
- The first boot might be a bit sluggish, but it should speed right up after a few minutes. The image is a fresh install, never booted, so all of the maintenance processes will run like any other fresh install.
- On my monitor the boot screen turns green, but YMMV. Once booted, the color is correct--if it isn't, unplugging the HDMI cable and plugging it back in should do the trick.
- HDMI audio doesn’t work, so use the other audio outputs. Analog audio is the "Internal Speakers" output, which is not selected by default.
- When logging in, you’ll see an unreadable disk error. This is simply due to Mac OS X not understanding the partition types correctly, and you can ignore it.
- The Apple TV only has 256 MB RAM, so keep this in mind during web browsing and other memory-intensive operations. MenuMeters is pre-installed so that you can keep an eye on usage.
- iCal doesn't open.
- Enjoy!
Credits
I can't take most of the credit for this, as it is based on the hard work of others in the Mac community. Here are the resources I used to make this possible:
- https://web.archive.org/web/20100715164941/http://www.hackint0sh.org/f98/70835.htm
- https://web.archive.org/web/20090512203105/http://www.hackint0sh.org/forum/f98/634.htm
- https://www.insanelymac.com/forum/topic/48201-codec-dumps-from-linux-to-fix-sound-on-osxonatv/
- https://www.insanelymac.com/forum/topic/32859-applehda-solution-work-in-progress/
- https://www.insanelymac.com/forum/topic/143898-voodoopower-123/
- https://archive.org/details/iDeneb-v1.3
- https://wiki.awkwardtv.org/wiki/AppleTV_OS_3.0.2
I had 10.4 on an Apple TV over a decade ago but I no longer have it. I was able to get a first gen ate to mess with this project again because I see it has a renassoince right now. I have 10.6.8 working with spotlight disabled, I was even able to do a 10.5.8 Server install on the ATV with a flashed procedure (SD to PATA) converter attached to a SD card reader.
I am curious if anyone got Lion 10.7 to work on the atv, probably needs too much memory but interesting to think about, 10.6.8 runs pretty nicely with the SD card as an HDD, flash vs 2006 5400 PATA drives is a leap.
I would like to have working bootable disks of Mac OS X Tiger, Mac OS X Leopard, Mac OS X Snow Leopard. I have both Leopards done, I need the 10.4 Tiger ATV image if anyone has it? There used to be a working Tiger image for ATV someone uploaded years ago, actually I think it was a mackintosh build I can't remember for sure but it ran leaner than 10.5..
Does anyone have Tiger running on their ATV First gen? Could you make an image and upload it? I may just do the super old method but I can't find the custom kernel for it rn..
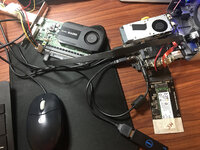
Neat!Just an FYI, the miniPCIE port does work for other things, like a dual SATA adapter.
View attachment 14635
Running DarkWeb on 10.5.8
View attachment 14636
XBMC playing movies off the SATA hard drive (with external power source).
View attachment 14637
I have an SSD for that mini pci slot but I can't get the ATV to recognize it and I don't want to use an adapter. Maybe Mac OS X didn't support that with drivers for storage yet I dunno..
This is what I have https://www.amazon.com/dp/B0BZNQ58TR?ref=ppx_yo2ov_dt_b_product_details&th=1
Just an FYI, the miniPCIE port does work for other things, like a dual SATA adapter.
View attachment 14635
What's the miniPCIE SATA performance like, especially compared to the built-in IDE?
The wifi card slot is mPCIE, which is different than mSATA. They both share the same form factor (like M.2 can be SATA or NVMe), but they are different logically. The reason the dual SATA card works is because of the SATA controller on the board. Mine happens to be the asmedia ASM1061 BCU18202A2.Neat!
I have an SSD for that mini pci slot but I can't get the ATV to recognize it and I don't want to use an adapter. Maybe Mac OS X didn't support that with drivers for storage yet I dunno..
This is what I have https://www.amazon.com/dp/B0BZNQ58TR?ref=ppx_yo2ov_dt_b_product_details&th=1
There are some motherboards out there that will accept both a SATA or NVMe drive in the M.2 slot (like some Intel NUCs do). I believe at one time the Mac Mini Intel version has a dual purpose mPCIE/mSATA port because the controller is on the motherboard. I thought I had put an mSATA drive in an Intel Mac Mini years ago... I may have to dig one out and try it again. My guess is that the ATV1.0 does NOT have a SATA controller on the motherboard, since it has no native SATA ports.
I do have an mPCIE to PCIE adapter and I tried it with a video card, but could not get it to boot. I know these work on other computers with NGFF wifi slots or M.2 PCIE/NVMe slots.
Here is an M.2 NVME adapter to PCIE working in an Ace Magician with external video card (hackintosh on a Celeron).
Attachments
Last edited:
TL;DR almost double.What's the miniPCIE SATA performance like, especially compared to the built-in IDE?
That was an M.2 drive in a 2.5 sata adpater connected to the dual mPCIE adapter.
It really depends on the SATA device. If SSD, almost double. I then tried an mSATA SSD on a SATA adapter.
Then I wondered if the mPCIE slot was bootable? swapped drives....
But disappointment, I got the Question Mark blinking.
SSD on IDE bus
M.2 drive on SATA adapter (liteon drive)
My guess is that the ATV1.0 does NOT have a SATA controller on the motherboard, since it has no native SATA ports.
It's been like a decade, but a long time ago I read up on the Intel Chipset used in the ATV and IIRC, there is one or more SATA ports on the chipset. The pins just aren't brought out on the motherboard.
I could be misremembering, but I think htat's what I found.
I've done a restore to a HDD using a firewire enclosure. All seems to be going along fine until I am trying to fix the partition info:
sudo gpt -r show /dev/disk4
This command is giving me an "Operation not permitted" error in macOS Sonoma.
I have done the steps in Security/Privacy settings to grant Terminal, DiskUtility, diskutil, asr, and even tried adding gpt in there. I just restarted my Mac mini M1 in recovery mode and disabled SIP. Till getting the Operation Not Permitted when trying to run the gpt command.
Thoughts?
My question above still stands for anyone trying this with a Sonoma Mac, but I was able to re-do all steps using my eMac running Sorbet without any issues. Booting now.
Also, I should mention that I am having another go at this using the V2 Leopard image. Previously, I had shared that my ATV was locking up because, I suspect, it was overheating. This time around I decided to look at the fan which I removed and cleaned. In the process, I noticed all of the black foam that seals the airways was rotting. I removed all of the crumbly black foam and replaced It with some similarly sized weather stripping which worked just fine.. I can again feel very light airflow on the left edge, but only time will tell.
Also, I should mention that I am having another go at this using the V2 Leopard image. Previously, I had shared that my ATV was locking up because, I suspect, it was overheating. This time around I decided to look at the fan which I removed and cleaned. In the process, I noticed all of the black foam that seals the airways was rotting. I removed all of the crumbly black foam and replaced It with some similarly sized weather stripping which worked just fine.. I can again feel very light airflow on the left edge, but only time will tell.
Last edited: