Modding the Kodak Reels 8mm Film Digitizer (Firmware Hack)

Mac84

Administrator
Staff member
Founder
Sep 4, 2021
177
237
43
New Jersey, USA
www.mac84.net
Another update:

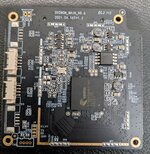
I've successfully connected an Arduino Nano (acting as a UART TTY serial to USB adapter) to the Kodak digitizer, which had nicely labeled and exposed serial connections.

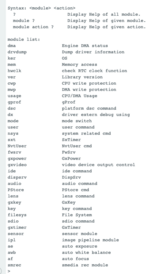
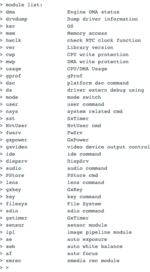
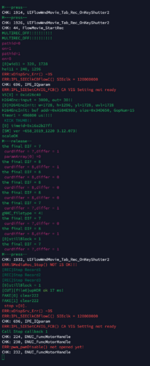
Setting the baud rate to 115200 allows me to connect and access, with plenty of things to look at! 🎉

It let me dump the firmware, run SD card checks... and loads more. More importantly, it's showing me errors and is giving me clues to what is happening (and potentially why) when I give it a firmware with too aspirational resolution / bit rate settings.

The serial pinout is circled below, I only needed to connect Ground, RX and TX. Cool stuff! I'll provide another update if this gets me further.

1693066687353.png


Update 2:

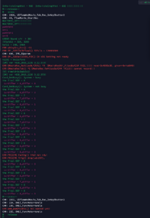
With the console monitor active it’s easier to see how and why it’s failing (sort of). The CPU is 430MHz and it has 1GB of RAM to work with.

After testing a lot of resolutions I’ve had success with 1920x1440. This means even with some minor post-production zooming/ cropping, you have mostly a full 4x3 ratio HD image.

Sadly at a higher resolution you must lower the bit rate, so 12,400 seems to be the limit with this resolution. But the results aren’t bad. I even opened the camera area and manually adjusted the lens, resulting in a sharper image.

I’ll add some more examples, but this is promising.
 

Attachments

  • Screen Shot 2023-08-25 at 8.30.40 PM.png
    Screen Shot 2023-08-25 at 8.30.40 PM.png
    15.8 KB · Views: 194
  • Bad Firmware Record Failure.png
    Bad Firmware Record Failure.png
    43 KB · Views: 117
  • Good Firmware Record Success.png
    Good Firmware Record Success.png
    28.7 KB · Views: 121
Last edited:

stick

New Tinkerer
Aug 26, 2023
1
1
3
This is great work. Thank you for digging into this. I was disappointed with my Reelz captures - so much so that I gave up on digitizing more of our family films because the quality was actually worse than my "project-on-the-wall+capture-with-a-DVD-camcorder" "digitizing" that I had done 20 years ago. Put up two frames side by side and the Reelz compression artifacts just made it look like impressionism art when compared to the DVD capture.

I have the 1.0 firmware, so will be trying your mods hopefully next weekend. I just wanted to pass along my early thanks and encouragement to document any other opportunities for improvements you find.

Thanks!
 
  • Like
Reactions: Mac84

gerald

New Tinkerer
Aug 26, 2023
2
1
3
Great work! Could you also post pictures of the hardware inside? Motherboard, camera, light, screen, motors... I wonder if the camera could be connected to some other more capable motherboard with open source applications.
 

Mac84

Administrator
Staff member
Founder
Sep 4, 2021
177
237
43
New Jersey, USA
www.mac84.net
This is great work. Thank you for digging into this. I was disappointed with my Reelz captures - so much so that I gave up on digitizing more of our family films because the quality was actually worse than my "project-on-the-wall+capture-with-a-DVD-camcorder" "digitizing" that I had done 20 years ago. Put up two frames side by side and the Reelz compression artifacts just made it look like impressionism art when compared to the DVD capture.

I have the 1.0 firmware, so will be trying your mods hopefully next weekend. I just wanted to pass along my early thanks and encouragement to document any other opportunities for improvements you find.

Thanks!

Thanks! I'm so glad this may help you get better quality out of your scans. I also found that my camera was slightly out of focus, but it's glued to the focus ring / lens and a bit of a pain to undo (I used a hot air gun on a low setting from a few inches away).

I haven't done extensive testing, but in a test today I pushed it to 1920x1440 at 20fps with a bit rate of 12,000. This may be the max it can go. Here is that firmware. But you get about an 11% increase in overall resolution and nearly double the original bit rate, not bad!


Great work! Could you also post pictures of the hardware inside? Motherboard, camera, light, screen, motors... I wonder if the camera could be connected to some other more capable motherboard with open source applications.

Thanks! And sure thing, they'll also be featured in a future video. There are three boards, one for the CPU/SD card holder, one that handles power and USB, and one for the camera. Here's an iCloud album of all the photos of the internals. (I'll organize and de-duplicate them at a later date).
I'm afraid I can't determine the camera brand, but the specs are listed on the label of the device: 8.08 Megapixel, 3280x2464 CMOS ⅓”
Hopefully that'll narrow it down it down.
 
Last edited:
  • Like
Reactions: gerald

jx0

New Tinkerer
Aug 24, 2023
8
5
3
This is great. Documenting the easiest way to dump the firmware will be helpful (someone can hopefully do this for V2.0 soon), and if it can be done with just a USB-TTL serial adapter that's great. I'm sure there are more clues to ID the sensor in the drivers (some clues like reference to the OnSemi AR0330 sensor in your pics).

I noticed the film still has a fair bit of Z movement possible, and some of my films have significant curl which moves the focus point up about 0.2 - 0.4mm or so, I'm sure that doesn't help. Easier access to the focus would have been good, and maybe there is a way to fix the film position a little better.

I think the CinePi project would be a great start for replacement digitizing hardware as well as raw capture modes. Not the easiest to work with but have been impressed with the results.
 
Last edited:
  • Like
Reactions: Mac84

Dare

New Tinkerer
Aug 27, 2023
4
3
3
If someone is willing to walk me through dumping the firmware; I have a serial to USB adapter and a Kodak reels with 2.0 firmware.
I've only ever used the USB serial adapter to flash firmware by following instructions, so I'm a complete novice in how to actually use it.
 
  • Wow
  • Like
Reactions: jx0 and Mac84

Mac84

Administrator
Staff member
Founder
Sep 4, 2021
177
237
43
New Jersey, USA
www.mac84.net
If someone is willing to walk me through dumping the firmware; I have a serial to USB adapter and a Kodak reels with 2.0 firmware.
I've only ever used the USB serial adapter to flash firmware by following instructions, so I'm a complete novice in how to actually use it.
Hey Dare, that would be excellent!

The biggest challenge will be removing the board and soldering 3 small cables to the serial contacts. This assumes your model has the same hardware. I'll make a tutorial for you and will post it here when I'm done.
 

Dare

New Tinkerer
Aug 27, 2023
4
3
3
In preparation, I've pulled the board and interestingly enough it looks almost identical to the 1.0 version, and even has the same revision number on the board.
The only difference I can see is that the
Main chip is a slightly different model: in the 1.0 it's a Novatek NT96658MBG and in my 2.0 it's a Novatek NT96658MBG-NH. Not sure what the "NH" distinction is.
 

Attachments

  • PXL_20230827_182908356.jpg
    PXL_20230827_182908356.jpg
    1 MB · Views: 72
  • Like
Reactions: Mac84

Dare

New Tinkerer
Aug 27, 2023
4
3
3
Hey Dare, that would be excellent!

The biggest challenge will be removing the board and soldering 3 small cables to the serial contacts. This assumes your model has the same hardware. I'll make a tutorial for you and will post it here when I'm done.
I can solder no problem. Do I need to solder a lead to the 3.3v pad? Or can I leave that empty?
 

Mac84

Administrator
Staff member
Founder
Sep 4, 2021
177
237
43
New Jersey, USA
www.mac84.net
I can solder no problem. Do I need to solder a lead to the 3.3v pad? Or can I leave that empty?
You can leave 3.3v empty. You only need Ground, TX and RX. I hope you got the device apart, I filmed a bit of a how-to to carefully take it open as the ribbon cables can be annoying.

I used long cables and routed the 3 for the serial connection out back through the vents. I'll edit this post with instructions of how to dump the firmware to an SD card from the serial terminal.
 

Dare

New Tinkerer
Aug 27, 2023
4
3
3
Hey Dare, that would be excellent!

The biggest challenge will be removing the board and soldering 3 small cables to the serial contacts. This assumes your model has the same hardware. I'll make a tutorial for you and will post it here when I'm done.
I've got leads soldered to all the pads except the 3.3v pad, and I've double checked there is no continuity between the three.
When I did this last GRD went to pin 5 of the serial, Rx went to pin 3 and Tx went to pin 2. Does that sound right? I've read that some times Rx and Tx are swapped. If it's wrong will it cause any permanent damage?

Also I didn't realize that the two connectors on the side ( I think they're labeled D9 and D12) are identical before I unplugged them. I think I have them marked correctly now, but how much trouble am I in if I connect them to the wrong port?

Apologies for being a bit scatterbrained. Haha
 

Mac84

Administrator
Staff member
Founder
Sep 4, 2021
177
237
43
New Jersey, USA
www.mac84.net
I've got leads soldered to all the pads except the 3.3v pad, and I've double checked there is no continuity between the three.
When I did this last GRD went to pin 5 of the serial, Rx went to pin 3 and Tx went to pin 2. Does that sound right? I've read that some times Rx and Tx are swapped. If it's wrong will it cause any permanent damage?

Also I didn't realize that the two connectors on the side ( I think they're labeled D9 and D12) are identical before I unplugged them. I think I have them marked correctly now, but how much trouble am I in if I connect them to the wrong port?

Apologies for being a bit scatterbrained. Haha
The rainbow cables on the left control the motors, if you mix them up you'll know it - as on the initial startup it will start the motors and not stop (instead of a brief motor start then stop). That's what happened to me, you can easily flip them around.

What serial device are you using? I'm using an Arduino nano and so Reset and Ground are shorted/bridged to set it as a serial adapter. Then another Gnd goes to Gnd of the device, and RX to RX, TX to TX. RX and TX should not be swapped in this case.

To dump the firmware connect via your serial USB device, set the baud rate to 115200 in your software, I'm using Arduino IDE's serial monitor (located under the Tools menu). On a Mac you may have issues getting the serial port (or driver) to work correctly, let me know if you have issues.

Then turn on the device and you should see the startup process. I'm curious if this differs, so please capture this as a text file and upload it. (I've attached mine below).

To dump the firmware, assuming they didn't remove anything, type mem dumpcode - then press enter/return. You should get this output after a pause of a few seconds if it was successful.

1693163977103.png


This will put a 23 meg (in my case) .bin file on the SD card root directory titled `DUMPCODE.BIN`. It'll need to be compressed to be re-used, but please share it if you can.

You can also type ? for a list of modules, again I've attached a list of mine.

Feel free to ping me via Discord if you need real-time help. :)
 

Attachments

  • Kodak v1 Serial Startup.txt
    2.1 KB · Views: 72
  • Kodak v1 Modules ?.png
    Kodak v1 Modules ?.png
    16.8 KB · Views: 59
Last edited:
  • Like
Reactions: jx0

gerald

New Tinkerer
Aug 26, 2023
2
1
3
Thanks! I'm so glad this may help you get better quality out of your scans. I also found that my camera was slightly out of focus, but it's glued to the focus ring / lens and a bit of a pain to undo (I used a hot air gun on a low setting from a few inches away).

I haven't done extensive testing, but in a test today I pushed it to 1920x1440 at 20fps with a bit rate of 12,000. This may be the max it can go. Here is that firmware. But you get about an 11% increase in overall resolution and nearly double the original bit rate, not bad!


Thanks! And sure thing, they'll also be featured in a future video. There are three boards, one for the CPU/SD card holder, one that handles power and USB, and one for the camera. Here's an iCloud album of all the photos of the internals. (I'll organize and de-duplicate them at a later date).
I'm afraid I can't determine the camera brand, but the specs are listed on the label of the device: 8.08 Megapixel, 3280x2464 CMOS ⅓”
Hopefully that'll narrow it down it down.
Thanks!!! Good to see the modularity of this device: having different independant modules (camera, motor drivers, power supply...) connected to the mainboard means that it is possible to replace the mainboard. It makes also life easier for reverse engineering, hacking and maintenance.
The mechanical part is not as great, with most parts in plastic and fixed parts. The film guide seems rather bad quality, maybe could be replaced by some metal parts from a projector could improve film positionning.
 
  • Like
Reactions: jx0

Mac84

Administrator
Staff member
Founder
Sep 4, 2021
177
237
43
New Jersey, USA
www.mac84.net
My kodak reel does not work anymore with more than 4gb cards.
I am working with user Dare to dump their version 2.0 firmware, but we ran into a hardware issue.

As soon as we figure it out hopefully we can help you restore your firmware to the version that shipped on your device.
 
Last edited:

ThomasTosh

New Tinkerer
Aug 31, 2023
1
0
1
Hello Steven,

I wanted to thank you for documenting this process! Small world - I think I saw you at a VCF panel this year.

I have a Kodak Reelz projector I bought used from Amazon marketplace. It stopped functioning properly -- it would sometimes freeze when recording a long movie. I am glad I copied nearly all of my film before it decided to act funny.

I emailed Kodak support and after a few days they replied and said they do not have the firmware files to share. I had thought they may have an update.

They are actually the ones that told me about a forum post where someone had modified the firmware. I found this link from Facebook as they did not specify it.

Kodak says they think the Reelz device came with version 1.0 and the "Reels" version has 2.0. I am guessin these are international and United States options. They were unable to confirm if any differences were present -- they said someone will look at this thread and see if any future updates can be done.

I asked them to make a setting to adjust the video compression. However I do not have high hopes that they will perform any updates. It is sad that companies these days cannot even provide a software download for their products. Surely not the Kodak of the old days - but we know it is another company who bought their name use.

I will try the original download and see if it makes my machine work smoother.

-T
 

Mac84

Administrator
Staff member
Founder
Sep 4, 2021
177
237
43
New Jersey, USA
www.mac84.net
Hi Thomas,

Thanks for the kind words. I'm happy to provide some insight into these devices. I'm sorry Kodak couldn't provide you with any update files.

Of course, in a perfect world user modification wouldn’t be required. It would be great if Kodak had some type of resolution or video bit rate options available via the Settings of the device.

Please try formatting your SD card and see if that does the trick. I’ve had captures fail on an old, worn SD card and swapping them did the trick. I'd suggest trying the official SD card formatting software to ensure the card is wiped. Of course backup any files from the card before erasing.

I think it goes without saying but…

The only reason people have been trying to squeeze more quality out of these 8mm film digitizers is that the default results are unfortunately not too great. Sure they may be "good enough" for some, but a lot of us have seen 8mm film looking great and want to capture it as best we can.

I understand these are mostly plastic machines and aren’t meant to be "prosumer" or professional grade. But I guess some of us crazy people see that with just a few adjustments, it could get much closer to that.

Most of our home movies on 8mm film don’t look the best. They are blurry, out of focus, or damaged - but preserving them for future generations is important to me, which is why I bought one of these devices in the first place. Professional units and services cost thousands more, and were simply not in my budget. I've considering building my own Raspberry Pi-powered unit, but I never got around to it.

Kodak (or their licensee) - if you are reading this:
You can see there is a lot of love for the product you have created. Offering a “Pro” model (or a software update) with configurable features would likely attract more users who wish to have more control over video compression, adding a 2K or 4K video recording resolutions, settings for HDR /auto white balance, and so on, would be a game changer!​
The existing products in this space are all mediocre at best. You have an opportunity to release something that beats them. Those of us who are digitizing this film hope to only have to do it once. And as time goes on, the film degrades and there will be less to digitizer. So improving that experience for your users would be a wonderful thing! (y)
 

Mac84

Administrator
Staff member
Founder
Sep 4, 2021
177
237
43
New Jersey, USA
www.mac84.net
@Dare was kind enough to send their board my way. Version 2.0 of the Kodak firmware has been preserved. You can find it here.

Doing a quick comparison in a hex editor, both firmware files have differences and are not identical.

Warning! I have no way to test the v2.0 firmware just yet. So use this at your own risk.

The firmware was read, de-compressed, and re-compressed using the same process above. I have no way to currently test this until I repair Dare's power input board. But hopefully this will help those with v2.0 "Reels" devices get their original firmware back.
 
  • Like
Reactions: jx0