Modding the Kodak Reels 8mm Film Digitizer (Firmware Hack)
- Thread starter Mac84
- Start date
You are using an out of date browser. It may not display this or other websites correctly.
You should upgrade or use an alternative browser.
You should upgrade or use an alternative browser.
- Status
- Not open for further replies.
Great! Glad to hear itI can confirm that with this file I have V2.0 firmware back on my Reels unit, verified on the about screen. Will try a capture later.
Thanks very much to all who contributed.
")
I will say that adjusting the resolution / bit rate on the 2.0 firmware seems to be the same process for version 1.0. I'll dig into this a bit more after VCFMW.
Hello@Dare was kind enough to send their board my way. Version 2.0 of the Kodak firmware has been preserved. You can find it here.
Doing a quick comparison in a hex editor, both firmware files have differences and are not identical.
Warning! I have no way to test the v2.0 firmware just yet. So use this at your own risk.
The firmware was read, de-compressed, and re-compressed using the same process above. I have no way to currently test this until I repair Dare's power input board. But hopefully this will help those with v2.0 "Reels" devices get their original firmware back.
Does this 2.0 Update include higher bitrate and resolution or is it with original setting
The v2.0 file is only with the original bit rate (6400) and the default resolution. I haven’t had a chance to modify it or test any mods. However the steps are detailed in the initial post if you wanted to try it yourself.Hello
Does this 2.0 Update include higher bitrate and resolution or is it with original setting
To clarify, there are two versions of the product. From what I gather (UPDATE: This is incorrect!), “Reelz” internationally uses v1.0 and “Reels” in the US uses v2.0. (from what I gather). It seems those with 2.0 can’t reliably use 1.0. I have not tried using 2.0 on my “Reelz” unit.
They seem to have nearly identical hardware. However, a quick compare of the firmware shows a lot of code / line differences.
Last edited:
HelloThe v2.0 file is only with the original bit rate (6400) and the default resolution. I haven’t had a chance to modify it or test any mods. However the steps are detailed in the initial post if you wanted to try it yourself.
To clarify, there are two versions of the product. “Reelz” internationally uses v1.0 and “Reels” in the US uses v2.0. (from what I gather). It seems those with 2.0 can’t reliably use 1.0. I have not tried using 2.0 on my “Reelz” unit.
They seem to have nearly identical hardware. However, a quick compare of the firmware shows a lot of code / line differences.
I am from Austria in Europe
My kodak reels came with 2.0 Software.
Bought by amazon Austria
Some of my digitized 8mm films have very strong yellow tint.
Sometimes the Kodak reels delivers wrong colors.
Finally had time to test, and yes I am fully back to normal and can properly digitize a film again. Thanks again. And yes looking forward to trying a modified v2.0 firmware.Great! Glad to hear it
I will say that adjusting the resolution / bit rate on the 2.0 firmware seems to be the same process for version 1.0. I'll dig into this a bit more after VCFMW.
Good to know. Yes, Kodak's firmware does a lot of auto-color / auto-white balance which can sometimes have undesirable results.Hello
I am from Austria in Europe
My kodak reels came with 2.0 Software.
Bought by amazon Austria
Some of my digitized 8mm films have very strong yellow tint.
Sometimes the Kodak reels delivers wrong colors.
Finally had time to test, and yes I am fully back to normal and can properly digitize a film again. Thanks again. And yes looking forward to trying a modified v2.0 firmware.
Great!
Thanks for getting the 2.0 UpdateI’ll see if I can contact Kodak asking if they’d provide me with a 2.0 update.
For the time being, anyone with a 2.0 software update may want to hold off. I’m unsure what hardware / software differences those devices may have.
have followed your instructions and have made the changes to my unit it all appears to be working well i modified it to 16222 exported flashed and the 2.0 version is working ..
Thanks man for all your help and work , especially in getting the 2.0 firmware . Impressed
I modified my version 2 firmware for a bitrate value of 15420. Everything works great! I was concerned about what would happen when the file size goes over 4gb. I transferred a 7 inch reel, and turns out the machine just stops recording when the file reaches 4gb, so I started the recording again, and have two files that I'll just splice on the computer.
Now that the 2.0 firmware for faster bit rates has been verified It would be excellent if it could be posted on the link that mac84 has shared on the first page of this posting - thus removing the need to repeat the exercise. I'm delighted to see the nice progress for home scanning.
Thanks for getting the 2.0 Update
have followed your instructions and have made the changes to my unit it all appears to be working well i modified it to 16222 exported flashed and the 2.0 version is working ..
Thanks man for all your help and work , especially in getting the 2.0 firmware . Impressed
Excellent, I'm glad you were successful in increasing the video bit rate on your device.
The original resolution (in a 4:3 aspect) of the device is 1728x1296.
I've recently found that I can bump up the resolution to 1920x1440, which gives a nice resolution increase, especially if you consider you'll likely want to crop the image afterwards for display on 16x9 displays. However, with this increase in resolution you are limited to a bit rate of ~12,400.
So at least on my v1 firmware model, 1920x1440 @ 12400 is the best I could push the little device. However, the results look pretty good. The ONLY issue is that the higher resolution content doesn't playback well on the device's built-in LCD. But it seems to play fine on a computer.
I'd be curious if you can achieve similar results on your device, as I only have a v1 model.
I modified my version 2 firmware for a bitrate value of 15420. Everything works great! I was concerned about what would happen when the file size goes over 4gb. I transferred a 7 inch reel, and turns out the machine just stops recording when the file reaches 4gb, so I started the recording again, and have two files that I'll just splice on the computer.
Great! I'd suggest you give a shot to the resolution increase (or similar) I shared above, it may produce nicer results.
Now that the 2.0 firmware for faster bit rates has been verified It would be excellent if it could be posted on the link that mac84 has shared on the first page of this posting - thus removing the need to repeat the exercise. I'm delighted to see the nice progress for home scanning.
Update: I now have a v2.0 unit. Here is the v2.0 firmware for US-based units. This has original and modified versions. It may NOT play nice on non-US units! (and make the screen have weird colors, etc)
I'm hesitant to post a v2.0 firmware mod as I do not have the v2 model to test it myself. However, maybe one of the individuals above can share their file. Also, if you have issues following the instructions above, please let me know where you got stuck and maybe I can help.
I'm hoping that I can spend more time on this project during my time off in December.
Last edited:
You're welcome!I just got myself the Kodak Reels and chanced upon this useful resource. Thank you for the amazing work!
Besides bitrate change, is it possible to lock the white balance? This is probably the most annoying for me as the white balance changes mid scene during a scan.
I've been able to change the resolution (up to 1920x1440) and bitrate, but not the white balance.
There is a program on the device that is taking a photo, adjusting the balance/color, and changing things... I am not smart enough to understand how it does this or if it could be modified. Maybe someone else can figure it out?However, if you want to try the 1920x1440 resolution change, here are the files for that.
Warning: There are two versions of the device, v1 and v2. Choose the right firmware for your model! The version of your model is listed under Settings > About. FYI - With the 1440 resolution mod, video file playback on the device is funky.
v1 - Higher Resolution Mod
v2 - Higher Resolution Mod (This is untested, I don't have a v2)
Here's a screenshot from a 1440p capture (with the sharpness set to off (-2.0), not too bad.
Last edited:
You're welcome!
I've been able to change the resolution (up to 1920x1440) and bitrate, but not the white balance.
However, if you want to try the 1920x1440 resolution change, here are the files for that.
Warning: There are two versions of the device, v1 and v2. Choose the right firmware for your model! The version of your model is listed under Settings > About. FYI - With the 1440 resolution mod, video file playback on the device is funky.
v1 - Higher Resolution Mod
v2 - Higher Resolution Mod (This is untested, I don't have a v2)
Here's a screenshot from a 1440p capture (with the sharpness set to off (-2.0), not too bad.
View attachment 14061
Thanks for the firmware links. I will give it a try after I digitised some of my existing films to do a comparison.
I have seen this video and it is indeed better. I am having the V2.0 based on what the software tells me. And I was told "Reelz" is shipped with V1.0 and "Reels" is shipped with V2.0.
I also noticed your scans are pretty sharp (without artificial sharpening). Have you adjusted the lens before? How can I do it?
Here's my tips for getting a good image:
1. Ensure the Zoom is all the way out, any zooming in is digital and doesn't help things much
2. Set the sharpness to -1.5 (this may be as close to the "off/low" setting as it goes), it seems the 0.0 setting still applies a filter and introduces compression artifacts, and -2.0 seems to smooth things out too much. But it's best to experiment yourself to see what works for you!
3. Adjust the lens ring on the camera if possible.
4. When adjusting the lens ring, zoom ALL the way in under the frame settings, this will help you see if it is focused.
Yes, I did remove the lens cover on the camera part and adjusted it. I took apart my whole unit, but the camera cover is clipped on the front, you could maybe yank it off, but be careful.
The lens ring is adjustable, from the factory it has glue on it. I found that mine was quite out of focus. I carefully removed the glue (this took heat and a knife) but I was very careful. As you can see in the image below, the yellow line is where I have it set now, the red glue residue is where it was set form the factory.
Last edited:
I stumbled upon this thread this week and immediately ordered a Kodak Reels (v2.0) off Amazon, some Pec Pads and emulsion cleaner. Today, I unpacked it all, flashed the Kodak unit with the upgraded firmware and recorded my first reel of my Dad running a track meet in 1966. I plan to do post processing but already am SO happy with a simple solution that is easier and higher quality than my previous efforts.
From unpacked to flashed with v2.0 firmware took 15 minutes. I manually focused the lens, however mine was sharp to begin with.
Past efforts were:
From unpacked to flashed with v2.0 firmware took 15 minutes. I manually focused the lens, however mine was sharp to begin with.
Past efforts were:
- Wolverine machine (returned due to bad quality)
- Camcorder aimed at matte white walll while projecting film (turned out better than Wolverine)
- Failed efforts at cobbling together a telecline machine from old projector parts, stepper motors and a Raspberry Pi (This could be the best route ultimately, but it's too much effort and I don't have the time away from my work to really commit to this. More importantly, I don't think my family will care if I cannot obtain 4K quality).
I too have have excellent results using the points contained in this thread. Here's some additional thoughts on the the scanner itself and significance of what is presented.
Of course, a good digitized recording of a film acquired in 1960 does not guarantee a video that is "easy to watch" in 2023, even when filmed in favorable conditions at the time. The good news is that much of this can be corrected in post. Critical improvements in videography include image stabilization, de-noise and de-artifact removal and, of course, auto-exposures and white balance. Here's my solution to taking the output from the improved Kodak Reels files and producing clean videos which we can enjoy today.
- I believe the actual design of the scanner is quite good. I have no problems even when scanning from 7" reels with multiple splices which are over 60 years as long as I don't pass the take-up through the last post to compensate for the reduced torque delivered by the take up reel when the diameter is increased.
- The frame to frame registration seems to be quite good. I set the frame capture at the beginning of the reel and I see essentially no shifting throughout . I believe good frame registration is also contributing to the final sharp final playback I'm seeing.
- The focus of the scanner off-the-shelf is questionable, but as described in this thread is wholly correctable. My scans certainly benefited from manually resetting focus, but I can also imaging that production results vary. As I manually set focus, even when fully zoomed in (when in the frame adjust mode) I noticed this takes some patience, and I also used a magnifying lens. I can only imagine how this could be less than predictable on a manufacturing line. This also brought be to the conclusion that to offset this issue, a significant amount of digital sharpening is applied by default. When properly focused I find no need to apply digital sharpening (I set the value in the scanner to -2) and I also don't add sharpening in my post-processing workflow.
- I believe the contribution of unlocking and increasing the bitrate offers the largest gain by unloading the processing required during video compression, thus further reducing compression artifacts. When considering the actual resolution in the film images, even the unmodified bitrate would nominally suffice, if not for the fact that scanning film results in considerable amount of digital noise which leads to a substantial increase in digital bandwidth.
- Some have suggested exploring an output file resolution above 1728x1296. In practice, I don't think this has much to offer. The reason is quite simple. When working from 8mm (3.3 x 4.5mm) or the even the larger Super 8 (5.8x4.0mm) film size and considering that Kodachrome film has less than 40 lp/mm this then gives a total of less than 240x160 lp (Super 8 - omitting limits in the original camera optics). Increasing the digital output resolution will not improve upon limits set in the film.
- There have also been comments on the effects of white balance shifts. I too see this - but in my experience - they all are linked to and a direct reflection of what is present in the film. My scans are an excellent reflection of the film. One thing I do that may contribute to this - is that I do zoom down to capture only the actual film frame - so that if there is and auto algorithm in play, then it's not biased by any non-image regions.
Of course, a good digitized recording of a film acquired in 1960 does not guarantee a video that is "easy to watch" in 2023, even when filmed in favorable conditions at the time. The good news is that much of this can be corrected in post. Critical improvements in videography include image stabilization, de-noise and de-artifact removal and, of course, auto-exposures and white balance. Here's my solution to taking the output from the improved Kodak Reels files and producing clean videos which we can enjoy today.
- The first step is correct the frame rate and apply image stabilization. To achieve this I use the free version of DaVinici Resolve. On the Edit page, it is simple to achieve both of these functions. For 8mm films which are recorded at 16 fps but saved as 20 fps) I set the speed increase at 125%. There is not interpolation applied, just simply resetting the notation so that the same frames digitized are played at a slower speed. On the same Edit page I enable and stabilize using Similarity mode with Zoom enabled. I limit the Cropping Ratio to 0.9 and leave the Smooth at 0.25 (fastest response) and Strength at 1.0) greatest effect. I then output as 1920x1080 in MP4 format limited to 12000 Kbps - which with the more powerful processing power in the home computer is as far as I can tell artifact free.
- The next step is to denoise AND remove film artifacts - including remaining dust, etc. For this I rely on new AI based techniques. The best solution I could find - one aimed specifically at film clean-up is achieved via uploading to an online server. This firm is TensorPix (tensorpix.ai). In addition to a broad set of AI based enhancement tools, is a Film Cleaner v2. The results are outstanding. You can start using the service without a plan, just pay as you go, or you can move into a plan, and then also advance through their plan schedule, with each advancement crediting you for what you have already paid. In addition to offering an AI based tool directed specifically at the needs of film digitization, it also benefits from running on optimized servers giving a significant step up in processing time over what I could achieve on my home computers. Basic processing costs with even the entry plan run about 50 cent/minute of film run time.
- The next step is exposure correction/color grading. In truth, this is even true for the top end players in the modern video industry. Getting color, exposure, contrast and saturation really right is what takes you over the finishline. For this, after downloading my file(s) that I've cleaned up using TensorPix's Film Cleaner v2, I bring them back in to DaVinci Resolve. When it comes to color correcting, etc. everything you need is also in the free version. It's not intuitive, but it's how the pros do it, so I figured I should get on board. After some study (online tutorials and Youtube videos) I've extremely pleased that I've made the learning investment. You will find that you need to brake your video into individual scenes, based on the the the lighting each was filmed under. But correcting each seen - assuming you take the time - will result in wonderful results.
One additional thought... Zooming to the actually final frame size during the actually scanning means that all the bitrate (now elevated to 15420 or 16222, or whatever you choose) is used for the selected image instead of being spread across a larger frame that you will then crop out later. Of course, I also understand the desire to have "full control" in post, but as commented above, the stability of the framing has been excellent. There's also a happy medium - leave a little edge in - which then will "automatically" be zoomed and cropped out during image stabilization.I too have have excellent results using the points contained in this thread. Here's some additional thoughts on the the scanner itself and significance of what is presented.
- I believe the actual design of the scanner is quite good. I have no problems even when scanning from 7" reels with multiple splices which are over 60 years as long as I don't pass the take-up through the last post to compensate for the reduced torque delivered by the take up reel when the diameter is increased.
- The frame to frame registration seems to be quite good. I set the frame capture at the beginning of the reel and I see essentially no shifting throughout . I believe good frame registration is also contributing to the final sharp final playback I'm seeing.
- The focus of the scanner off-the-shelf is questionable, but as described in this thread is wholly correctable. My scans certainly benefited from manually resetting focus, but I can also imaging that production results vary. As I manually set focus, even when fully zoomed in (when in the frame adjust mode) I noticed this takes some patience, and I also used a magnifying lens. I can only imagine how this could be less than predictable on a manufacturing line. This also brought be to the conclusion that to offset this issue, a significant amount of digital sharpening is applied by default. When properly focused I find no need to apply digital sharpening (I set the value in the scanner to -2) and I also don't add sharpening in my post-processing workflow.
- I believe the contribution of unlocking and increasing the bitrate offers the largest gain by unloading the processing required during video compression, thus further reducing compression artifacts. When considering the actual resolution in the film images, even the unmodified bitrate would nominally suffice, if not for the fact that scanning film results in considerable amount of digital noise which leads to a substantial increase in digital bandwidth.
- Some have suggested exploring an output file resolution above 1728x1296. In practice, I don't think this has much to offer. The reason is quite simple. When working from 8mm (3.3 x 4.5mm) or the even the larger Super 8 (5.8x4.0mm) film size and considering that Kodachrome film has less than 40 lp/mm this then gives a total of less than 240x160 lp (Super 8 - omitting limits in the original camera optics). Increasing the digital output resolution will not improve upon limits set in the film.
- There have also been comments on the effects of white balance shifts. I too see this - but in my experience - they all are linked to and a direct reflection of what is present in the film. My scans are an excellent reflection of the film. One thing I do that may contribute to this - is that I do zoom down to capture only the actual film frame - so that if there is and auto algorithm in play, then it's not biased by any non-image regions.
Of course, a good digitized recording of a film acquired in 1960 does not guarantee a video that is "easy to watch" in 2023, even when filmed in favorable conditions at the time. The good news is that much of this can be corrected in post. Critical improvements in videography include image stabilization, de-noise and de-artifact removal and, of course, auto-exposures and white balance. Here's my solution to taking the output from the improved Kodak Reels files and producing clean videos which we can enjoy today.
Sorry for the long posting, but I figured many are in the same place and summarizing the full workflow would be helpful.
- The first step is correct the frame rate and apply image stabilization. To achieve this I use the free version of DaVinici Resolve. On the Edit page, it is simple to achieve both of these functions. For 8mm films which are recorded at 16 fps but saved as 20 fps) I set the speed increase at 125%. There is not interpolation applied, just simply resetting the notation so that the same frames digitized are played at a slower speed. On the same Edit page I enable and stabilize using Similarity mode with Zoom enabled. I limit the Cropping Ratio to 0.9 and leave the Smooth at 0.25 (fastest response) and Strength at 1.0) greatest effect. I then output as 1920x1080 in MP4 format limited to 12000 Kbps - which with the more powerful processing power in the home computer is as far as I can tell artifact free.
- The next step is to denoise AND remove film artifacts - including remaining dust, etc. For this I rely on new AI based techniques. The best solution I could find - one aimed specifically at film clean-up is achieved via uploading to an online server. This firm is TensorPix (tensorpix.ai). In addition to a broad set of AI based enhancement tools, is a Film Cleaner v2. The results are outstanding. You can start using the service without a plan, just pay as you go, or you can move into a plan, and then also advance through their plan schedule, with each advancement crediting you for what you have already paid. In addition to offering an AI based tool directed specifically at the needs of film digitization, it also benefits from running on optimized servers giving a significant step up in processing time over what I could achieve on my home computers. Basic processing costs with even the entry plan run about 50 cent/minute of film run time.
- The next step is exposure correction/color grading. In truth, this is even true for the top end players in the modern video industry. Getting color, exposure, contrast and saturation really right is what takes you over the finishline. For this, after downloading my file(s) that I've cleaned up using TensorPix's Film Cleaner v2, I bring them back in to DaVinci Resolve. When it comes to color correcting, etc. everything you need is also in the free version. It's not intuitive, but it's how the pros do it, so I figured I should get on board. After some study (online tutorials and Youtube videos) I've extremely pleased that I've made the learning investment. You will find that you need to brake your video into individual scenes, based on the the the lighting each was filmed under. But correcting each seen - assuming you take the time - will result in wonderful results.
I stumbled upon this thread this week and immediately ordered a Kodak Reels (v2.0) off Amazon, some Pec Pads and emulsion cleaner. Today, I unpacked it all, flashed the Kodak unit with the upgraded firmware and recorded my first reel of my Dad running a track meet in 1966. I plan to do post processing but already am SO happy with a simple solution that is easier and higher quality than my previous efforts.
From unpacked to flashed with v2.0 firmware took 15 minutes. I manually focused the lens, however mine was sharp to begin with.
Past efforts were:
Thank you Steve @Mac84 for your tenacity and making this machine better, and making my archiving project so much simper. I have 80 reels to get through, including some Super 8 that I have repaired and old Chinon projector so I can grab the sound. I wanted to join the discussion to say thank you. This will help me and my grieving family to see films of my father that we haven't seen in about 3 decades.
- Wolverine machine (returned due to bad quality)
- Camcorder aimed at matte white walll while projecting film (turned out better than Wolverine)
- Failed efforts at cobbling together a telecline machine from old projector parts, stepper motors and a Raspberry Pi (This could be the best route ultimately, but it's too much effort and I don't have the time away from my work to really commit to this. More importantly, I don't think my family will care if I cannot obtain 4K quality).
I'm so glad this thread has proven helpful for your archiving efforts!
I'm touched that this has helped you with archiving your precious family memories.I'm tempting to purchase a v2.0 unit, although the hardware inside looks nearly identical... but I do wonder if somehow I can push it further. I'd love to see some examples of what you've captured (if you have something that isn't too personal).
One additional thought... Zooming to the actually final frame size during the actually scanning means that all the bitrate (now elevated to 15420 or 16222, or whatever you choose) is used for the selected image instead of being spread across a larger frame that you will then crop out later. Of course, I also understand the desire to have "full control" in post, but as commented above, the stability of the framing has been excellent. There's also a happy medium - leave a little edge in - which then will "automatically" be zoomed and cropped out during image stabilization.
I appreciate your detailed thoughts on the subject, this is great. I'd love to see some examples of what you've captured (if you have something that isn't too personal).
Have you had any issues with the film take up mechanism eating sprockets of the film or getting stuck? That occurred to me in one film sadly. I read that sometimes not using the take up reel (and instead letting the film pool into a container) can sometimes ease this. Perhaps mine was just out-of-sync.
Regarding the resolution increase:
Yes, it's a small increase. However, I'll take what I can get, even if the results are only a hair better. Every extra pixel on the file helps when cropping and later processing, sharpening via a video editing program. But yes, the higher bitrate and sharpness settings really do the best to fight blocky compression artifacts (which can't be removed in post). So while the side-by-side resolution boosts aren't huge, I'm very glad the bitrate change helps.
Personally, I found that recording at 1920x1440 allows me to better crop the final image for output to a 1080p TV set and authoring for a blu-ray disc. But that's a my own preference. Previously I recorded Super8 in 720p and later 1080p using a home made capture setup, with a lot of black bars around the subject I was happy to get whatever I could as I had to crop the image or rotate things at times. In those cases the higher resolution did make it possible to better crop / sharpen the video later on without blowing things up too much.
Exposure:
Sadly in my tests the exposure changes seem to be "delayed" with some captures. So for example, a new scene will start, the colors will look okay, then a few seconds later the scene colors change pretty drastically without the camera moving. This may be down to the film or the process the device does, but it is a bit frustrating at times, but not the end of the world.
About zooming:
Yes, focusing the camera isn't fun. If only the device has a video out function it would make things a bit easier. I'm happy the screen is the size it is, some other products are much smaller, but my eyes would appreciate a larger viewing area!
I believe any 'zoom' from the device is a digital zoom or crop, not an optical effect. So it may help to zoom in if you are sure you want to crop things, or you want to reduce any of the exposure / white balance a bit better.
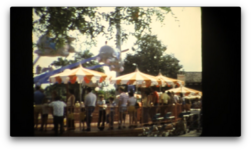
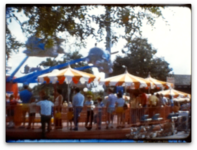
This weekend I digitized a Super 8 reel using the Kodak device (1920x1440, etc) and compared it to a previous capture I made using my old home-made telecine style setup I made in 2017 using a DSLR (which was limited to 720p resolution).
The attached screenshots below are from the original files (I took a screenshot of the video window) and are otherwise unaltered.
Besides the cropping/framing and the color differences, it was difficult for me to spot a real quality differences between them. Since my previous telecine setup was "good enough" in my book, but required a lot of manual processes, I'm quite happy with the Kodak results. I don't see any serious compression or other differences introduced. And as you can see, the framing on the Kodak didn't cut off the image. I think some color correction and some light sharpness adjusting in Final Cut Pro would make these look quite nice.
Attachments
-
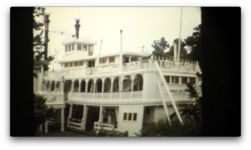 Boat-Oldmethod.png229.1 KB · Views: 414
 -
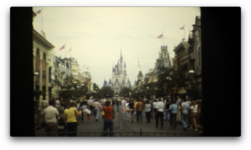 Disney-Oldmethod.png261.6 KB · Views: 364
 -
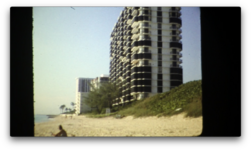 Beach-Oldmethod.png271.2 KB · Views: 385
 -
 Dumbo-Oldmethod.png332.8 KB · Views: 383
 -
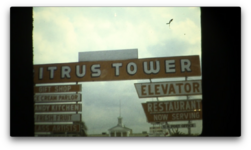 Sign-Oldmethod.png241.6 KB · Views: 389
 -
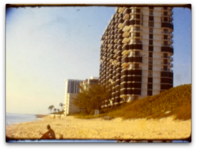 Beach-Kodak.png915.7 KB · Views: 421
 -
 Dumbo-Kodak.png1 MB · Views: 396
 -
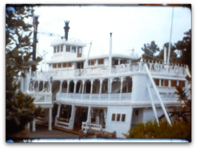 Boat-Kodak.png823.6 KB · Views: 408
 -
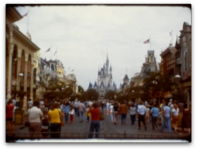 Disney-Kodak.png850 KB · Views: 421
 -
 Sign-Kodak.png879.2 KB · Views: 427
- Status
- Not open for further replies.