Modding the Kodak Reels 8mm Film Digitizer (Firmware Hack)
- Thread starter Mac84
- Start date
You are using an out of date browser. It may not display this or other websites correctly.
You should upgrade or use an alternative browser.
You should upgrade or use an alternative browser.
- Status
- Not open for further replies.
The original Kodak lens has a dab of string glue on it. I removed mine with a hot air gun set to low, unsure if a hair dryer may work. You want to be careful not to melt anything.Can anyone tell me how to remove the lens cap? I thought it was snapped on, but I can't. I would like to check if the focus is OK.
Once removed the lens is on a spiral mount, so you can rotate it one way or the other to get better focus. At least one of the units I had from the factory wasn't focused well, while the other was perfect.
Although it's likely possible to remove the plastic hood for the camera without taking apart the whole unit... it's way easier to do it once the device has been taken apart. As the piece is very firmly in place, in my experience.Oh the translator. I wanted to know how to remove the cover to get to the lens.
Be careful, there's a lot of small ribbon cables in the device that can be easily damaged.
Here's a rough guide of how to open the unit. Please follow the instructions carefully to avoid damage.

Hello Mac84, what do I have to do? Sorry I don't understand what do you mean. Thank youThanks for the revised 3D model. Can you please share it by attaching it to a post here?
I'd like to see if it solves the issue I have of things not being in focus on the left side of things.
You posted a photo of the 3D model you modified to fit the camera mount. Can you please upload the 3D model printable file (STL, Step, etc) that you created so I may print it and use it on my Kodak digitizer too?Hello Mac84, what do I have to do? Sorry I don't understand what do you mean. Thank you
You can attach the 3D print file to a reply post to upload it.
Thanks

I'm not very good with the dynamics of these posts, I answered in the other thread you posted. SorryYou posted a photo of the 3D model you modified to fit the camera mount. Can you please upload the 3D model printable file (STL, Step, etc) that you created so I may print it and use it on my Kodak digitizer too?
You can attach the 3D print file to a reply post to upload it.
Thanks
My reading (perhaps incorrectly) of his modifications are that he drilled/filed/shaped the original model. He said the STL needed to be modified, but didn't say that HE modified it. So get the drill bits and files out, campers!You posted a photo of the 3D model you modified to fit the camera mount. Can you please upload the 3D model printable file (STL, Step, etc) that you created so I may print it and use it on my Kodak digitizer too?
You can attach the 3D print file to a reply post to upload it.
Thanks
I misunderstood. I guess I was confused that there was an image of a 3D model… and assumed it could be downloadedMy reading (perhaps incorrectly) of his modifications are that he drilled/filed/shaped the original model. He said the STL needed to be modified, but didn't say that HE modified it. So get the drill bits and files out, campers!
Ok, I dismantled It.Thank you for the details.
I'm sorry - I assumed you created a new 3D model based on the one 0dan0 made. I was unaware that you physically modified it, instead of digitally modeling it inside of a 3D program.
I'll try to duplicate with the steps you provided. Thank you!
")
Since the back of the camera has a square shape, you have to remove a block of plastic that expose the hole.View attachment 22854View attachment 22855
Then there are the two pins protruding.
The spacer drilled, not a masterpiece.
View attachment 22856View attachment 22857View attachment 22858
I drilled the printed piece with a modeling micromotor (don't know if the translation is correct) by eye, trying it in place until the parts fit one against the other with no presumable "basculation", and I enlarged the "wrong" holes a little. then I used some new screw M1 1.6 12mm long. Sorry I don't have pictures of the workflow. I also tried to mount the camera without the spacer but with long screws and nuts, but I was unable to find a little wrench to tigthen the small nut on the other side.
In my opinion that would have been a better solution, because you can control the "banking" and the "jaw" of the camera in all direction. But vibrations made the nut loose because I was not able to tighen them properly.View attachment 22847View attachment 22849View attachment 22850To me this ideais is viable, but I don't have the tools small enough.
This little wrench has the head too big, that doesn't fit in the small space to apply force.
View attachment 22851View attachment 22853View attachment 22852
I have a tip for those who are bothered by film skipping. This is largely caused by the high friction in the film path, as someone already wrote here.
I tried various tricks and finally found two that work. First I polished both sheets, because in their original state they were not completely smooth. That was not enough and so I tried loosening the screws that hold them, but it was not very good. Finally I took out the first spring and the films that were skipping are almost skipping-free. They only jump when there is poor-quality gluing and then they continue well.
The picture is with the spring still attached.
Attachments

Last edited:
New short test.
Kodak Tri X developed in Caffenol.
As Stated by 0dan0: " The "gate weave" risk was reduced greatly in 6.6. It is likely a processing delay yes, as it gets worse with a long exposure on the first frame, this is why in 6.6 the first frame uses a high ISO and short shutter. It doesn't completely eliminate the issue, more captures than not are good in my experience. About 30% of the time I will re-scan if it is visible. The large frame data might be a factor, but I've been trying everything else before removing any resolution gains. The chroma artifacts, I so rarely see now, as it happens more with under-exposed footage. I should back looking into these hacks in a few weeks."
Here the link to 0dan0 video where he explains his findings:
This is the third scan, and the film is well preserved with almost no scratches, thanks to the PEC PADs

The lower jitter tha sqeezes the images makes them unusable.
You can also see the ghost color (pink in the upper part of the frame and Green in the lower part) these artifacts are randomly present?
I'm relieved by the fact that they are compression dependent and not linked to the transport mechanism.
Every now and again the machine freezes while keeping on recording.


As Stated by 0dan0: " The "gate weave" risk was reduced greatly in 6.6. It is likely a processing delay yes, as it gets worse with a long exposure on the first frame, this is why in 6.6 the first frame uses a high ISO and short shutter. It doesn't completely eliminate the issue, more captures than not are good in my experience. About 30% of the time I will re-scan if it is visible. The large frame data might be a factor, but I've been trying everything else before removing any resolution gains. The chroma artifacts, I so rarely see now, as it happens more with under-exposed footage. I should back looking into these hacks in a few weeks."
Here the link to 0dan0 video where he explains his findings:
This is the third scan, and the film is well preserved with almost no scratches, thanks to the PEC PADs
The lower jitter tha sqeezes the images makes them unusable.
You can also see the ghost color (pink in the upper part of the frame and Green in the lower part) these artifacts are randomly present?
I'm relieved by the fact that they are compression dependent and not linked to the transport mechanism.
Every now and again the machine freezes while keeping on recording.
There seems to be large unit-to-unit variations, seems that mechanically the cam for the film movement is not tightly in sync with the firmware. The frame jitter, if I get it, is at the top of the frame. This means the capture started while frame was loading into place. The rolling shutter of the sensor, works like a slit scan, showing when the film is in motion. Jitter at the bottom means the frame was stationary at the start of the capture then moved too early. It is baffling that the design is so bad to allow this. I believe this is mostly relates to the new lens using more of the sensor, much less than the firmware hacks (although it has some it can influence.) I believe these unit pass QA, as the jitter most happens outside of the narrow window, used by the stock lens. The active pixel read out for the 12mm lens takes ~40ms, whereas the stock lens the low res image is read out in ~17ms.

You can see it on the stock lens, just less often.
Now for the fix. I was optimizing for the top of the frame jitter with 6.6, but that would potentially make bottom jitter worse for hardware with the bias. The fix for top was to shorten the first frames exposure time, maybe the opposite can work. Need to work out a user control to calibrate that.
You can see it on the stock lens, just less often, or less pronounced.
Now for the fix. I was optimizing for the top of the frame jitter with version 6.6, but that would potentially make bottom jitter worse for hardware with that bias. The fix for top was to shorten the first frame's exposure time, so the maybe the opposite can work. I need to work out a user control to calibrate that.
As for color artifact, still no idea. Although as you are seeing it on B&W scans, it less likely stale image data in chrome channels.
I shoot some reels for a short film project this weekend, the scans worked out great. So this can be made to work well: https://www.dropbox.com/scl/fi/xmo0...roll.mp4?rlkey=6mimupzui75m2oelpzaar7dra&dl=0
Hi @Umba67 , can you please share which PEC PAD you use? I'm not a material engineer, but what read on Wikipedia about Polyestercarbonate, its quite a rigid material, but also I don't know what material the original posts are made of. Trying to avoid damages on my films, I'm currently thinking of a mechanism that controls the tension of the pickup roll.
Hi CDenhart, they are specific for cleaning lens, films eccc. I also have the liquid.Hi @Umba67 , can you please share which PEC PAD you use? I'm not a material engineer, but what read on Wikipedia about Polyestercarbonate, its quite a rigid material, but also I don't know what material the original posts are made of. Trying to avoid damages on my films, I'm currently thinking of a mechanism that controls the tension of the pickup roll.
Amazon.com : PEC-PAD Lint Free Wipes Ultra Soft Cloth for Cleaning Sensitive Surfaces like Camera, Lens, Filters, Film, Scanners, Telescopes, Microscopes, Binoculars (4x4 (25 sheets)) : Electronics
Amazon.com : PEC-PAD Lint Free Wipes Ultra Soft Cloth for Cleaning Sensitive Surfaces like Camera, Lens, Filters, Film, Scanners, Telescopes, Microscopes, Binoculars (4x4 (25 sheets)) : Electronics
www.amazon.com
Last edited:
New update.
The Tri X film is a nasty one with a lot of visible grain and the development in Caffenol accentuate it.
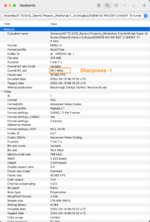
My attention was captured by the high bitrate that the previous clip had eq. 46.7 Mbit/s, well above the 35 Mbit/s 0dan0 set.

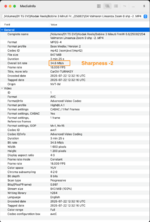
So i tried to to reduce sharpness more, at -1.5 and -2. At -2 I hit the sweet spot of 34.6, loosing in definition but removing the jitter effect quite completely.
The clip now is usable, a little muddier but usable. Maybe there will be some software improvements in the future.

I also removed the ghost images converting the clips to monocromatic in Davinci Resolve.
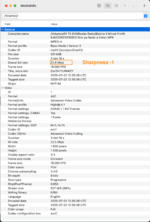
I digitized again a color film, (an Ektachrome 40 developed in 1975), with a bit ate of 22.3 Mb/s, sharpness -2. The image suffers from jittering in the upper part of the frame and is also visible the ghosting.
I'll do some more tets.

The Tri X film is a nasty one with a lot of visible grain and the development in Caffenol accentuate it.
My attention was captured by the high bitrate that the previous clip had eq. 46.7 Mbit/s, well above the 35 Mbit/s 0dan0 set.
So i tried to to reduce sharpness more, at -1.5 and -2. At -2 I hit the sweet spot of 34.6, loosing in definition but removing the jitter effect quite completely.
The clip now is usable, a little muddier but usable. Maybe there will be some software improvements in the future.
I also removed the ghost images converting the clips to monocromatic in Davinci Resolve.
I'll do some more tets.
Attachments
- Status
- Not open for further replies.